Effort sensor#
Deprecated since version 6.0: The isaacsim.sensors.physics Effort Sensor extension is deprecated.
Use isaacsim.sensors.experimental.physics.EffortSensor instead.
See the API Documentation section below for links.
The effort sensor in Isaac Sim tracks the torque or force applied to individual joints. Torque is measured for revolute joints and magnitude of force is measured for linear joints.
See the Isaac Sim Conventions documentation for a complete list of Isaac Sim conventions.
GUI#
Scene setup#
Begin by adding a Simple Articulation to the scene, which can be accessed in the Content Browser.
In the Content Browser, search for
simple_articulationor navigate toIsaac Sim/Robots/IsaacSim/SimpleArticulation/simple_articulation.usd.Drag
simple_articulationonto the World prim in the Stage UI window on the right hand side to add an instance into the environment.To drive the revolute joint, in the Stage window, select the RevoluteJoint prim at /World/simple_articulation/Arm/RevoluteJoint, and scroll down to Drive in the Property window. Set the target velocity to
90 deg/s, and stiffness to0.
Creating and modifying the effort sensor#
The following section describes how to create the effort sensor using the Script Editor, opened from Window > Script Editor.
The effort sensor is created by constructing an isaacsim.sensors.experimental.physics.EffortSensor directly with the joint prim path. The class exposes get_sensor_reading() and get_data() for reading sensor output, plus update_dof_name() and change_buffer_size() for runtime reconfiguration. (Unlike the contact, IMU, and raycast sensors, EffortSensor has no separate authoring class because it has no schema-bearing prim of its own.)
from isaacsim.sensors.experimental.physics import EffortSensor

sensor = EffortSensor(path="/World/simple_articulation/Arm/RevoluteJoint", enabled=True)
Note
The joint prim you pass in is the sensor’s prim — EffortSensor does not author a separate USD prim in the Stage panel on construction. Effort readings become available via get_sensor_reading() once the simulation is playing; check reading.is_valid after pressing Play to confirm the sensor is active.
To modify sensor parameters, change class member variables such as enabled directly. To change the dof_name and buffer_size for readings, use the corresponding member functions, update_dof_name and change_buffer_size.
Reading sensor output with Python#
There are two methods for reading the sensor output:
EffortSensor.get_sensor_reading()— returns anEffortSensorReadingobject withis_valid,time, andvalue.EffortSensor.get_data()— returns a structured dictionary withvalue,is_valid,time, andphysics_step.
After you create the effort sensor, press Play to start the simulation and call the function below to get the sensor reading for the current frame:
EffortSensor.get_sensor_reading()
reading = sensor.get_sensor_reading()
EffortSensor.get_data()
frame = sensor.get_data()
print(f"Effort: {frame['value']}, valid: {frame['is_valid']}, time: {frame['time']}")
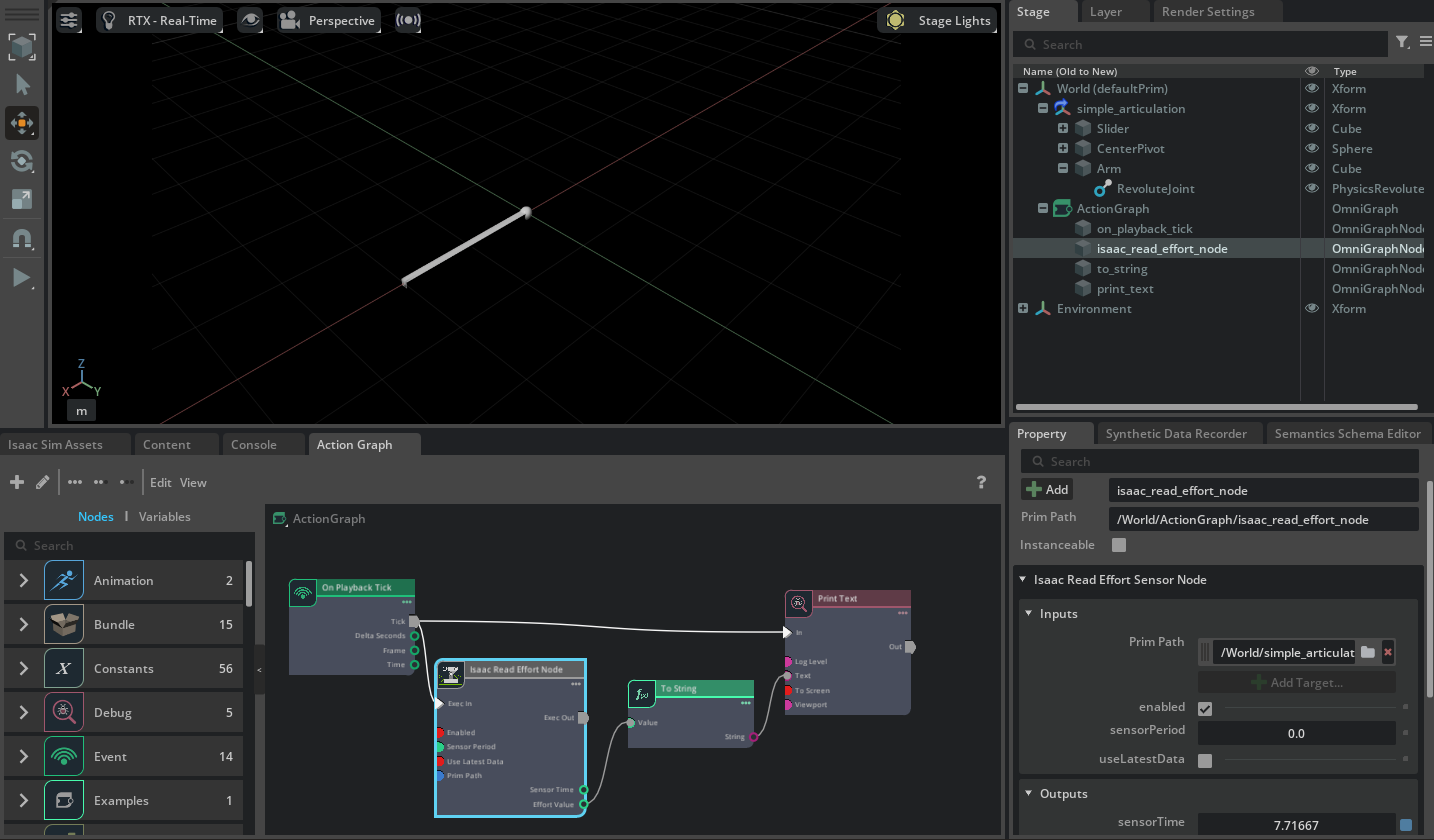
OmniGraph workflow#
Set up OmniGraph to create the effort sensor and collect readings from it:
Create the new action graph by navigating to Window > Graph Editors > Action Graph, and selecting New Action Graph in the new tab that opens.
Add the following nodes to the graph:
On Playback Tick: Executes the graph nodes every simulation timestep.
Isaac Read Effort Node: Reads the effort sensor. In the Property tab, set Effort Prim to the exact joint of measurement. For example /World/simple_articulation/Arm/RevoluteJoint in
simple_articulation.usd.To String: Converts the effort sensor readings to string format.
Print Text: Prints the string readings to console. In the Property tab, set Log Level to Warning so that messages are visible in the terminal/console by default. Additionally, check To Screen to print directly to screen.
Connect the nodes as follows to print the effort sensor reading:
Note
Configure the joints to the correct axis to get the expected readings.
API documentation#
Deprecated since version 6.0: The isaacsim.sensors.physics extension is deprecated. Use isaacsim.sensors.experimental.physics.EffortSensor instead.
See the isaacsim.sensors.experimental.physics API Documentation for the current API and isaacsim.sensors.physics API Documentation (deprecated) for the deprecated API.