URDF Importer Extension#
Note
Starting from the Isaac Sim 2023.1.0 release, the URDF importer has been open-sourced. Source code and information for contributing can be found at our Github repository. As of Isaac sim 5.0, the former dedicated repository has been deprecated, and the code has been moved to the Isaac Sim repository.
The URDF Importer Extension is used to import URDF representations of robots. Unified Robot Description Format (URDF), is an XML format for representing a robot model in ROS.
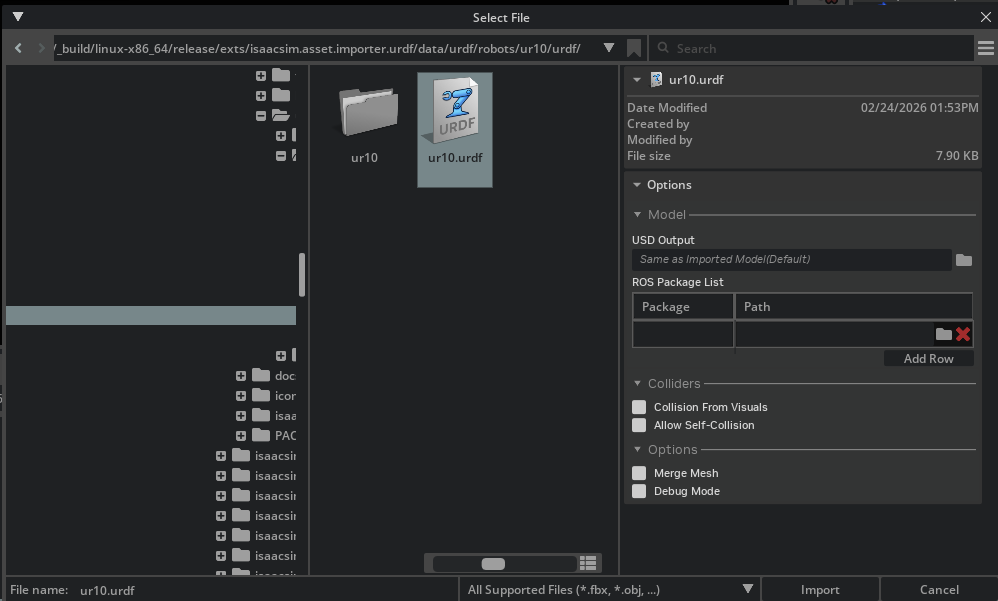
To Import URDF files, go to the top menu bar and click File > Import.
This extension is enabled by default. If it is ever disabled, it can be re-enabled from the Extension Manager
by searching for isaacsim.asset.importer.urdf.
Import results are logged in the Output Log, accessible from the bottom of the screen.
The Output Log will display any errors or warnings that occur during the import process. For more detailed log information, open Isaac Sim’s log file, change the console to Info mode, or start Isaac Sim with the parameter --verbose to display results in the terminal output.
Note
The Imported model follows the Isaac Sim Asset Structure convention, and the meshes are already instantiable to optimize performance.
Conventions#
Note
To comply with USD prim name conventions, special characters in link, joint, mesh names, and all other reference asset filenames are not supported and will be replaced with an underscore. In the event that the name starts with an underscore due to the replacement, an a is pre-pended. It is recommended to make these name changes in the URDF directly.
Refer to the Isaac Sim Conventions documentation for a complete list of NVIDIA Isaac Sim conventions.
Import Options#
- USD Output: Specifies where the generated USD file will be saved. By default, this is set to “Same as Imported Model(Default)”,
which saves the USD file in the same directory as the source URDF file. Users can click the folder icon to select a different output location.
ROS Package List: Add ROS package name/path mappings to resolve package:// URLs in the URDF file. Click “Add Row” to add multiple package mappings.
- Colliders:
Collision From Visuals: When enabled, collision geometry is generated from the visual meshes in the URDF file. This is useful when the URDF file doesn’t have explicit collision geometry defined. When this option is checked, the Collision Type dropdown becomes visible.
- Collision Type: Select between:
Convex Hull: Creates a convex hull around the visual mesh.
Convex Decomposition: Decomposes the visual mesh into multiple convex pieces for more accurate collision detection.
Bounding Sphere: Uses a simple bounding sphere approximation.
Bounding Cube: Uses a simple bounding box approximation.
Allow Self-Collision: When enabled, allows the robot model to collide with itself. This can be useful for certain simulation scenarios but may cause instability if collision meshes between links are self-intersecting.
- Options:
Robot Type: Sets the
isaac:robotTypeattribute on the imported robot’s schema. Choose from: Default, End Effector, Manipulator, Humanoid, Wheeled, Holonomic, Quadruped, Mobile Manipulators, or Aerial.Base Type: Tri-state control of how the robot’s root link is anchored.
Source (default): leaves the source URDF authoring untouched.
Fixed: adds a world-to-root fixed joint and relocates
ArticulationRootAPIto the correct ancestor prim.Mobile: removes any existing world-to-root fixed joint so the robot is free to translate and rotate.
Maps directly onto the
fix_base: bool | Nonefield onURDFImporterConfig(None/True/False).Merge Mesh: When enabled, merges meshes where possible to optimize the model. This can reduce the number of prims in the resulting USD file and improve performance.
Debug Mode: When enabled, activates debug mode to preserve the intermediate files and asset transformer reports
Importing URDF from a ROS 2 Node#
Source your ROS 2 environment before launching Isaac Sim.
Install and enable the extension isaacsim.ros2.urdf to enable this feature. This will open a standalone URDF importer UI that allows to define a ROS 2 Node containing a robot description.
To select the appropriate node, type in the name of the node in the Node text box. If changes were made to the import settings, or to the published node hit Refresh. If the node name is in
Note
This feature is only available when the ROS 2 bridge is enabled.
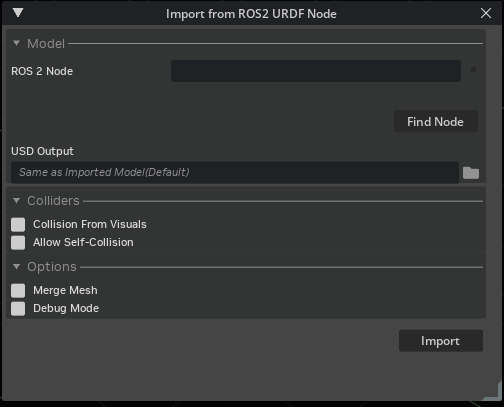
For more on how to use the ROS 2 URDF Importer, refer to the Import from ROS 2 Node Tutorial.
Note
If no output folder is selected, the USD is written to a system temp directory alongside the intermediate URDF file. A warning is logged with the output path. Set the USD Output folder in the import window to control where the USD is saved.
Robot Properties#
There might be many properties you want to tune on your robot. These properties can be spread across many different schemas and APIs.
The general steps of getting and setting a parameter are:
Find which API is the parameter under. Most common ones can be found in the Pixar USD API.
Get the prim handle that the API is applied to. For example, articulation and drive APIs are applied to joints, and MassAPIs are applied to the rigid bodies.
Get the handle to the API. From there on, you can Get or Set the attributes associated with that API.
For example, if you want to set the wheel’s drive velocity and the actuators’ stiffness, find the DriveAPI:
# -- Test setup --
import omni.usd
from pxr import UsdGeom, UsdPhysics

stage = omni.usd.get_context().get_stage()
UsdGeom.Xform.Define(stage, "/carter")
UsdGeom.Xform.Define(stage, "/carter/chassis_link")
UsdGeom.Xform.Define(stage, "/carter/chassis_link/left_wheel")
UsdGeom.Xform.Define(stage, "/carter/chassis_link/right_wheel")
left_joint = UsdPhysics.RevoluteJoint.Define(stage, "/carter/chassis_link/left_wheel")
right_joint = UsdPhysics.RevoluteJoint.Define(stage, "/carter/chassis_link/right_wheel")
UsdPhysics.DriveAPI.Apply(stage.GetPrimAtPath("/carter/chassis_link/left_wheel"), "angular")
UsdPhysics.DriveAPI.Apply(stage.GetPrimAtPath("/carter/chassis_link/right_wheel"), "angular")
# -- End test setup --
# get handle to the Drive API for both wheels
left_wheel_drive = UsdPhysics.DriveAPI.Get(stage.GetPrimAtPath("/carter/chassis_link/left_wheel"), "angular")
right_wheel_drive = UsdPhysics.DriveAPI.Get(stage.GetPrimAtPath("/carter/chassis_link/right_wheel"), "angular")

# Set the velocity drive target in degrees/second
left_wheel_drive.GetTargetVelocityAttr().Set(150)
right_wheel_drive.GetTargetVelocityAttr().Set(150)

# Set the drive damping, which controls the strength of the velocity drive
left_wheel_drive.GetDampingAttr().Set(15000)
right_wheel_drive.GetDampingAttr().Set(15000)

# Set the drive stiffness, which controls the strength of the position drive
# In this case because we want to do velocity control this should be set to zero
left_wheel_drive.GetStiffnessAttr().Set(0)
right_wheel_drive.GetStiffnessAttr().Set(0)
Alternatively you can use the Omniverse Commands Tool Extension to change a value in the UI and get the associated Omniverse command that changes the property.
Note
The drive stiffness parameter should be set when using position control on a joint drive.
The drive damping parameter should be set when using velocity control on a joint drive.
A combination of setting stiffness and damping on a drive will result in both targets being applied, this can be useful in position control to reduce vibrations.
Note
See the Gain Tuner Extension tutorial to tune the gains for your robot.
Multi-Physics Engine Support#
The URDF importer supports the conversion of URDF joint data to PhysX schemas for multi-physics engine support. This allows you to use the same URDF file with different physics engines.
The conversion is done automatically when the URDF importer is used. You can use the Gain Tuner Extension tutorial to tune the gains for your robot with the multi-physics engine.
URDF Attribute |
PhysX Attribute |
MJCF Attribute |
Notes |
|---|---|---|---|
urdf:limit:effort |
UsdPhysics DriveAPI.maxForce |
mjc:forceRange:max |
The URDF joint’s effort limit is mapped to the UsdPhysics drive’s maxForce and the MJCF actuator’s force range max attribute. MJCF min force is set to the negative of maxForce. |
urdf:limit:velocity |
PhysxJointAPI.maxJointVelocity |
N/A |
The URDF velocity limit is stored in the PhysX schema for max joint velocity. |
N/A |
UsdPhysics DriveAPI.stiffness |
mjc:gainPrm |
If stiffness is present, it is mapped directly. For MJCF, gainPrm and biasPrm arrays are constructed from drive attributes (stiffness -> gainPrm[0] or -biasPrm[1]). |
N/A |
UsdPhysics DriveAPI.damping |
mjc:biasPrm |
If damping is present, it is mapped directly. For MJCF, biasPrm is constructed from drive attributes (damping -> -biasPrm[2]). |
N/A |
N/A |
mjc:gainType |
PhysX stiffness and damping only match the MJCF “fixed” gain type and “affine” bias type. |
N/A |
N/A |
mjc:biasType |
PhysX stiffness and damping only match the MJCF “fixed” gain type and “affine” bias type. |
N/A |
PhysxJointAPI.jointFriction |
mjc:frictionloss |
Friction attribute in URDF is mapped to both the PhysX joint friction and MJCF actuator friction loss. |
N/A |
PhysxJointAPI.armature |
mjc:armature |
Armature data is mapped directly between PhysX and MJCF joints. |
N/A |
UsdPhysics DriveAPI.targetPosition |
mjc:ref |
The drive target position attribute is mapped to the initial reference position in MJCF. |
Important
USD Physics uses PD controller for position control and P controller for velocity control, which is different from MJCF’s general controller formulation F = gain * control + bias, so only fixed gain type and affine bias type are supported. For mujoco backend, you can alter the gain and bias type and parameters to have other controller formulations.
Note
Mimic joints:
The URDF importer supports conversion of mimic (dependent) joints, allowing one joint’s motion to follow another with scaling and offset. URDF <mimic> tags use joint, multiplier, and offset to express the relationship follower = offset + multiplier * leader.
When importing, the mimic attributes are written through NewtonMimicAPI on the follower joint:
newton:mimicJointis a relationship targeting the leader joint.newton:mimicCoef1stores the multiplier (scale).newton:mimicCoef0stores the offset.
The runtime consumes NewtonMimicAPI directly, so no equivalent PhysxMimicJointAPI is authored.
See source code for precise logic and usage.
Articulation Root API#
The URDF importer applies the standard UsdPhysics.ArticulationRootAPI and the NewtonArticulationRootAPI on the root link of the URDF file. Self-collision behavior is authored via newton:selfCollisionEnabled and consumed by the runtime directly; the PhysX-specific PhysxArticulationAPI is no longer authored.
References#
Refer to the Asset Structure for more information about the asset structure.
Examples#
For usage examples, refer to the Tutorial: Import URDF .