ROS 2 Custom C++ OmniGraph Node#
Learning Objectives#
In this example, you learn how to:
Write a custom C++ OmniGraph node to use with Isaac Sim.
Note
This tutorial is supported only on Linux with ROS 2 Jazzy.
Getting Started#
Prerequisite
Basic understanding of building ROS 2 packages.
Building a Custom Message Package#
To use our custom message with Isaac Sim, you must build the custom message package with ROS 2. Follow the custom message sample in the official ROS 2 documentation. The definition of the message (Sphere.msg file) is:
geometry_msgs/Point center
float64 radius
Follow the instructions on the ROS 2 Jazzy Documentation for Creating custom msg and srv files.
Note
You only need to complete the steps up to subsection 6. Confirm msg and srv creation.
Important
Follow the package and message naming terminology provided in the official tutorials; it is important when you build your own C++ OmniGraph nodes.
Setting Up the Extension C++ Template#
To use the custom ROS 2 OmniGraph nodes, you must build your own extension, which contains the necessary C++ code. For this purpose, we are going to use the Isaac Sim repository.
Clone and build the Isaac Sim repository from GitHub by following the instructions described in the Quick Start section.
Ensure that the
isaac-sim.shscript, located in the_build/linux-*/releasefolder, works as expected.Create a new Isaac Sim OmniGraph Node Extension template using the
./repo.sh template newcommand.Select (with the arrow keys) or fill in the prompts with the following values:
? Do you accept the governing terms?
Yes? Select what you want to create with arrow keys:
Extension? Select desired template with arrow keys:
[isaacsim-omnigraph-extension]: Isaac Sim OmniGraph Node Extension? Enter name of extension [name-spaced, lowercase, alphanumeric]:
custom.cpp.ros2_node? Enter title:
ROS 2 C++ Custom OmniGraph Node? Enter version:
0.1.0? Enter description:
A new Isaac Sim OmniGraph node extension.? Enter category:
Simulation
After answering the prompts, the template will be created in the
source/extensions/custom.cpp.ros2_nodepath.Edit the
deps/kit-sdk-deps.packman.xmlfile to add the following lines at the end, before the</project>closing tag:<dependency name="system_ros" linkPath="../_build/target-deps/system_ros" tags="${config}"> <source path="<FULL_PATH_TO_THE_ROS_2_INSTALL>" /> </dependency> <dependency name="additional_ros_workspace" linkPath="../_build/target-deps/additional_ros" tags="${config}"> <source path="<FULL_PATH_TO_WORKSPACE_CREATED_ABOVE>/install/tutorial_interfaces" /> </dependency>
Update the source
pathaccording to your local setup. For example:<FULL_PATH_TO_THE_ROS_2_INSTALL>:/opt/ros/jazzy<FULL_PATH_TO_WORKSPACE_CREATED_ABOVE>:/home/user/ros2_ws
This ensures that the
premake5.luafile can find the relevant ROS 2 headers and libraries on your system. These are needed for building your custom nodes.Edit the
source/extensions/custom.cpp.ros2_node/premake5.luafile to include the headers and libraries of the custom message package.Extend the
includedirsdefinition (under the-- C++ Carbonite pluginsection) to include system level ROS includes and the additional sourced ROS workspace includes. Add thelibdirsandlinksdefinitions to link against the ROS 2 C API libs and the custom message with its libs.includedirs { "%{root}/source/extensions/custom.cpp.ros2_node/include", -- System level ROS includes "%{target_deps}/system_ros/include/builtin_interfaces", "%{target_deps}/system_ros/include/geometry_msgs", "%{target_deps}/system_ros/include/rcl", "%{target_deps}/system_ros/include/rcl_yaml_param_parser", "%{target_deps}/system_ros/include/rcutils", "%{target_deps}/system_ros/include/rmw", "%{target_deps}/system_ros/include/rosidl_dynamic_typesupport", "%{target_deps}/system_ros/include/rosidl_runtime_c", "%{target_deps}/system_ros/include/rosidl_typesupport_interface", "%{target_deps}/system_ros/include/service_msgs", "%{target_deps}/system_ros/include/std_msgs", "%{target_deps}/system_ros/include/type_description_interfaces", -- Additional sourced ROS workspace includes "%{target_deps}/additional_ros/include/tutorial_interfaces", } libdirs { -- System level ROS libraries "%{target_deps}/system_ros/lib", -- Additional sourced ROS workspace libraries "%{target_deps}/additional_ros/lib", } links{ -- Minimal ROS 2 C API libs needed for your nodes to work "rosidl_runtime_c", "rcutils", "rcl", "rmw", -- Add dependencies of the custom message with its libs "geometry_msgs__rosidl_typesupport_c", "geometry_msgs__rosidl_typesupport_c", "tutorial_interfaces__rosidl_typesupport_c", "tutorial_interfaces__rosidl_generator_c", }
Create the
ROS2CustomMessageNode.ogndefinition file and theROS2CustomMessageNode.cppsource code file with the following specification in thesource/extensions/custom.cpp.ros2_node/nodesfolder.ROS2CustomMessageNode.ogn#{ "ROS2CustomMessageNode": { "version": 1, "icon": "icons/isaac-sim.svg", "description": [ "This node publishes a custom message with a ROS 2 OG node" ], "metadata": { "uiName": "ROS2 Publish Custom Message" }, "categories": ["tutorials"], "inputs": { "execIn": { "type": "execution", "description": "The input execution port." }, "publishCenter": { "type": "float[3]", "description": "Center co-ordinates to publish in order [x, y, z]", "default" : [0.0, 0.0, 0.0] }, "publishRadius": { "type": "float", "description": "Value of radius to publish", "default" : 1.5 } } } }
ROS2CustomMessageNode.cpp#// SPDX-FileCopyrightText: Copyright (c) 2026 NVIDIA CORPORATION & AFFILIATES. All rights reserved. // SPDX-License-Identifier: Apache-2.0 // // Licensed under the Apache License, Version 2.0 (the "License"); // you may not use this file except in compliance with the License. // You may obtain a copy of the License at // // http://www.apache.org/licenses/LICENSE-2.0 // // Unless required by applicable law or agreed to in writing, software // distributed under the License is distributed on an "AS IS" BASIS, // WITHOUT WARRANTIES OR CONDITIONS OF ANY KIND, either express or implied. // See the License for the specific language governing permissions and // limitations under the License. #include <ROS2CustomMessageNodeDatabase.h> #include <string> // In this example, we will publish a string message with an OmniGraph Node #include "tutorial_interfaces/msg/sphere.h" // ROS includes for creating nodes, publishers etc. #include "rcl/rcl.h" // Helpers to explicit shorten names you know you will use using omni::graph::core::Type; using omni::graph::core::BaseDataType; class ROS2CustomMessageNode { public: static bool compute(ROS2CustomMessageNodeDatabase& db) { auto& state = db.internalState<ROS2CustomMessageNode>(); if(!state.pub_created) { state.context = rcl_get_zero_initialized_context(); state.init_options = rcl_get_zero_initialized_init_options(); state.allocator = rcl_get_default_allocator(); rcl_ret_t rc; // create init_options rc = rcl_init_options_init(&state.init_options, state.allocator); if (rc != RCL_RET_OK) { printf("Error rcl_init_options_init.\n"); return false; } // create context rc = rcl_init(0, nullptr, &state.init_options, &state.context); if (rc != RCL_RET_OK) { printf("Error in rcl_init.\n"); return false; } // create rcl_node state.my_node = rcl_get_zero_initialized_node(); state.node_ops = rcl_node_get_default_options(); rc = rcl_node_init(&state.my_node, "node_0", "custom_node", &state.context, &state.node_ops); if (rc != RCL_RET_OK) { printf("Error in rcl_node_init\n"); return false; } const char * topic_name = "sphere_msg"; const rosidl_message_type_support_t * my_type_support = ROSIDL_GET_MSG_TYPE_SUPPORT(tutorial_interfaces, msg, Sphere); state.pub_options = rcl_publisher_get_default_options(); // Initialize Publisher rc = rcl_publisher_init( &state.my_pub, &state.my_node, my_type_support, topic_name, &state.pub_options); if (RCL_RET_OK != rc) { printf("Error in rcl_publisher_init %s.\n", topic_name); return false; } // Node, publisher was successfully created state.pub_created = true; return true; } tutorial_interfaces__msg__Sphere* ros_msg = tutorial_interfaces__msg__Sphere__create(); // Set the center of the sphere with the input to the OG node ros_msg->center.x = db.inputs.publishCenter()[0]; ros_msg->center.y = db.inputs.publishCenter()[1]; ros_msg->center.z = db.inputs.publishCenter()[2]; // Set the radius of the sphere to the input radius ros_msg->radius = db.inputs.publishRadius(); rcl_ret_t rc; rc = rcl_publish(&state.my_pub, ros_msg, NULL); if (rc != RCL_RET_OK) { // RCL_RET_PUBLISHER_INVALID is returned initially and then the message gets published return false; } // Destroy the ROS message published to release the memory it used tutorial_interfaces__msg__Sphere__destroy(ros_msg); // Returning true tells Omnigraph that the compute was successful and the output value is now valid. return true; } static void releaseInstance(NodeObj const& nodeObj, GraphInstanceID instanceId) { auto& state = ROS2CustomMessageNodeDatabase::sPerInstanceState<ROS2CustomMessageNode>(nodeObj, instanceId); // Remove Publisher rcl_ret_t rc = rcl_publisher_fini(&state.my_pub, &state.my_node); if (rc != RCL_RET_OK) { printf("Failed to finalize publisher: %d\n", rc); } // Remove Node rc = rcl_node_fini(&state.my_node); if (rc != RCL_RET_OK) { printf("Failed to finalize node: %d\n", rc); } state.pub_created = false; } private: rcl_publisher_t my_pub; rcl_node_t my_node; rcl_context_t context; rcl_node_options_t node_ops; rcl_init_options_t init_options; rcl_allocator_t allocator; rcl_publisher_options_t pub_options; bool pub_created {false}; }; // This macro provides the information necessary to OmniGraph that lets it automatically register and deregister // your node type definition. REGISTER_OGN_NODE()
The
rclROS 2 API is used for creating and working with the ROS 2 components in the OmniGraph node:In the C++ Node,
compute()is called when theExec Incondition is true, this is where the node and publisher are initially created. The message is also published from this function.
Run
./build.shto build your new extension with ROS 2 OmniGraph nodes.The built extension will be located in the
_build/linux-*/release/extsfolder.Note
The following error messages produced during the Python stubs generation post-build step can be safely ignored. They occur because ROS 2 is not sourced in the terminal where the build is being performed; as a result, the dynamic library cannot be loaded when generating the Python stub files (type hints and function/class signatures).
running kit for python stubs generation...
...
[Error] [carb] [Plugin: libcustom.cpp.ros2_node.plugin.so] Could not load the dynamic library from ...exts/custom.cpp.ros2_node/bin/libcustom.cpp.ros2_node.plugin.so.
Error: librcutils.so: cannot open shared object file: No such file or directory...
[Warning] [carb] Potential plugin preload failed: ...exts/custom.cpp.ros2_node/bin/libcustom.cpp.ros2_node.plugin.so
[Error] [omni.ext.plugin] [ext: custom.cpp.ros2_node-0.1.0] failed to load native plugin: ...exts/custom.cpp.ros2_node/bin/libcustom.cpp.ros2_node.plugin.so
Adding the Extension to Isaac Sim#
To add the extension and corresponding nodes into Isaac Sim:
Source the ROS 2 installation and the local ROS 2 workspace containing the
tutorial_interfacespackage created above.source /opt/ros/jazzy/setup.bash
source install/local_setup.bash
Run Isaac Sim from this terminal.
Go to Window > Extensions and search for the
custom.cpp.ros2_nodeextension. Then enable it by toggling the switch.Note
If you want to use the extension in a different Isaac Sim application than the one used to build it, follow these steps to make the extension available in the new application:
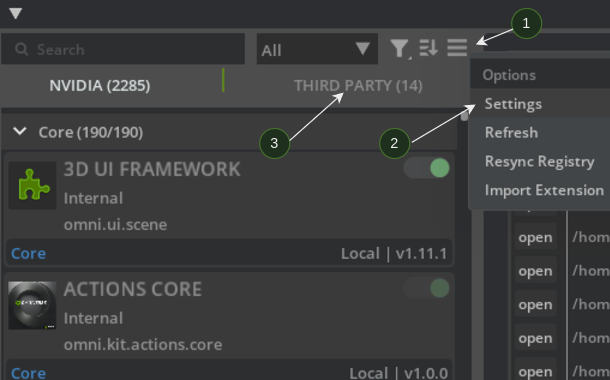
Go to Window > Extensions, look for the hamburger menu (1) to the right side of the search bar (just above Third Party tab). Click Settings (2).
Click the
+icon under Extension Search Paths and add the path to your built extension in the previous section (your built extensions are under_build/linux-*/release/exts).Verify that your extensions are under the Third Party tab (3). Then, enable the extension by toggling the switch.
Building the Action Graph and Running the Nodes#
With the custom.cpp.ros2_node extension enabled, go and create an ActionGraph with the new ROS 2 node:
Go to Window > Graph Editors > Action Graph and create a New Action Graph.
Search for
ROS 2in the Action Graph tab, drag theROS2 Publish Custom Messagenode into the graph.Search for
Playback Tickand drag it into the graph.Connect
Tickfrom theOn Playback Ticknode toExec Infor the ROS 2 node.

Click Play on the scene and the node starts publishing to ROS 2.
Verify the publishing, by opening a new terminal and sourcing ROS 2 and the local workspace in it.
Verify that the
/custom_node/sphere_msgtopic is available by runningros2 topic list. Also, show the published messages by runningros2 topic echo /custom_node/sphere_msg.
Summary#
This tutorial covered the following topics:
Building your own extension, which contains ROS 2 C++ OmniGraph nodes
Using these nodes with Isaac Sim
Next Steps#
Continue on to the next tutorial in the ROS2 Tutorials series, ROS 2 Launch to learn how to deploy Isaac Sim using ROS 2 Launch.