Tutorial 6: Joint Gains Tuning#
Max torque and max velocity are set (Tutorial 5). The remaining question: how does each joint respond when you command a new position? Too stiff and the hand can jitter or overshoot; too soft and it lags or never reaches the target. Stiffness and damping form a PD (Proportional-Derivative) controller: stiffness pulls the joint toward the target, damping resists velocity and reduces oscillation. This tutorial uses the Gain Tuner in Isaac Sim to tune these gains for the thumb, run step and sinewave tests, and analyze position and velocity with the built-in charts—so you can see underdamped, critically damped, and overdamped behavior and aim for responsive, stable motion.
Learning Objectives#
In this tutorial, you will:
Tune drive stiffness and damping for the thumb using the Gain Tuner.
Run step and sinewave tests and interpret underdamped, critically damped, and overdamped behavior.
Analyze tuning results with the Gain Tuner charts and save gains to the physics layer.
Prerequisites#
Complete Tutorial 5: Joint Drive Tuning.
Open
/path/to/Inspire/module_4_end-checkpoint_2/inspire_hand.usdain Isaac Sim if not already open.
Module 5.1: Understanding Joint Drive Stiffness and Damping#
Position control in Isaac Sim uses stiffness and damping:
Force = (Stiffness × delta_position) + (Damping × delta_velocity)
Stiffness — Like a spring; force proportional to distance from target. Higher stiffness pulls the joint toward the target more strongly.
Damping — Like a shock absorber; force proportional to velocity. Higher damping reduces oscillation and overshoot.
Together they form a PD (Proportional-Derivative) controller.
Why Tuning Stiffness and Damping Matters#
Stiffness and damping directly determine how the joint responds to position commands and how it behaves in contact. Poor tuning leads to:
Unrealistic motion — Too stiff can look robotic or cause jitter; too soft makes the hand feel sluggish or weak.
Instability — High stiffness with low damping causes oscillation and overshoot; in contact, this can produce chatter or unstable grasps.
Poor tracking — If gains are too low, the joint never reaches the target in time or drifts under load.
The ratio of stiffness to damping defines the damping regime of the response. For a step to a target position, you will see one of three behaviors:
Regime |
What it looks like |
Cause |
|---|---|---|
Underdamped |
The joint overshoots the target, then oscillates (rings) before settling. You may see multiple overshoots. |
Stiffness is high relative to damping; the “spring” dominates and there isn’t enough “shock absorber” to dissipate energy. |
Critically damped |
The joint approaches the target smoothly and reaches it in the shortest time without overshooting. |
Stiffness and damping are balanced so that the system neither rings nor moves slowly. Often the goal for responsive, stable motion. |
Overdamped |
The joint approaches the target slowly and never overshoots. Response is sluggish; it may take a long time to settle. |
Damping is high relative to stiffness; motion is heavily resisted. |
In the Gain Tuner, if you see oscillation or overshoot in the position chart, you are underdamped—increase damping (or reduce stiffness). If the joint barely moves or creeps toward the target, you are overdamped—increase stiffness or reduce damping. Aim for a response that reaches the target quickly with little or no overshoot (near critically damped).
Module 5.2: Using Gain Tuner to Tune Joint Drive Stiffness and Damping#
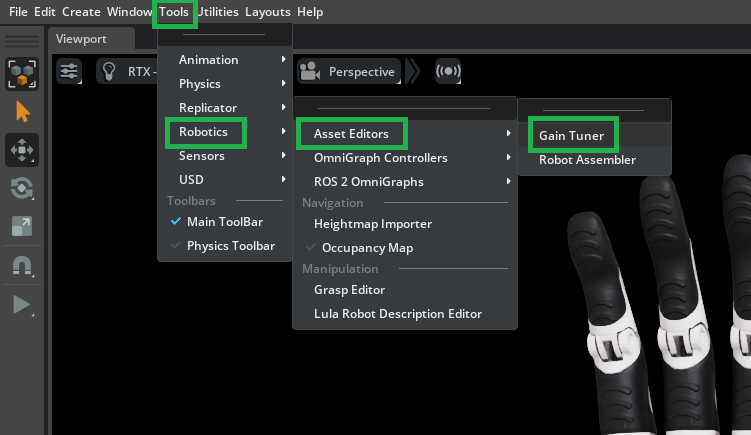
Open
/path/to/Inspire/module_4_end-checkpoint_2/inspire_hand.usdain Isaac Sim if not already open.Go to Tools > Robotics > Asset Editors > Gain Tuner.
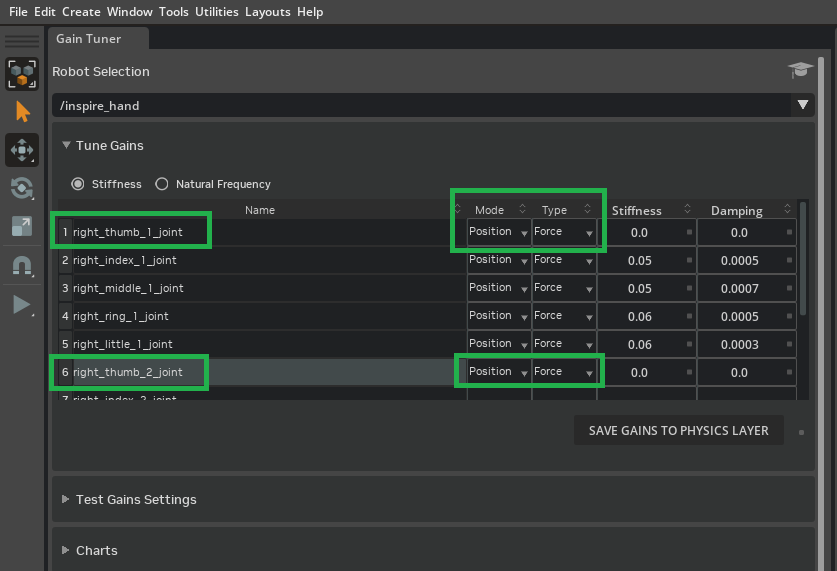
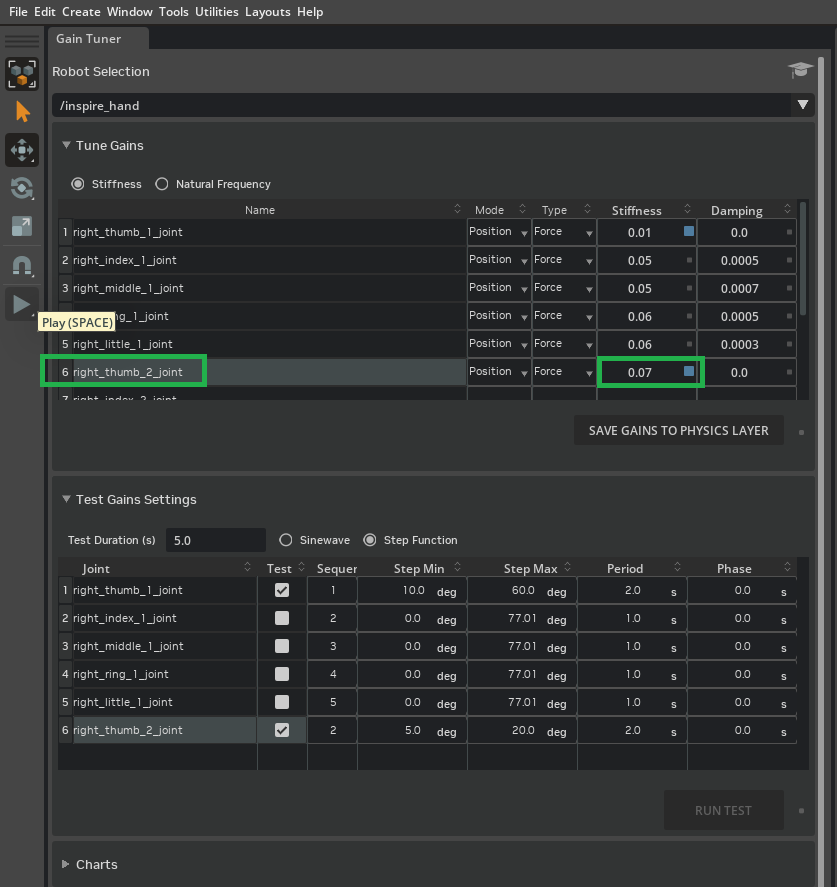
In Tune Gains, set Mode to Position and Type to Force.
Note
In the module_4_end-checkpoint_2 file, the finger joints already have stiffness and damping set for you. We focus on tuning and verifying the thumb joints (right_thumb_1_joint, right_thumb_2_joint) in this tutorial.
Tuning Guidelines (PhysX)#
Set damping to zero and tune only stiffness to see the basic position response.
Increase stiffness until the joint converges close to the target.
Set damping one order of magnitude lower than stiffness as a baseline (should not overshoot); for a faster response, reduce damping.
Fine-tune both around this baseline for stability, response time, and overshoot.
Run a Test#
In the Stiffness column, set initial values for
right_thumb_1_jointandright_thumb_2_joint(e.g. 0.01).

In Test Gains Settings, enable the Test checkbox for
right_thumb_1_jointandright_thumb_2_joint.
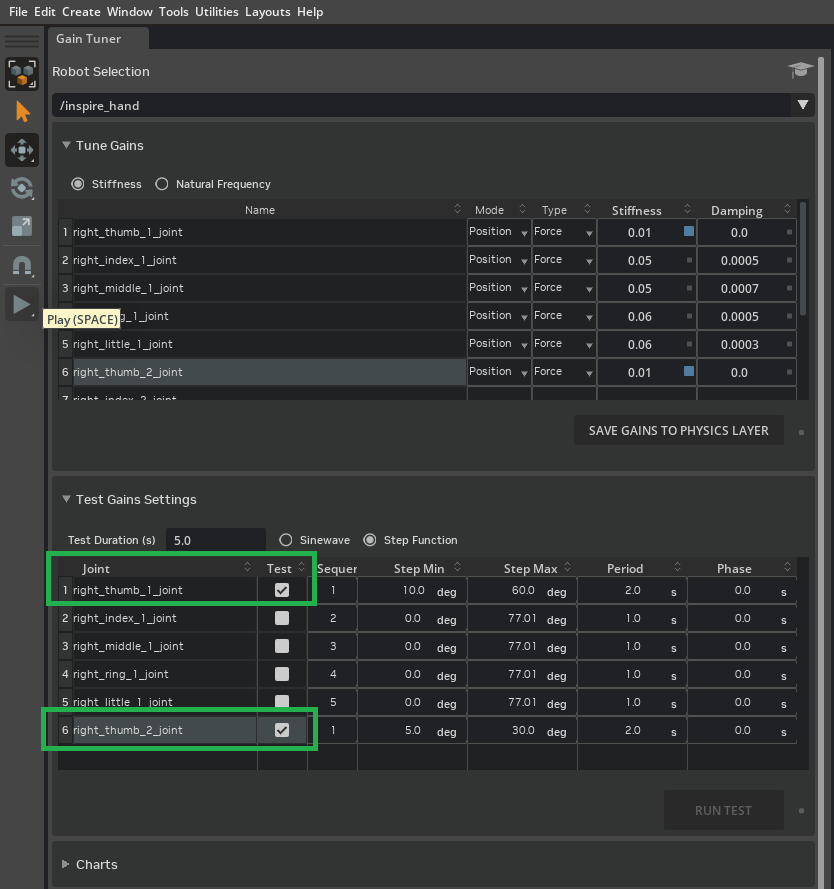
Set Step Function min and max so the thumb moves through a useful range: set
right_thumb_1_jointStep Min to 10° and Step Max to 60°, and setright_thumb_2_jointStep Min to 5° and Step Max to 20°. Increase Duration to 2.0 so the joints can reach their targets within their maximum velocity limits.

Tip
The step function ranges (min/max) for the thumb joints are chosen to move through a substantial portion of their range of motion, but purposely avoid extreme or problematic poses (such as excessive curling without lateral movement, which could cause unrealistic contact).
If you want to precisely inspect and interactively move any joint through its full range, use the Physics Inspector tool:
Go to Tools > Physics > Physics Inspector.
In the Inspector window, select
r_base_linkas the Articulation in the dropdown.Use the interface to directly set drive target positions for any joint and observe their behavior in the viewport.
Before commanding targets, make sure the joint’s stiffness is set to a nonzero value—otherwise the joint may not respond to target changes.
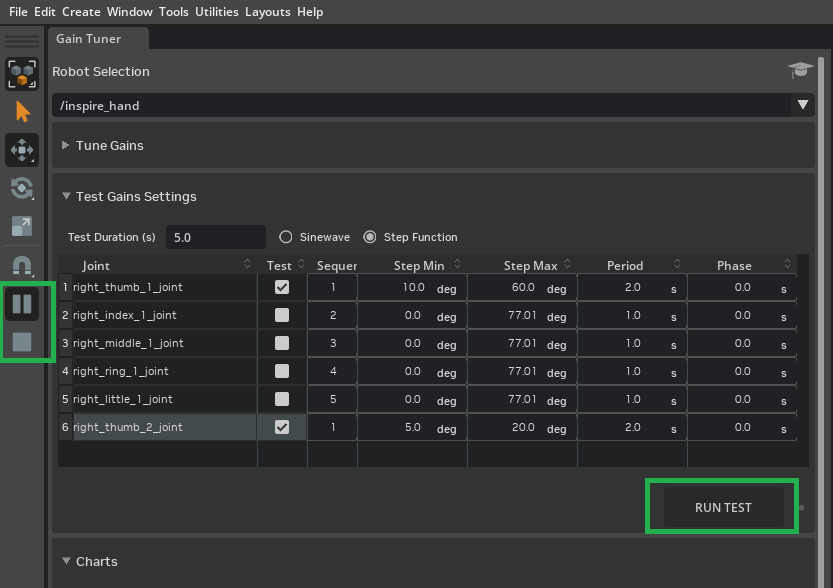
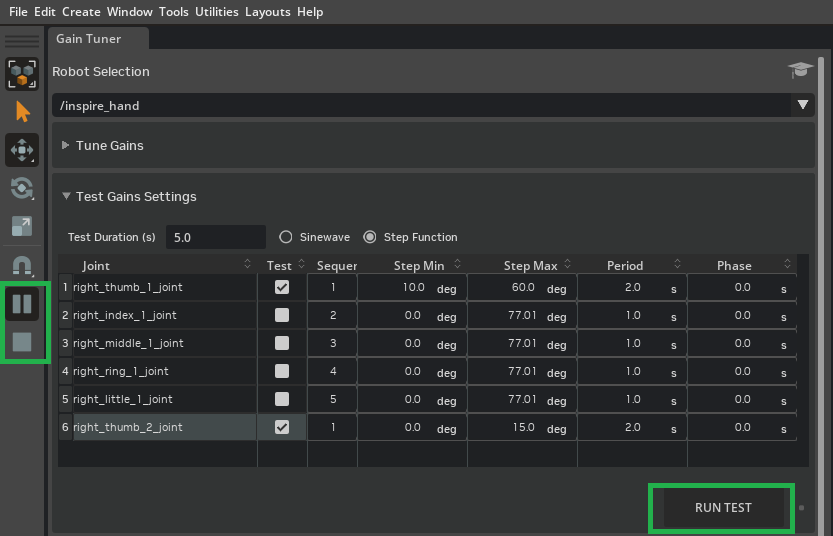
Press Play, then Run Test to apply the gains and run the evaluation.
Tip
If you see instabilities at higher stiffness values, open the Property panel, select PhysicsScene, and try increasing Time Steps Per Second.
Module 5.3: Analyze Tuning Results#
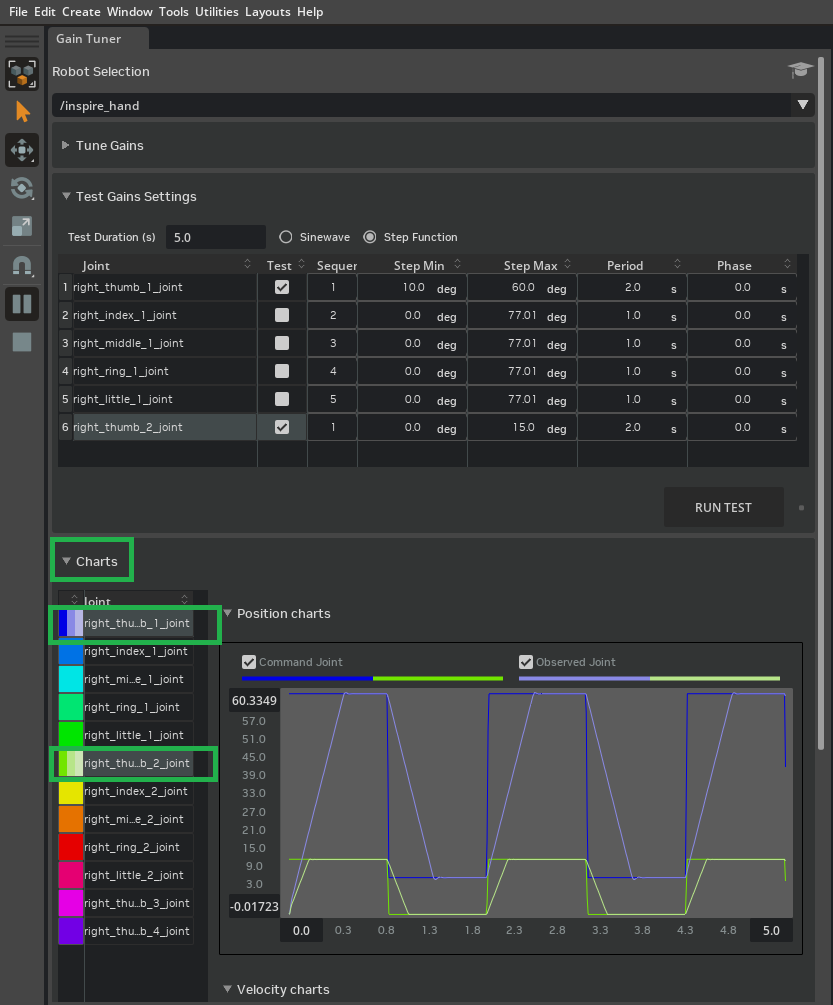
The Gain Tuner’s Charts let you compare actual position and velocity to the commanded values. Use them to spot overshoot, lag, or coupling: for example, right_thumb_2_joint tested alone can behave differently than when both thumb joints move together. We’ll adjust gains, run parallel tests for both thumb joints, then run all fingers in parallel to confirm the full hand tracks commands before saving to the physics layer.
Once the tests from Run a Test are completed, expand the Charts section and multi-select (CTRL + left-click)
right_thumb_1_jointandright_thumb_2_joint.
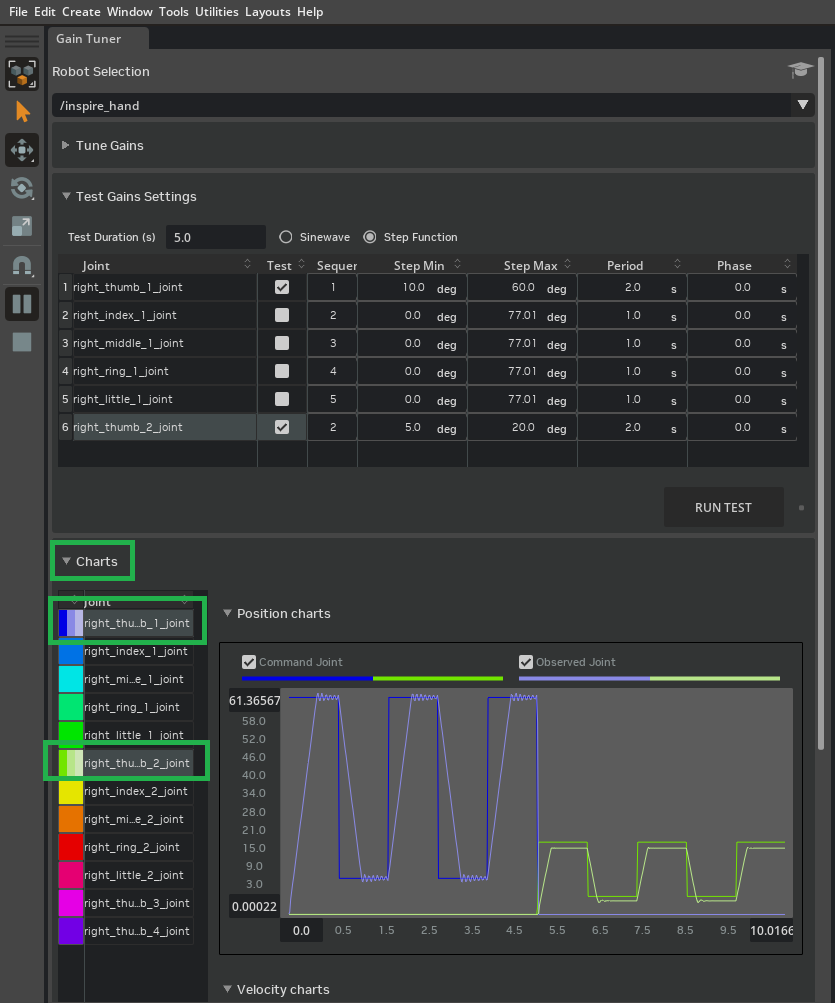
You should see that right_thumb_1_joint is oscillating around the target and right_thumb_2_joint is struggling to reach the target.
To improve tracking, increase stiffness to 0.07 for
right_thumb_2_joint.
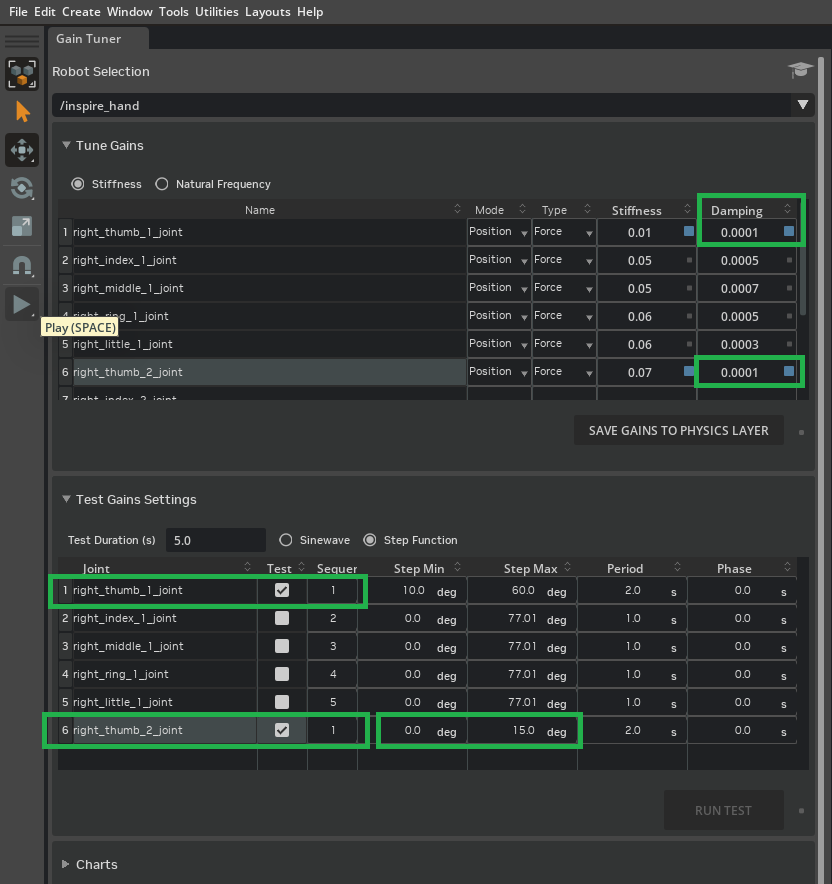
Add damping 0.0001 to reduce oscillation. Set Sequence to 1 for both
right_thumb_1_jointandright_thumb_2_jointso they run at the same time (parallel tests let the thumb’s lateral motion create space for the curling motion). Set Step Min to 0.0 and Step Max to 15 forright_thumb_2_jointto observe the effect of the range change.
Press Play if the simulation is not already playing. Click Run Test.
Once the tests are finished, expand the Charts section and multi-select (CTRL + left-click)
right_thumb_1_jointandright_thumb_2_joint.
Run the Sinewave test to evaluate how each joint responds to a smooth, continuous motion command. Set the Amplitude parameter to 50 for
right_thumb_1_jointand 30 forright_thumb_2_joint(feel free to experiment with these values to observe effects), then click Run Test.
Continue tuning by experimenting with different gain values (stiffness and damping) and various test parameters. As you tune, monitor joint velocities during the test to ensure none exceed the maximum joint velocity limits defined earlier. To do this:
Select any joint in the Property panel.
Scroll down to Extra Properties > Velocity to view its current velocity while the test is running.
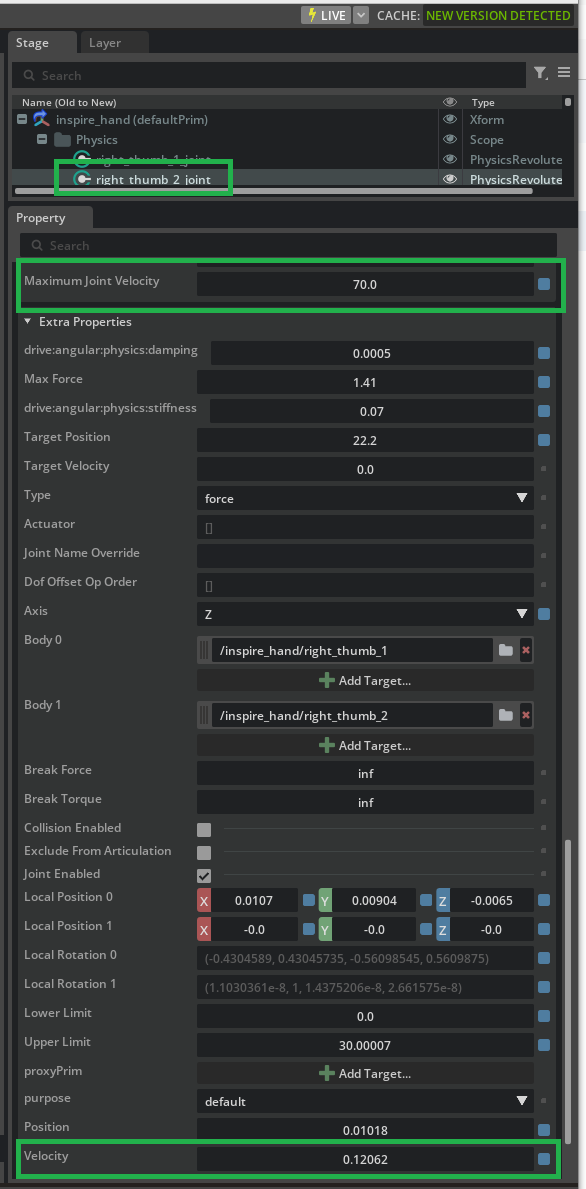
If velocities approach or exceed the maximums, reduce gain values or adjust test parameters.
To evaluate the entire hand’s coordinated tracking, run a parallel step function test:
Enable Test for all joints in the Gain Tuner.
Set Sequence to 1 for each joint (this runs tests in parallel for all fingers).
Set Step Min and Step Max to 10 and 30, respectively, for each joint.
Click Run Test. The resulting charts will reveal how well your current Stiffness and Damping settings allow the full hand to execute simultaneous step commands. You should see coordinated, stable motion across all joints. The expected results might look similar to the example below:

Joint |
Test |
Sequencer |
Step Min |
Step Max |
Period |
Phase |
|---|---|---|---|---|---|---|
right_thumb_1_joint |
1 |
1 |
10.0 deg |
60.0 deg |
2.0 s |
0.0 s |
right_index_1_joint |
1 |
1 |
10.0 deg |
30.0 deg |
2.0 s |
0.0 s |
right_middle_1_joint |
1 |
1 |
10.0 deg |
30.0 deg |
2.0 s |
0.0 s |
right_ring_1_joint |
1 |
1 |
10.0 deg |
30.0 deg |
2.0 s |
0.0 s |
right_little_1_joint |
1 |
1 |
10.0 deg |
30.0 deg |
2.0 s |
0.0 s |
right_thumb_2_joint |
1 |
1 |
0.0 deg |
10.0 deg |
2.0 s |
0.0 s |
Note
In the Gain Tuner, open /path/to/Inspire/module_5_end-checkpoint_3/inspire_hand.usda to review the final tuned stiffness and damping values.
Summary#
This tutorial covered:
Using the Gain Tuner to tune stiffness and damping (Position, Force) for the thumb joints and saving gains to the physics.usda layer so the hand responds to position commands with stable, near–critically damped motion.
Running step and sinewave tests and interpreting damping regimes (underdamped, critically damped, overdamped) in the Charts to diagnose overshoot or sluggishness.
Verifying parallel tests for all joints; the same workflow applies to other digits or custom hands. The module_5_end-checkpoint_3 checkpoint contains the final tuned values.
Next Steps#
Continue to Tutorial 7: Using the Dexterous Hand in Practice for next steps and further resources.
Further Learning#
Read Gain Tuner Extension for more details on the physical mechanics relating joint gains to derived motions and how the Gain Tuner works.