Basic Robot Tutorial#
This tutorial describes how to add a robot to the stage, move the robot, and examine the robot.
You must complete the previous Isaac Sim Basic Usage Tutorial before starting this one.
Tutorial#
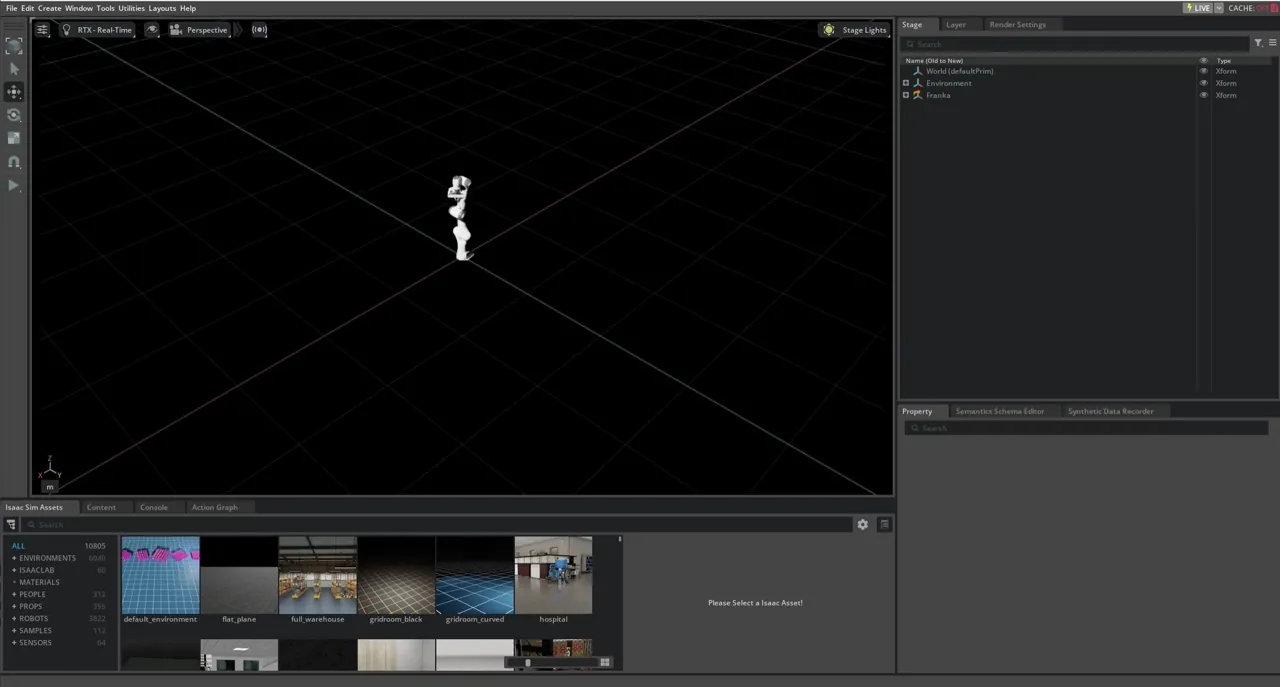
Add a robot to Stage
Start with a new stage, File > New Stage.
Add robot to the scene, from the top Menu Bar, click Create > Robots > Franka Emika Panda Arm.
Examine the robot
Use the Physics Inspector to examine the robot’s joint properties.
Go to Tools > Physics > Physics Inspector. A window opens on the right.
Select Franka to inspect. The window will populate the joint information, such as the upper and lower limits as well as its default position by default.
Click on the hamburger icon on the top right to see more options, such as the joint stiffness and damping.
Optionally, make any changes to these values to see the robot move on the Stage corresponding to the change. A green check mark will appear.
To commit the changes to be the new default values for the robot, click the green check mark.
Control the Robot
The GUI-based robot controllers are inside the Omniverse visual programming tool, OmniGraphs. There are more involved tutorials about OmniGraph in the OmniGraph section. For the purpose of this tutorial, we will generate the graph using a shortcut tool, and then examine the graph in the OmniGraph editor.
Open the graph generator by going to Tools > Robotics > OmniGraph Controllers > Joint Position.
In the newly appeared Articulation Position Controller Inputs popup window, click Add for the Robot Prim field.
Select Franka as the Target.
Click OK to generate the graph.
To move the robot:
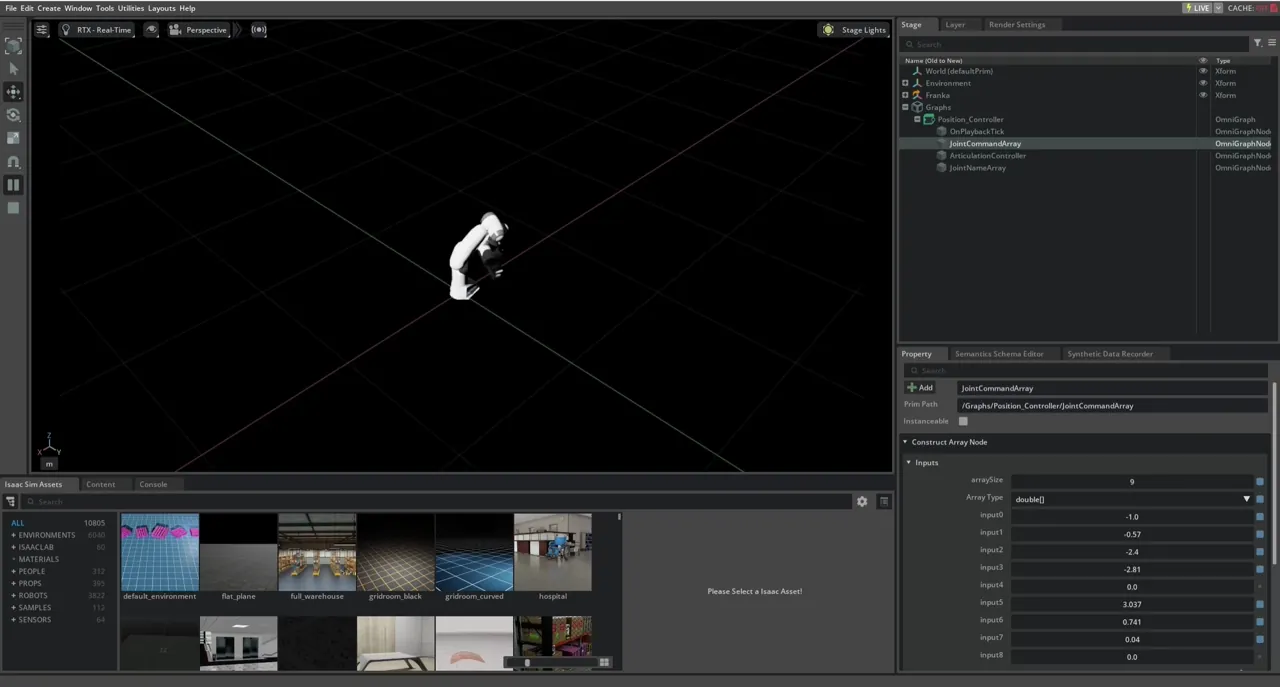
In the Stage tab to the upper right, select Graph > Position_Controller.
Select the JointCommandArray node. You can do this by either selecting the node on the Stage tree, or selecting the node in the graph editor.
In the Property tab to the lower right, you can see the joint command values. The Inputs under the Construct Array Node correspond to joints on the robot, starting with the base joint.
Press Play to start the simulation.
Click+hold+drag various value fields or type different values to see the robot arm change position.
To visualize the generated graph:
Open an graph editor window, Window > Graph Editors > Action Graph. The editor window opens in the tab below the Viewport tab that contains the robot.
Pull up the newly opened browser tab.
Click Edit Action Graph that is in the middle of the graph editor window.
Select the only existing graph on the list.
Select an array and review the Stage and Property tabs to see the values associated with each array node.
Select the Articulation Controller object in the graph to review its properties.
Add a robot to Stage
Start with a new Stage (File > New). To add a robot to the scene, copy-paste the following code snippet into the Script Editor and run it.
import isaacsim.core.experimental.utils.stage as stage_utils
from isaacsim.core.experimental.prims import Articulation, XformPrim
from isaacsim.storage.native import get_assets_root_path

assets_root_path = get_assets_root_path()
asset_path = assets_root_path + "/Isaac/Robots/FrankaRobotics/FrankaPanda/franka.usd"
stage_utils.add_reference_to_stage(usd_path=asset_path, path="/World/Arm")

arm_transform = XformPrim("/World/Arm")
arm_transform.set_world_poses(positions=[0.0, 1.0, 0.0])

arm_handle = Articulation("/World/Arm")
Examine the robot
Isaac Sim Core API has many function calls to retrieve information about the robot. Here are some examples for finding the number of joints and the joint names, various joint properties, and joint states.
Open a new tab in the Script Editor, copy-paste the following code snippet. This can only be run after the previous adding robot step, where arm_handle has already been established. Press Play before running the snippet. Physics must be running for these commands to work.
# Requires physics running (Press Play first). arm_handle from add_franka_to_stage snippet.
print("Number of joints:", arm_handle.num_dofs)
print("Joint names:", arm_handle.dof_names)
positions = arm_handle.get_dof_positions()
print("Joint positions:", positions)
Notice when you pressed “Run”, it only prints the state once, even if the simulation is running. You would have to keep pressing “Run” if you want to see more recent states. If you want to see the information printed at every physics step, you would need to insert these commands into a physics callback that runs at each physics step. We will go more in depth on how time stepping works in the next section Workflows.
To insert the commands into a physics callback, run the following snippet in a separate tab in the Script Editor.
from isaacsim.core.simulation_manager import IsaacEvents, SimulationManager


def print_joint_positions_callback(dt, context):
    positions = arm_handle.get_dof_positions()
    print("Joint positions:", positions)


# Store callback_id to remove later if needed
callback_id = SimulationManager.register_callback(print_joint_positions_callback, IsaacEvents.POST_PHYSICS_STEP)
Start the simulation by pressing Play, then run the snippet. You should see the information printed at every physics step in the terminal.
If printing at every physics step is no longer necessary, you can remove the physics callback by running the following snippet. Use the callback_id that was returned when you registered the callback.
from isaacsim.core.simulation_manager import SimulationManager

# callback_id was returned when registering the callback
SimulationManager.deregister_callback(callback_id)
Control the Robot
There are many ways to control the robot in Isaac Sim. The lowest level is sending direct joint commands to set position, velocity, and efforts. Here is an example of how to control the robot using the Articulation API at the joint level.
Open a new tab in the Script Editor, copy-paste the following code snippet. This can only be run after the previous “Add a robot to Stage” step, where arm_handle has already been established. Press Play before running the snippet. Physics must be running for these commands to work. The snippet sets the Franka arm to a target pose. If you have added the print-state callback above, you should see the printed joint values change as the robot moves.
# Move arm to a target pose. arm_handle from add_franka_to_stage snippet.
# Franka has 9 DOFs: 7 arm joints + 2 finger joints
arm_handle.set_dof_positions([-1.5, 0.0, 0.0, -1.5, 0.0, 1.5, 0.5, 0.04, 0.04])

# To reset to default pose:
# arm_handle.set_dof_positions([0.0, 0.0, 0.0, 0.0, 0.0, 0.0, 0.0, 0.04, 0.04])
Similar to the examine snippet above, set_dof_positions here is executed once when you press “Run”. If you wish to send commands at every physics step, you would need to insert these commands into a physics callback that runs at each physics step.
The script that runs this tutorial is located in standalone_examples/tutorials/getting_started/getting_started_robot.py. To run the script, open a terminal, navigate to the root of the Isaac Sim installation, and run the following command:
./python.sh standalone_examples/tutorials/getting_started/getting_started_robot.py
python.bat standalone_examples\tutorials\getting_started\getting_started_robot.py
Code Explained
The getting_started_robot.py script sets up the scene and adds robots to the stage using the same core API as the Extension workflow. It imports the necessary modules, adds the ground plane and a distant light, sets the camera view, then adds two robots (a Franka arm and a Nova Carter) to the scene.
The notable differences between the Extension workflow and Standalone Python are:
Starting the Simulator at the top
The standalone script starts the simulation app and sets up the stage (create new stage, ground plane, add Franka and Carter). The following snippet illustrates the pattern: starting the app, then using the experimental API to create the stage and add the robot.
from isaacsim import SimulationApp

simulation_app = SimulationApp({"headless": False})

import isaacsim.core.experimental.utils.stage as stage_utils
from isaacsim.core.experimental.objects import GroundPlane
from isaacsim.core.experimental.prims import Articulation, XformPrim
from isaacsim.storage.native import get_assets_root_path

assets_root_path = get_assets_root_path()
stage_utils.create_new_stage()
GroundPlane("/World/GroundPlane", positions=[0, 0, 0])

asset_path = assets_root_path + "/Isaac/Robots/FrankaRobotics/FrankaPanda/franka.usd"
stage_utils.add_reference_to_stage(usd_path=asset_path, path="/World/Arm")
arm_transform = XformPrim("/World/Arm")
arm_transform.set_world_poses(positions=[0.0, 1.0, 0.0])
arm = Articulation("/World/Arm")
Stepping the simulation explicitly
At the bottom of the script, a loop calls SimulationManager.step() and RenderingManager.render() every iteration to advance physics and rendering. The script runs for 4 cycles; in each cycle the arm and the car move or stop, and the car’s joint positions are printed at every physics step in the last cycle.
from isaacsim.core.rendering_manager import RenderingManager
from isaacsim.core.simulation_manager import SimulationManager

# Move the arm
arm.set_dof_positions([-1.5, 0.0, 0.0, -1.5, 0.0, 1.5, 0.5, 0.04, 0.04])

for _ in range(100):
    SimulationManager.step()
    RenderingManager.render()
    simulation_app.update()
    # Print joint positions at every physics step
    joint_positions = arm.get_dof_positions()
    print("Joint positions:", joint_positions)
The get_dof_positions and set_dof_positions functions are the same as those used in the Extension workflow. Because stepping is explicit in standalone, these commands sit inside the loop and run every physics step by default. This is the main difference between the Extension and Standalone Python workflows. See the next section Workflows for more details.
Save your work.
The next set of recommend tutorials are the GUI reference Robot Setup Tutorials Series.
Or, you can continue to the next section to explore use-cases and capabilities of NVIDIA Isaac Sim by accessing a library of examples and demos in Examples.