Tutorial: Import URDF#
Learning Objectives#
This tutorial shows how to import a URDF and convert it to a USD in NVIDIA Isaac Sim. After this tutorial, you can use URDF files in your pipeline while using NVIDIA Isaac Sim.
10-15 Minutes Tutorial
Getting Started#
Prerequisites
Review the Quick Tutorials prior to beginning this tutorial.
Check the URDF Importer Extension for more details on the extension.
To import a UR10 URDF from the Built in URDF files that come with the extension:
Enable the isaacsim.asset.importer.urdf extension in NVIDIA Isaac Sim if it is not automatically loaded by going to Window > Extensions and enable isaacsim.asset.importer.urdf.
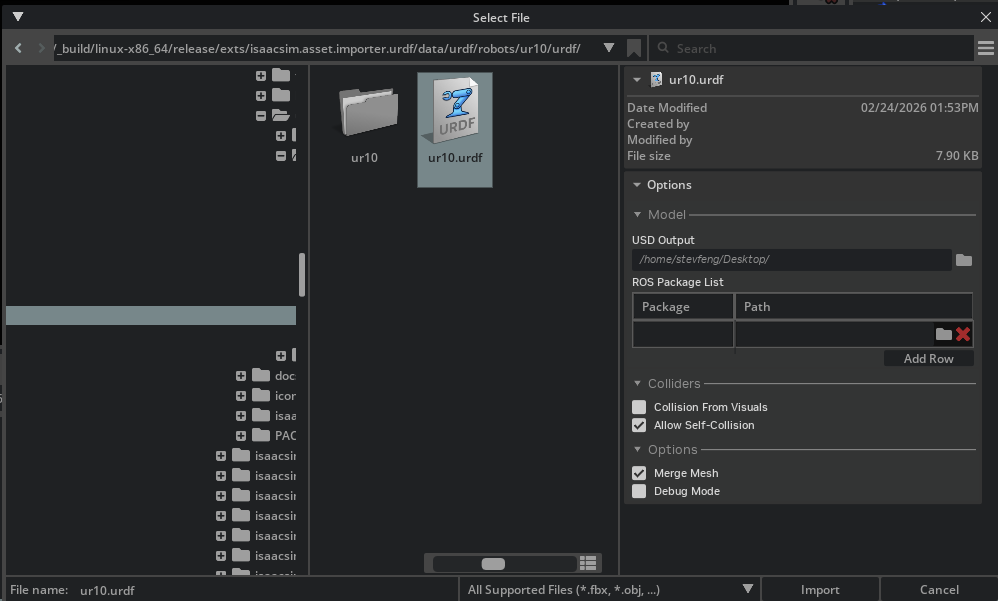
- In this example, import the ur10.urdf that is included in the URDF importer extension. To find it:
Click on the file icon beside AUTOLOAD to find the isaacsim.asset.importer.urdf extension.
Navigate to
/data/urdf/robots/ur10/urdfand findur10.urdf, and copy this path.
Accesses the URDF extension by going to the File > Import, and select an URDF file you want to import. In this case, paste the path above to the navigation bar and left-click on ur10.urdf.

Specify the settings you want to use to import UR10 with:
Set USD Ouptut to your desired output location for the USD.
Select or enter an address to store the output USD file.
Select Merge Mesh to merge the meshes under a rigid body into a single mesh.
Select Allow Self-Collision for the Colliders section and leave everything else as default.
Note
You must have write access to the output directory used for import, it will default to the same directory as your URDF.
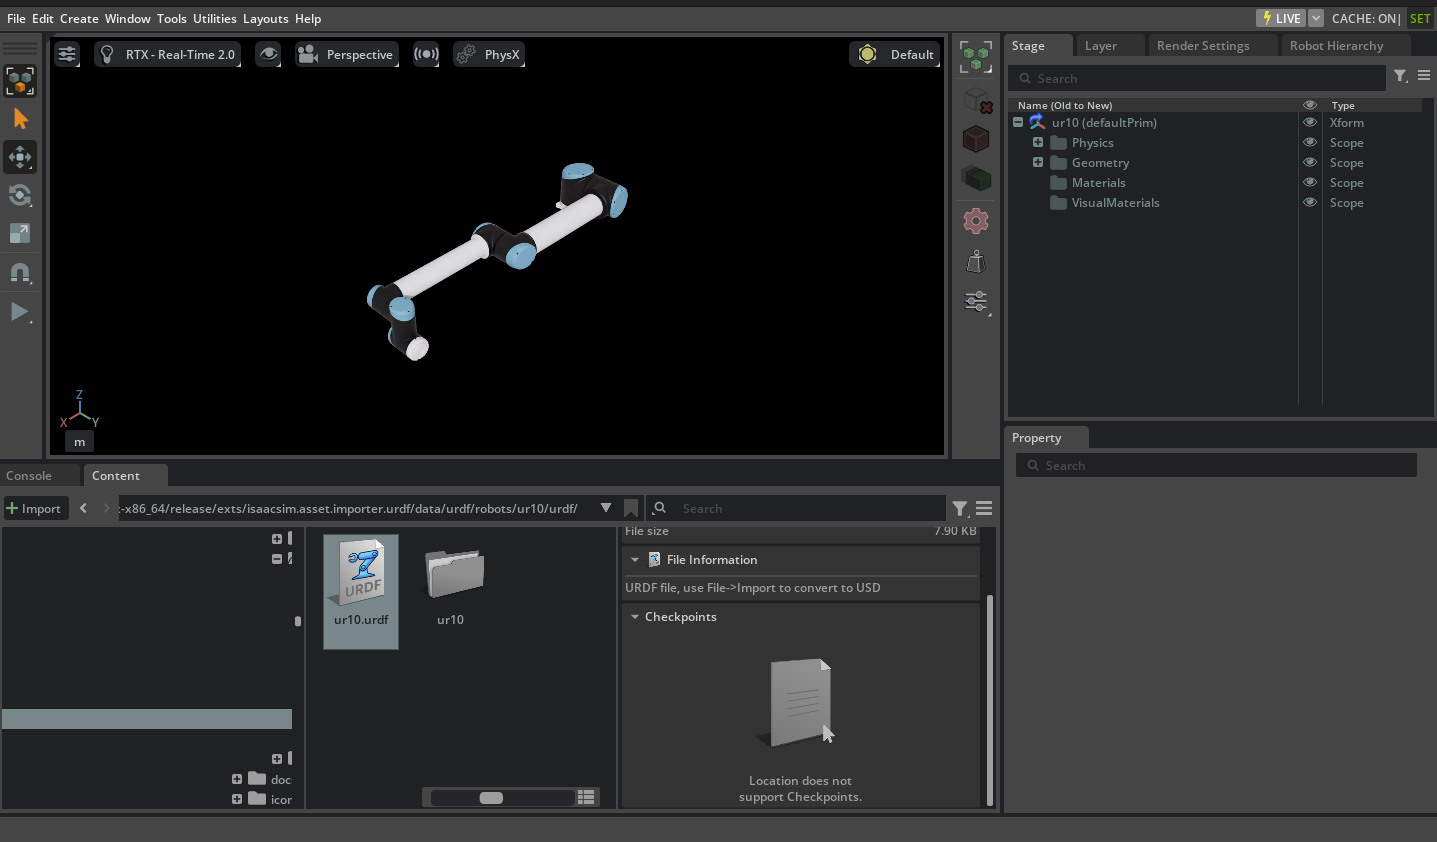
Click the Import button to add the robot to the stage.
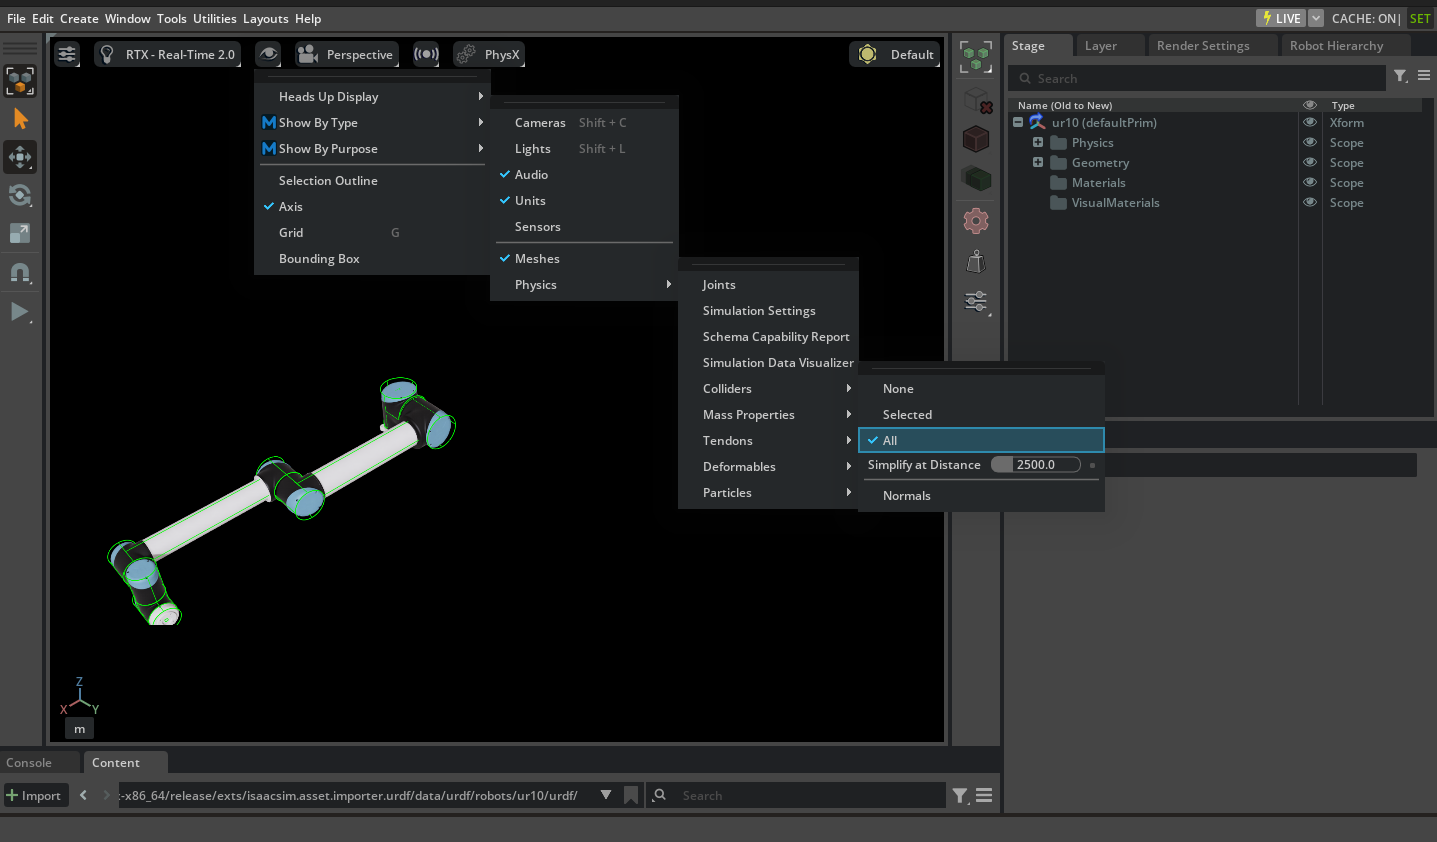
#. Visualize the collision meshes, not all the rigid bodies need to have collision properties, and collision meshes are often a simplified mesh compared to the visual ones. Therefore you might want to visualize the collision mesh for inspection. To visualize collision in any viewport:
Select: the eye icon in the upper left corner of the viewport.
Select: Show by type.
Select: Physics.
Select: Colliders.
Check: All.
Note
See the Tutorial 11: Tuning Joint Drive Gains tutorial to tune the gains for your robot.
Set the joint drive type to Velocity drive for the velocity controlled joints (that is, wheels), and Position for the position controlled joints (that is, steering joint).
Set the Joint Drive Strength to the desired level. This will be imported as the joint’s damping parameter. Joint stiffness are always set to zero in velocity drive mode.
Note
If you are importing a torque controlled mobile robot such as a quadruped:
Set the joint drive type to None drive for the torque controlled joints (that is, legs), and Position or Velocity for the position or velocity controlled joints.
Set the Joint Drive Strength to the desired level. For the torque controlled drives, stiffness and damping have no effect and will be imported as zero.
Open the Script Editor. Go to the top Menu Bar and click Window > Script Editor.
The window for the Script Editor is visible in the workspace.
Copy the following code into the Script Editor window.
"""Test the documented example workflow for importing and configuring URDF."""

import os

import isaacsim.core.experimental.utils.stage as stage_utils
import omni
from isaacsim.asset.importer.urdf import URDFImporter, URDFImporterConfig

# Get path to extension data:
ext_manager = omni.kit.app.get_app().get_extension_manager()
ext_id = ext_manager.get_enabled_extension_id("isaacsim.asset.importer.urdf")
extension_path = ext_manager.get_extension_path(ext_id)
# import URDF

importer = URDFImporter(
    URDFImporterConfig(
        urdf_path=os.path.normpath(os.path.join(extension_path, "data", "urdf", "robots", "ur10", "urdf", "ur10.urdf")),
        usd_path=os.path.normpath(os.path.join(extension_path, "data", "urdf", "robots", "ur10", "urdf", "ur10.usd")),
        merge_mesh=True,
        allow_self_collision=True,
    )
)
output_path = importer.import_urdf()

print(output_path)
result, stage = stage_utils.open_stage(output_path)
Do the exact same thing with Python standalone instead.
Open a terminal and navigate to the root of the Isaac Sim installation.
Run the following command:
./python.sh standalone_examples/api/isaacsim.asset.importer.urdf/urdf_import.py- Args:
--urdf: Path to a URDF file (.urdf) or a directory containing URDF files to import.--usd-path: Directory to write converted USD assets.--robot-type: Robot type for the Isaac robot schema. One of: Default, End Effector, Manipulator, Humanoid, Wheeled, Holonomic, Quadruped, Mobile Manipulators, Aerial (default: Default).--merge-mesh: Merge meshes after conversion.--merge-fixed-joints: Merge fixed joints where possible to optimize the model.--debug-mode: Enable debug mode and keep intermediate outputs.--collision-from-visuals: Generate collision geometry from visuals.--collision-type: Collision geometry type (e.g. “Convex Hull”, “Convex Decomposition”, “Bounding Sphere”, “Bounding Cube”).--allow-self-collision: Allow self-collision for the imported asset.--fix-base/--no-fix-base: Tri-state base-type toggle. Pass--fix-baseto anchor the robot to the world via a fixed joint. Pass--no-fix-baseto strip any existing world-to-root fixed joint so the robot is floating-base. Omit the flag entirely to leave the source asset’s base authoring untouched (default).--link-density: Default density (kg/m^3) for rigid body links with no explicit mass.--joint-drive-type: Joint drive type applied to all joints (forceoracceleration).--joint-target-type: Joint target type applied to all joints (none,position, orvelocity).--override-joint-stiffness: Joint stiffness in Nm/rad (revolute) or N/m (prismatic) applied to all joints.--override-joint-damping: Joint damping in Nm*s/rad (revolute) or N*s/m (prismatic) applied to all joints.--ros-package: ROS package mapping in formatname:path. Can be specified multiple times for multiple packages.--run-asset-transformer: Run asset transformer after conversion (default: True).--run-multi-physics-conversion: Run multi-physics conversion after conversion (default: True).--test: Use the built-incarter.urdftest asset and write output to a temp directory.
Example:
./python.sh standalone_examples/api/isaacsim.asset.importer.urdf/urdf_import.py --urdf /path/to/ur10.urdf --usd-path /path/to/output --merge-mesh
Importing a URDF through a ROS 2 node is a powerful way to integrate NVIDIA Isaac Sim with your existing ROS 2 workflow. This allows you to import a URDF from a ROS 2 node and use it in NVIDIA Isaac Sim, also indirectly enabling importing XACRO definitions without explicit conversion to URDF.
Note
This tutorial is only supported on Linux and for Isaac Sim (while it may be possible to run in other Omniverse Applications, it is not covered by this tutorial and the extension may not work as expected).
Prerequisites
ROS 2, installing ros may require root or sudo access.
A ROS 2 workspace with a robot description (for example Universal Robots ROS 2 Description ).
Follow the tutorials on how to set up a ROS 2 workspace and include a robot description like the one in this example, along with all its dependencies.
Steps
- Terminal 1
Source ROS 2
Launch a transform publisher for the robot description node (for example
ros2 launch ur_description view_ur.launch.py ur_type:=ur10e).
- Terminal 2
Source ROS 2
Pick the ROS 2 node name for the node just created with
ros2 node list. For example,robot_state_publisher.
- Terminal 3
Source ROS 2
Start Isaac Sim
Install and enable the extension
isaacsim.ros2.urdfOpen the URDF Importer using the File > Import from ROS 2 URDF Node menu
Put the node name in the text box
Click Find Node to find the node
Define an output directory. If not defined, the USD is written to a system temp directory and a warning is logged with the path.
Import
Extra steps to try:
- Terminal 1
Stop the publisher, change it to another robot and start service again (for example,
ros2 launch ur_description view_ur.launch.py ur_type:=ur3)
- Terminal 3
Click the Find Node button
Change the output directory
Import
The robot is now imported into the stage. You can now use it in your simulation. You can perform additional changes to the asset after it’s imported, such as adding sensors, changing materials, and updating the joint drives and configuration to achieve a more stable simulation. Robots are mapped as Articulations in the simulation, and for a complete guide in tuning articulations, refer to Articulation Stability Guide.
Summary#
This tutorial covered the following topics:
Importing URDF file using GUI
Importing URDF file using Python
Importing URDF file using a ROS Node
Using the imported URDF in a Task
Visualizing collision meshes
Setting up importing a robot with the UI through the built-in examples
Further Learning#
Checkout URDF Importer Extension to learn more about the different configuration settings to import a URDF in NVIDIA Isaac Sim.