Contact sensor#
Deprecated since version 6.0: The isaacsim.sensors.physics Contact Sensor extension is deprecated.
Use isaacsim.sensors.experimental.physics.ContactSensor instead.
See the API Documentation section below for links.
The contact sensor uses the PhysX Contact Report API to generate a sensor reading similar to contact cells or pressure-based sensors placed on the surface of an object. The Contact Sensor API builds on the Contact Report API by providing contact data filtered by the object it was placed in, along with an optional filter that only considers contacts in a specific region of the object. For example, imagine a quadruped robot with sensors in its feet. While the simulation treats the entire leg as a rigid body, you can only measure contact on the foot pads, so you can add a region filter that discards contacts outside that boundary. The Contact Sensor API also provides persistent contact data, even when the PhysX engine stops streaming contacts to preserve compute time. While the simulation provides full information about contacts, such as contact pairs, normals, and contact points, the Contact Sensor API matches real data obtained by single-cell contact pads. If you need full contact data, the Contact Sensor API gets you filtered contact information without changes to the data acquired in PhysX.
See the Isaac Sim Conventions documentation for a complete list of Isaac Sim conventions.
Contact sensor properties
radiusparameter specifies the distance of the contact force that it would detect. A value of-1uses the prim’s collision geometry.enabledparameter determines if the sensor is running or not.min thresholdparameter specifies the minimum amount of force to trigger a contact.max thresholdparameter specifies the maximum amount of force the sensor outputs.sensorPeriodparameter specifies the time in between sensor measurement. Deprecated sinceisaacsim.robot.schema6.2.0 — only used by the deprecatedisaacsim.sensors.physicsextension. The newisaacsim.sensors.experimental.physicsextension reads every physics step.
For the full USD attribute definitions, see the Contact Sensor schema reference.
GUI#
Creating and modifying the contact sensor#
To create and modify a contact sensor, start with a prim in the scene that you want to attach the sensor to.
To create a Physics Scene, go to the top Menu Bar and click Create > Physics > Physics Scene. Verify that there is now a
PhysicsScenePrim in the Stage panel on the right.To create a contact sensor, left click on the prim to attach the contact sensor on the stage, then go to the top Menu Bar and click Create > Sensors > Contact_sensor.
To change the position and orientation of the contact sensor, use Translate and Orientate tab.
To change other contact sensor properties, click Raw USD Properties and modify properties such as min/max force threshold, enable/disable sensor, and sensor period.
Contact sensor example#
To run the Contact Sensor Example:
Activate Robotics Examples tab from Windows > Examples > Robotics Examples.
Click Robotics Examples > Sensors > Contact Sensor.
Verify that you see a window containing the sensor’s force readings color coded by each ant’s arm.
Press the Open Source Code button to view the source code. The source code illustrates how to load an Ant body into the scene and then add sensors to it using the Python API.
Press the Play button to begin simulating.
Press
SHIFT + LEFT_CLICKto drag the ant around and see changes in the readings.
OmniGraph workflow#
The following tutorial shows how to use OmniGraph to interact with and visualize the contact sensor readings.
Scene setup#
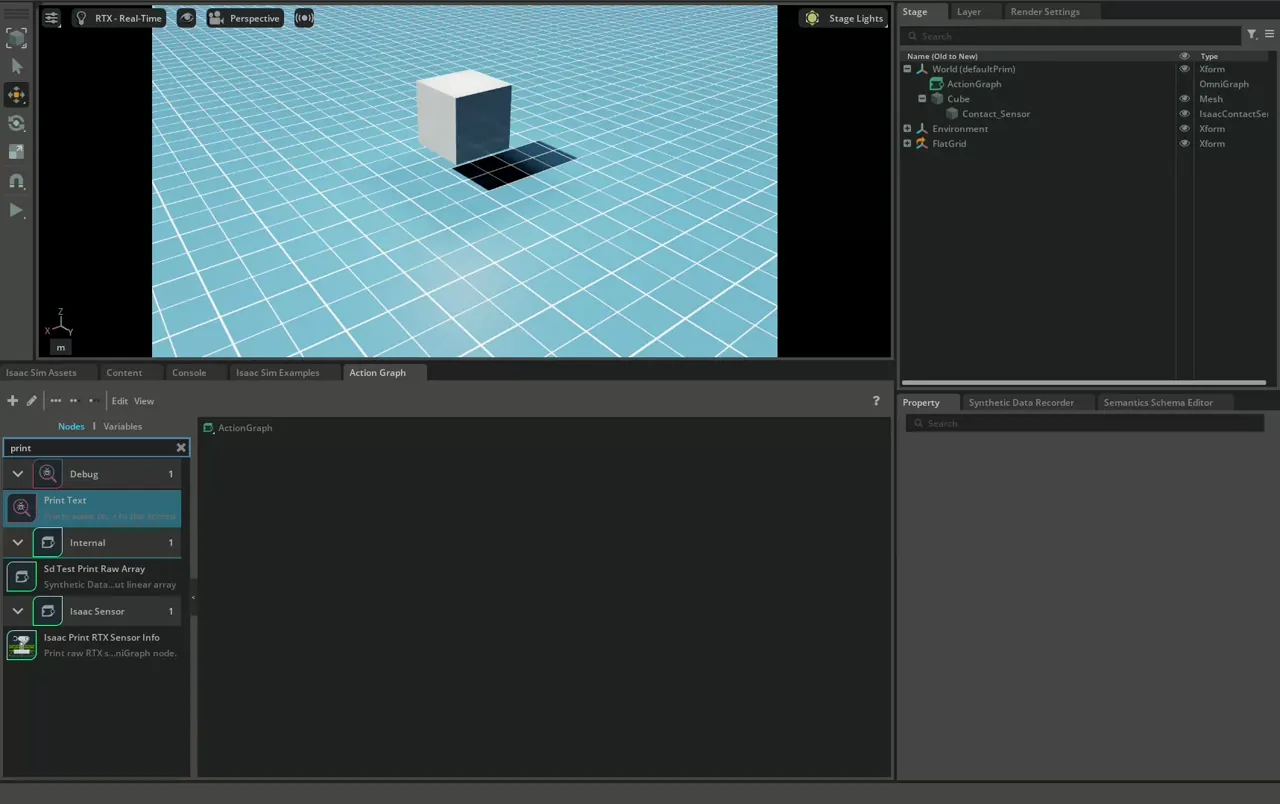
Add a cube to the stage by Create > Mesh > Cube, select the cube and drag it up. Then select the cube and right click Add > Physics > Rigid Body with Colliders Preset.
Add a physics scene by Create > Physics > PhysicsScene.
Add a ground plane by Create> Physics > GroundPlane.
Add a contact sensor by selecting the cube, and select on the top menu Create > Sensors > Contact Sensor.
OmniGraph setup#
To set up the OmniGraph to collect readings from this sensor:
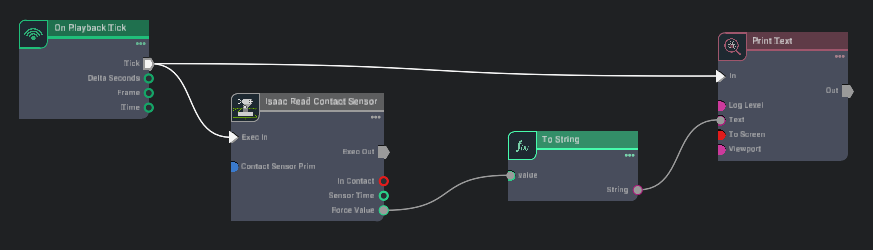
Create the new action graph by navigating to Window > Graph Editors > Action Graph, and selecting New Action Graph in the new tab that opens.
Add the following nodes to the graph:
On Playback Tick: Executes the graph every simulation timestep.
Isaac Read Contact Sensor: Reads the contact sensor. In the Property tab, set Contact Sensor Prim to /World/Cube/Contact_Sensor to point to the location of the contact sensor prim.
To String: Converts the contact sensor readings to string format.
Print Text: Prints the string readings to console. In the Property tab, set Log Level to Warning so that messages are visible in the terminal or console by default.
Connect the above nodes as follows to print out the contact sensor reading:
Press the Play button on the GUI. If set up correctly, verify that the Isaac Sim internal Console reads out the contact sensor’s force output.
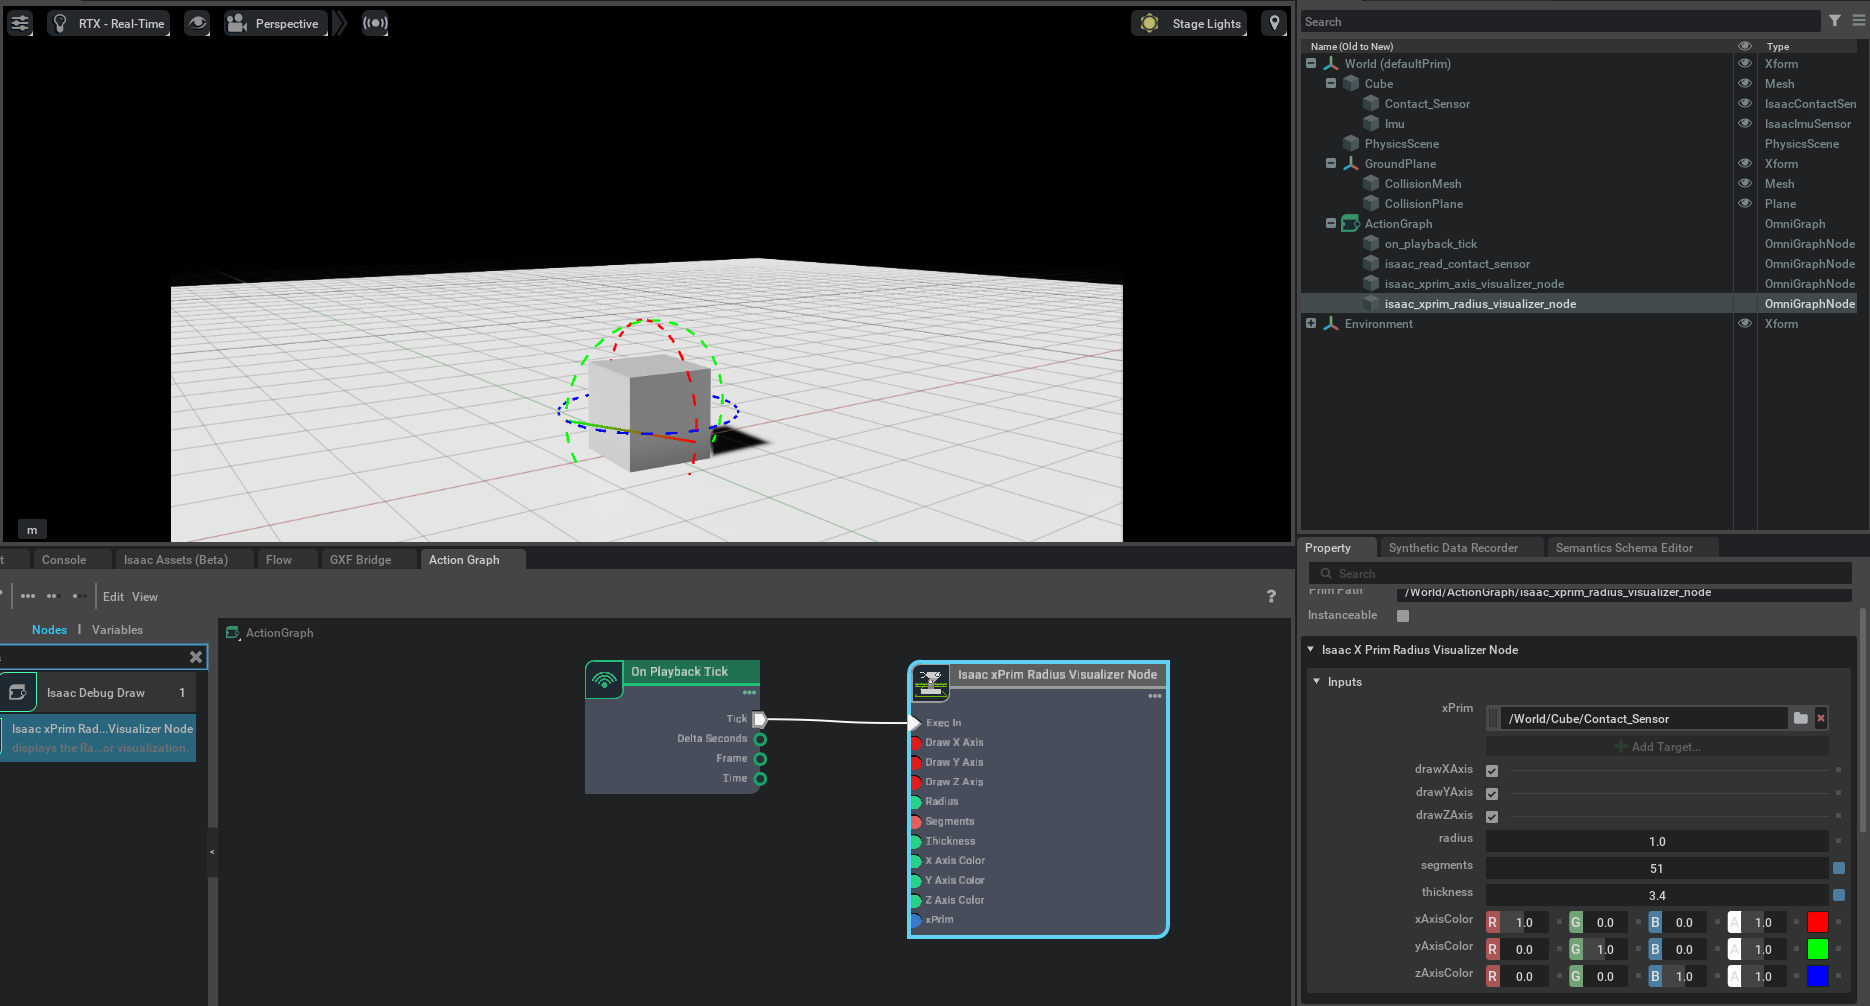
Contact sensor visualization
You can visualize the contact sensor position and radius using the Isaac xPrim Radius Visualizer Node. Connect the xPrim input to the contact sensor prim and connect Tick to Exec in. Then set the radius, color, and line thickness. The contact sensor appears when you press Play.
Note
The spherical region only determines the boundary for contacts that are counted. All contacts still only happen at the surface of the object bounded by the spherical region.
Standalone Python#
Creating and modifying the contact sensor#
For the example snippets below, prepare the scene using the following snippet by adding a PhysicsScene, GroundPlane, and a Cube prim with collision and rigid body physics.
Attach the contact sensor to the latter.
from isaacsim import SimulationApp

simulation_app = SimulationApp({"headless": False})

import numpy as np
import omni.usd
from isaacsim.core.experimental.objects import Cube, GroundPlane
from isaacsim.core.experimental.prims import GeomPrim, RigidPrim
from pxr import UsdPhysics

# Create physics scene
stage = omni.usd.get_context().get_stage()
UsdPhysics.Scene.Define(stage, "/World/PhysicsScene")

# Add ground plane and a dynamic cube with collision and rigid body
GroundPlane("/World/groundPlane", sizes=10, colors=np.array([0.5, 0.5, 0.5]))
Cube(
    "/World/Cube",
    positions=np.array([-0.5, -0.2, 1.0]),
    scales=np.array([0.5, 0.5, 0.5]),
    colors=np.array([0.2, 0.3, 0.0]),
)
RigidPrim("/World/Cube")
GeomPrim("/World/Cube", apply_collision_apis=True)
Using the Python API#
Contact sensors are created with Python by calling Contact.create() (the authoring class) and wrapping the returned authoring object with ContactSensor for runtime data access. Available parameters and their defaults are listed below; the path must include the parent prim path.
import numpy as np
from isaacsim.sensors.experimental.physics import Contact, ContactSensor

sensor = ContactSensor(
    Contact.create(
        "/World/Cube/Contact_Sensor",
        min_threshold=0.0001,
        max_threshold=100000,
        translations=np.array([[0.0, 0.0, 0.0]]),
    )
)
Using the Python wrapper#
The contact sensor can also be created by constructing a Contact authoring object directly and wrapping it with ContactSensor for runtime data access. The Contact constructor wraps an existing sensor prim or creates a new one with default attributes; the ContactSensor runtime exposes get_sensor_reading(), get_data(), and get_raw_data() for reading sensor output. Property setters (set_min_threshold / set_max_threshold / set_radius / corresponding getters) live on the Contact authoring object, accessible as sensor.contact after construction.
import numpy as np
from isaacsim.sensors.experimental.physics import Contact, ContactSensor

sensor = ContactSensor(
    Contact(
        "/World/Cube/Contact_Sensor",
        translations=np.array([[0.0, 0.0, 0.0]]),
    )
)
Note
translations (local-frame) and positions (world-frame) cannot both be defined — they are mutually exclusive.
Creating a contact sensor requires an enabled rigid-body ancestor, and the body depends on a Contact Report API. Contact-producing geometry still needs collision APIs. Contact.create() applies the Contact Report API on the rigid-body ancestor when it creates the sensor prim; when wrapping an existing sensor prim with Contact(path) the API is not applied by Python, but the C++ runtime ensures contact reporting is enabled when the sensor goes live on Play. You can also manually add a Contact Report API to a prim through:
stage = omni.usd.get_context().get_stage()
parent_prim = stage.GetPrimAtPath("/World/Cube")
contact_report = PhysxSchema.PhysxContactReportAPI.Apply(parent_prim)
# Set a minimum threshold for the contact report to zero
contact_report.CreateThresholdAttr(0.0)
To modify sensor parameters at runtime, use the authoring object exposed via sensor.contact: sensor.contact.set_min_threshold(value), sensor.contact.set_max_threshold(value), sensor.contact.set_radius(value). The previous shorthand methods on ContactSensor itself were removed in 3.0.0 — call them on sensor.contact.
Reading sensor output#
The contact sensors are created dynamically on Play. Moving the sensor prim while the simulation is running invalidates the sensor. If you need to make hierarchical changes to the contact sensor like changing its rigid body parent, stop the simulator, make the changes, and then restart the simulation.
There are three methods for reading the sensor output:
ContactSensor.get_sensor_reading()— returns the cachedContactSensorReadingContactSensor.get_data()— returns a structured dictionaryOmniGraph node
Isaac Read Contact Sensor
The following snippets assume you have created a /World/Cube prim and contact sensor prim using one of the two snippets above.
ContactSensor.get_sensor_reading()
Returns a ContactSensorReading with is_valid, time, value (force magnitude), and in_contact.
Sample usage to get the reading from the current frame:
from isaacsim.sensors.experimental.physics import ContactSensor

sensor = ContactSensor("/World/Cube/Contact_Sensor")
sensor.get_sensor_reading()
ContactSensor.get_data()
The get_data() member function on the ContactSensor runtime class returns a structured dictionary with time, physics_step, in_contact, force, and number_of_contacts. Internally it calls get_sensor_reading() for the contact state and get_raw_data() to compute number_of_contacts. When add_raw_contact_data_to_frame() has been called, the dictionary additionally contains a contacts list whose entries provide body0, body1, position, normal, and impulse per contact point.
Sample usage:
import numpy as np
from isaacsim.sensors.experimental.physics import Contact, ContactSensor

sensor = ContactSensor(
    Contact(
        "/World/Cube/Contact_Sensor",
        translations=np.array([[0.0, 0.0, 0.0]]),
    )
)

value = sensor.get_data()
print(value)
ContactSensor.get_raw_data()
Returns a list of raw contact records (one per contact event in the current physics step). Each record contains time, dt, body0, body1, position, normal, and impulse. Raw data disregards the sensor’s min_threshold/max_threshold filtering: contacts that fall below the threshold are still reported here, even though they would be discarded by the filtered ContactSensorReading. To pass through to a frame call instead, enable the contacts list with ContactSensor.add_raw_contact_data_to_frame().
from isaacsim.sensors.experimental.physics import ContactSensor

sensor = ContactSensor("/World/Cube/Contact_Sensor")
raw_data = sensor.get_raw_data()
print(str(raw_data))
API documentation#
Deprecated since version 6.0: The isaacsim.sensors.physics extension is deprecated. Use isaacsim.sensors.experimental.physics.ContactSensor instead.
See the isaacsim.sensors.experimental.physics API Documentation for the current API and isaacsim.sensors.physics API Documentation (deprecated) for the deprecated API.