Surface Gripper Extension#
About#
The Surface Gripper Extension is used to create a suction cup-style gripper for an end-effector. It works by parsing the Surface Gripper properties on the USD Surface Gripper Schema, and managing a set of D6 joints between the parent and child rigid bodies at points of contact.
The physical properties of the gripper are defined within the D6 joint, such as joint limits across the different degrees of freedom, and the stiffness and damping of the joint. The Surface Gripper object then handles the activation of the constraints, and defines which objects are grasped based on the grip threshold.
This extension is enabled by default. If it is ever disabled, it can be re-enabled from the Extension Manager by searching for isaacsim.robot.surface_gripper and isaacsim.robot.surface_gripper.ui.
To create a surface gripper through the GUI, go to the menu Create > Robots > Surface Gripper. This will create a surface gripper prim in the stage.
API Documentation#
See the API Documentation for usage information.
Setting up a Surface Gripper#
The Surface Gripper has the following properties:
Property |
Description |
|---|---|
Attachment Points |
The list of joints that will be used to attach the gripper to the object
|
Status |
(Read-Only) The current state of the gripper
|
Gripped Objects |
(Read-Only) The list of objects that are currently grasped by the gripper
|
Max Grip Distance |
Distance from the gripper point within which closing contact is accepted
|
Retry Interval |
How long the gripper will keep attempting to close on an object
|
Shear Force Limit |
The maximum lateral force that the gripper can apply to an object before it will break the constraint
|
Coaxial Force Limit |
The maximum axial force that the gripper can apply to an object before it will break the constraint
|
Attachment Joints#
The joints that are used to attach the gripper to the object are defined by the Attachment Points property within the Surface Gripper Schema. This is a list of paths to the D6 joints that will be used to attach the gripper to the object. These joints must be defined in the USD file at the gripper points of contact, and must be of type D6. Any physical properties for the joint are defined in the D6 Joint Schema, but there are a few properties that are required to be set for the joint:
Joint must be enabled.
For all joints, Body 0 must be the same.
Joint must have “Exclude from Articulation” set to True. If this is not set, the surface gripper manager will set it to True at runtime.
Attachment Point API#
The joints that are defined by the Attachment Points property are automatically assigned the Attachment API. This API is responsible for providing additional attributes to the joint, which are necessary for the Surface Gripper Manager to handle the gripper. In the Attachment Point API, the following attributes are available:
Clearance Offset: This registers the distance from the joint to the parent object’s surface. Since the surface gripper works by sending a raycast from the joint world position, this offset will be added to the raycast origin to avoid false positive hits with the parent object. If this offset is not defined, the raycast will start at the joint’s world position, and the gripper will automatically calculate and save the offset the first time it clears the parent object collider.Forward Axis: This registers which joint axis will be used to attempt to close the gripper. The default value isX.
These additional attributes can be found within the Raw USD Properties section of the Property tab.
Adding Attachment Joint API#
To add an attachment joint API, select the joint in the stage. In the right panel under the Properties tab, click the + Add button and navigate to Isaac > Robot Schema > Attachment Point API.
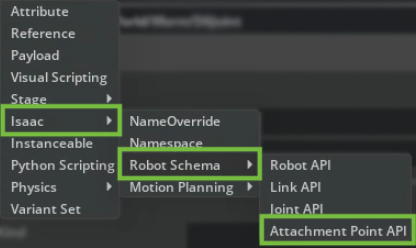
+ Add > Isaac > Robot Schema > Attachment Point API in the Property tab.#
Note
The Attachment Point API is automatically applied to the joint when the Surface Gripper is created. It does not need to be added manually.
Omniverse OmniGraph Node#
The Surface Gripper extension provides an implementation through Omniverse OmniGraph. To use it, add a surface gripper node to the desired graph, and select the surface gripper prim it will control.
The following inputs are available:
Close: Closes the gripper. If the gripper is already closed, this will do nothing.
Open: Opens the gripper. If the gripper is already open, this will do nothing.
Toggle: Toggles the gripper between open and closed states.
Enabled: Enables or disables the gripper.
Surface Gripper: The surface gripper prim to control.
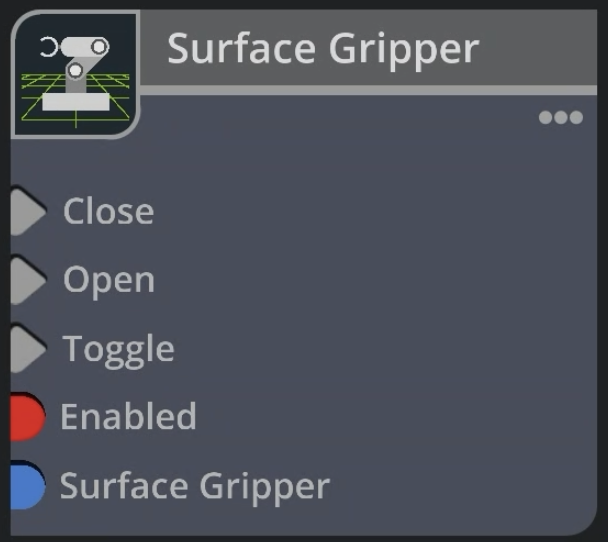
Surface Gripper node in the graph editor.#
Creating a Surface Gripper fully in code#
This section describes how to implement a surface gripper completely from code. These are snippets from the Surface Gripper Example code, and are not complete.
Defining the Surface Gripper Properties#
import usd.schema.isaac.robot_schema as robot_schema
from isaacsim.robot.surface_gripper import _surface_gripper as surface_gripper

gripper_prim_path = "/World/SurfaceGripper"
gripper_interface = surface_gripper.acquire_surface_gripper_interface()

# Create the Surface Gripper Prim
# Once it is created it can be saved and this doesn't need to be redone
robot_schema.CreateSurfaceGripper(stage, gripper_prim_path)
gripper_prim = stage.GetPrimAtPath(gripper_prim_path)
attachment_points_rel = gripper_prim.GetRelationship(robot_schema.Relations.ATTACHMENT_POINTS.name)

# Select the joints to the gripper
# The joints should be D6 joints defined in the usd file.
# All joint attributes can be defined as desired, except for:
# Joint Should be enabled
# Joint Type should be D6
# All Joint Parents should be the same Rigid body
# Exclude from Articulation must be checked
# No Break force/Torque should be set
# Joint drives can be used to derive the desired joint bounce/stretch behavior
# Enable/Disable the joint DoFs and limits as desired.

gripper_joints = [p.GetPath() for p in stage.GetPrimAtPath("/World/Surface_Gripper_Joints").GetChildren()]
attachment_points_rel.SetTargets(gripper_joints)

# Define the distance the joint can grasp, and at what distance from the origin of the joints it will settle
gripper_prim.GetAttribute(robot_schema.Attributes.MAX_GRIP_DISTANCE.name).Set(0.011)
# Define the Override Break limits
gripper_prim.GetAttribute(robot_schema.Attributes.COAXIAL_FORCE_LIMIT.name).Set(0.005)
gripper_prim.GetAttribute(robot_schema.Attributes.SHEAR_FORCE_LIMIT.name).Set(5)

# How long the gripper will try to close if it is open
gripper_prim.GetAttribute(robot_schema.Attributes.RETRY_INTERVAL.name).Set(1.0)
Get Gripper State#
The Surface Gripper is updated on every simulation step, and the state can be retrieved at any time through the interface:
status = gripper_interface.get_gripper_status(gripper_prim_path)
print(status)  # Open, Closed, or Closing
Controlling the Gripper#
The Gripper State is controlled through the open and close methods of the interface. Alternatively, there’s also the set_gripper_action method, which receives a numeric value between -1 and 1, where < -0.3 will open the gripper, > 0.3 will close it, and anything in between will be ignored.
gripper_interface.close_gripper(gripper_prim_path)

gripper_interface.open_gripper(gripper_prim_path)

gripper_interface.set_gripper_action(gripper_prim_path, 0.5)  # Closes the gripper
gripper_interface.set_gripper_action(gripper_prim_path, -0.5)  # Opens the gripper
Keeping USD Scene in Sync#
In order to optimize the Surface Gripper Update performance, the USD Scene update is disabled by default. When the USD writeback is disabled, the Properties panel for the Surface Gripper prim will not be updated automatically. The surface gripper status can still be retrieved through the get_gripper_status method of the surface gripper interface, and objects currently grasped by the gripper can be retrieved through the get_gripped_objects method of the surface gripper interface.
The USD writeback can be enabled by setting the set_write_to_usd property to True on the Surface Gripper interface. This is a global setting for all surface gripper instances.
Tutorials & Examples#
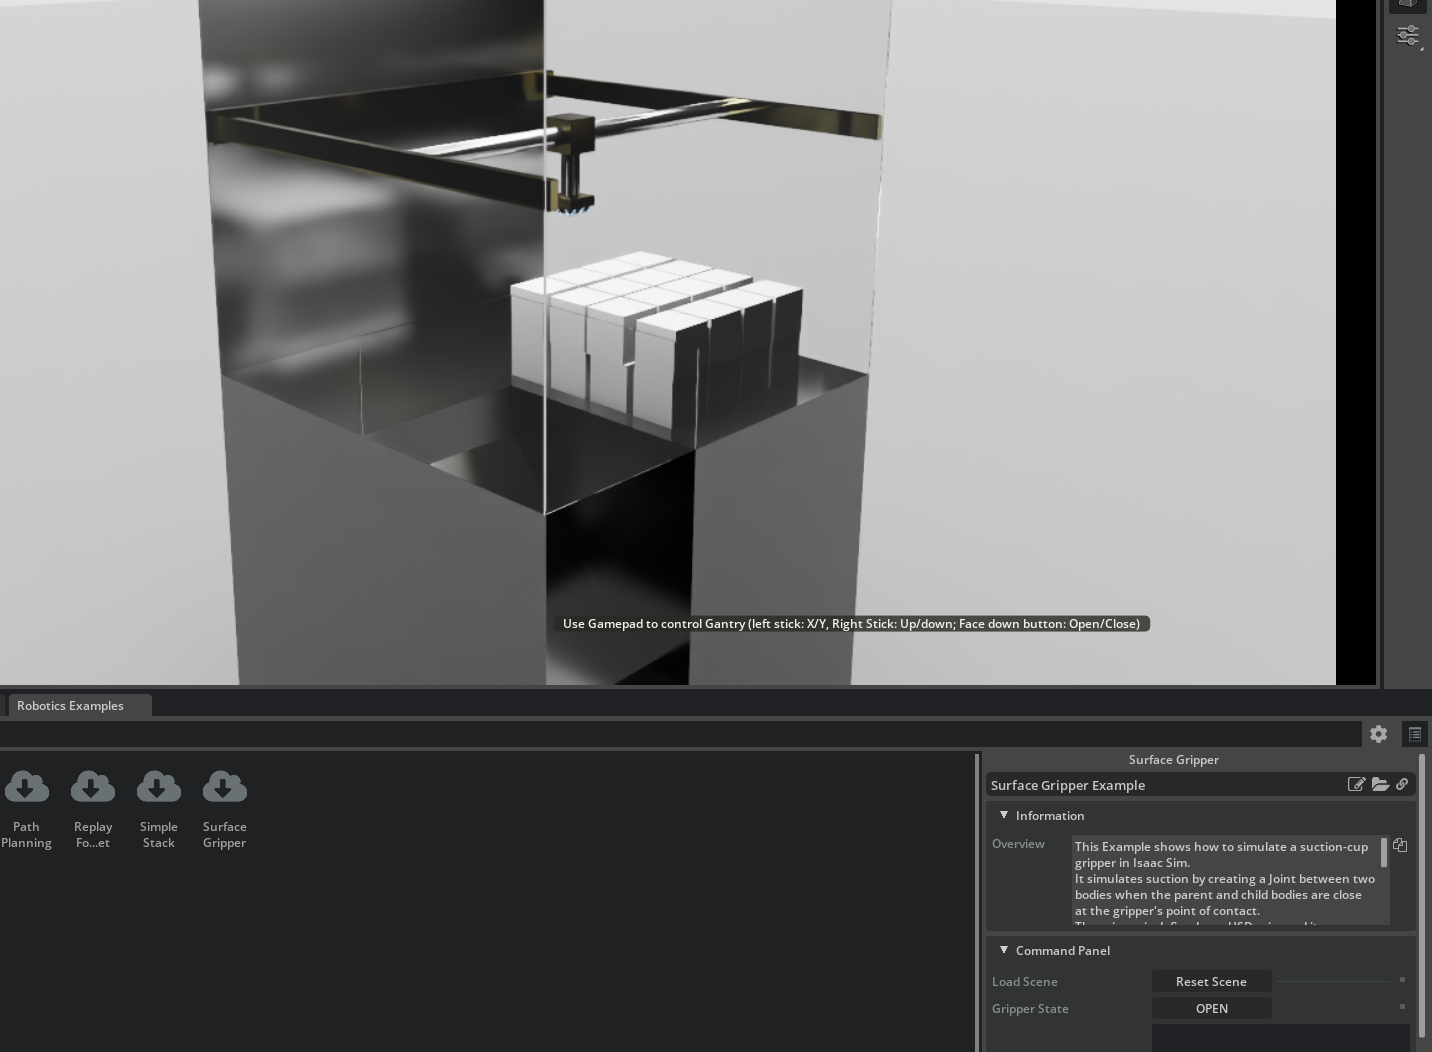
Activate the Robotics Examples content browser from Windows > Examples > Robotics Examples. Navigate to Manipulation, select the Surface Gripper Example, and click the load button in the information window on the right side of the Robotics Examples content browser. You may need to adjust the GUI to see the load button.
Surface Gripper Example (gantry)#
This example shows a surface gripper mounted to a gantry, and contains cubes that can be grasped by the gripper. This surface gripper is added by code, and also connected through the surface gripper Omniverse OmniGraph node.
To run the example:
Press the Load button. The scene should begin playing.
You can move the gantry with the gamepad axes, or by manually editing the gantry joint target positions.
Move the gantry near some cube or set of cubes, and click on the “Open/Close” button - the button label reflects the current gripper state. The gripper can also be closed by the down face button on the gamepad (e.g. X on PlayStation controllers, or A on Xbox controllers).
The gripper will attempt to close on the cubes, and if successful, the cubes will be grasped by the gripper.
Lift the gantry. The cubes remain grasped by the gripper unless forces are excessive, in which case the gripper constraint may break.
Walkthrough#
This walkthrough demonstrates how to attach a simple suction-style end effector to a UR10 robot arm, and how to use the Surface Gripper extension to control the gripper. The pick-and-stack sequence is driven by differential inverse kinematics.
Learning Objectives#
In this example, you:
Attach a suction-style end effector built from simple primitives to a UR10.
Configure a D6 joint with IsaacAttachmentPointAPI, limits, and drives for the Surface Gripper.
Add a Surface Gripper prim whose Attachment Points reference that joint.
Run a pick-and-stack sequence using the Surface Gripper.
Getting Started#
Prerequisite
Comfortable with the stage tree and Property tab in Isaac Sim, or completion of Tutorial 2: Assemble a Simple Robot.
Create the Surface Gripper Geometry#
Go to File > New to start an empty stage.
In the Content Browser, open Isaac Sim > Robots > Universal Robots > ur10, then drag
ur10.usdinto the viewport. Zero out the translation and rotation of the UR10 so it is centered in the stage.In the Stage tree, expand
/World/ur10and find the Xformee_link. You will attach the gripper visuals and the Surface Gripper to this link so they move with the wrist.
Add cylinder geometry under ee_link
Use three Cylinder prims (Create > Shape > Cylinder). For each cylinder, parent it under ee_link, rename them and set Translate, Orient (degrees), and Scale in the Property tab according to the table below.
Prim name |
Translate |
Orient (degrees) |
Scale (X, Y, Z) |
|---|---|---|---|
|
|
|
|
|
|
|
|
|
|
|
|
You can add material properties to the cylinders to make them look more realistic.
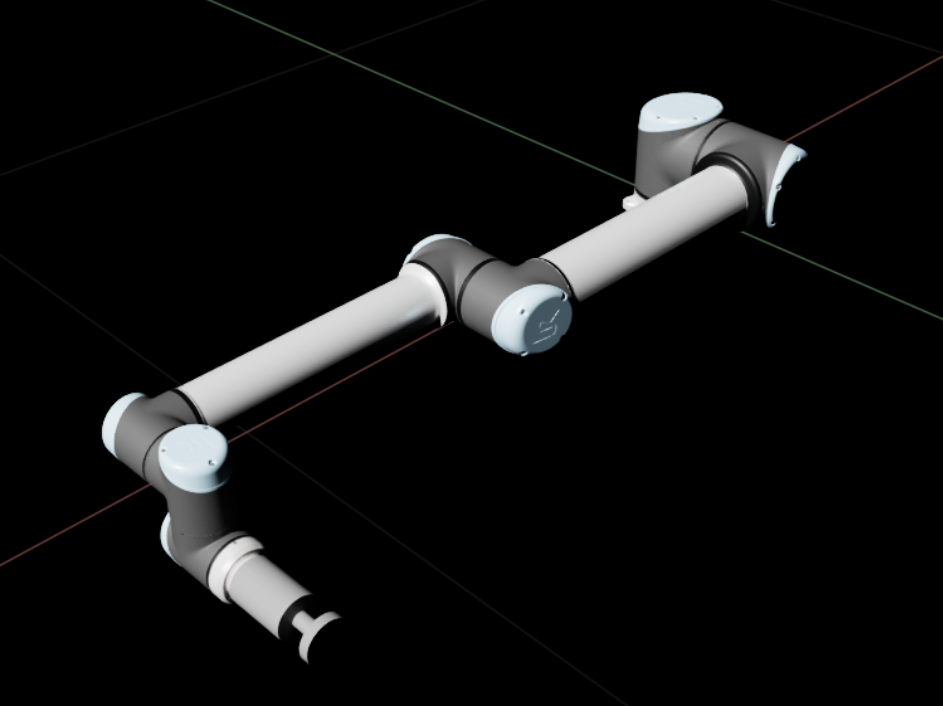
UR10 with base, tube, and suction_cup parented under ee_link.#
Create the D6 Joint and AttachmentPointAPI#
Under ee_link create a new Xform named surface_gripper. Then add a D6 joint prim to it named suction_joint by clicking Create > Physics > Joints > D6. Configure the joint properties as shown below. Note that Exclude from Articulation should be checked.


Configure the D6 joint
The D6 joint exposes six degrees of freedom that can be configured independently. To simulate suction-cup compliance, you can set linear limits along the suction direction so the cup can sag or compress under load, and rotational limits so the grasped object can bend or twist at the contact point. Higher stiffness produces a stiffer grasp and adding damping prevents oscillation. Together these let you model elastic deformation without true soft-body physics.
In this example, we add small limits of about -5 to 5 degrees for each rotation axis and 0.01 meters for the Z axis limit to allow for some compliance along the gripper’s normal axis. Additionally, add a Z Axis Translation Drive by clicking + Add > Physics > Z Axis Translation Drive. Set the Stiffness to 1000 and the Damping to 100. These values can be tuned for your specific application.
AttachmentPointAPI on suction_joint
Note
The AttachmentPointAPI is automatically applied to the joint when a Surface Gripper prim is created (see next section). Below is the explicit method. See Adding Attachment Joint API for additional details.
Select
suction_joint. In the Property tab, click + Add > Isaac > Robot Schema > Attachment Point API to apply it.Confirm the new attributes in the Property tab under Attachment Point.
Set Forward Axis in the Attachment Point section to
Zto align the suction direction with the gripper.
Add the Surface Gripper Prim#
The Surface Gripper prim is used to control the suction action of the gripper. You can create it in the UI or via Python. An OmniGraph node can be used to control the gripper from a graph.
Right-click
ee_linkin the Stage Tree, choose Create > Isaac > Robots > Surface Gripper.If the new prim is not under
ee_link, drag it so it is parented underee_link.Select the Surface Gripper prim. Set Max Grip Distance to
0.01.Set Attachment Points to the stage path of the D6 joint you created earlier (
suction_joint).
You can leave Retry Interval, Shear Force Limit, and Coaxial Force Limit at their defaults until something needs tuning. If the grasp releases too easily or never holds, adjust those fields (see the property table under Setting up a Surface Gripper).
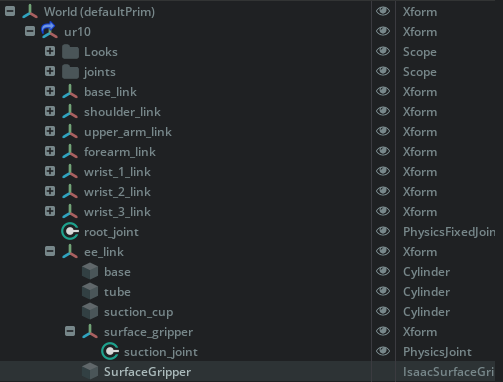
Stage hierarchy under ee_link: gripper cylinders, surface_gripper / suction_joint, and the Surface Gripper prim.#
After the previous sections are complete, run the following from the Script Editor. It mirrors the GUI tab: it will create the prim under ee_link, set Attachment Points to suction_joint, and set Max Grip Distance to 0.01.
# Create and configure a Surface Gripper prim under ee_link (same outcome as the GUI tab).
# Run with the Isaac Sim stage loaded; paths must match your robot and suction_joint from the walkthrough.

import omni.usd
import usd.schema.isaac.robot_schema as robot_schema
from isaacsim.robot.surface_gripper import create_surface_gripper
from pxr import Sdf

stage = omni.usd.get_context().get_stage()

# Parent Xform for the tool (same as in the walkthrough when the robot lives under /World/ur10).
ee_link_path = "/World/ur10/ee_link"
# D6 joint configured earlier under surface_gripper (see walkthrough).
suction_joint_path = f"{ee_link_path}/surface_gripper/suction_joint"

# Create a SurfaceGripper prim under ee_link using the convenience function.
gripper_prim = create_surface_gripper(stage, ee_link_path)

# **Attachment Points** → suction_joint
attachment_points_rel = gripper_prim.GetRelationship(robot_schema.Relations.ATTACHMENT_POINTS.name)
attachment_points_rel.SetTargets([Sdf.Path(suction_joint_path)])

# **Max Grip Distance** = 0.01 (defaults for retry / force limits match the GUI until you tune them)
gripper_prim.GetAttribute(robot_schema.Attributes.MAX_GRIP_DISTANCE.name).Set(0.01)
create_surface_gripper is the same function the UI uses when you pick Create > Isaac > Robots > Surface Gripper; it picks a free prim name such as SurfaceGripper or SurfaceGripper_01. For lower-level control, call robot_schema.CreateSurfaceGripper directly — see Creating a Surface Gripper fully in code.
Ensure you’ve either completed the GUI or Code tab first. A Surface Gripper can’t be created in an OmniGraph, but it can be controlled by logic within a graph. As shown below, the Surface Gripper node can be used to toggle the gripper between open and closed states and entirely enable/disable the gripper.
Open Window > Graph Editors > Action Graph and choose New Action Graph.
In the graph search field, find Surface Gripper and add it to the graph.
Select the Surface Gripper node. In the property panel, set the SurfaceGripper target to the prim path you created earlier; for example
/World/ur10/ee_link/SurfaceGripper.To drive Toggle from the keyboard, add a On Keyboard Input node. As seen in the Property tab, A is the default key that can now be used to toggle the gripper when physics simulation is playing. Try this when running the stacking example below.
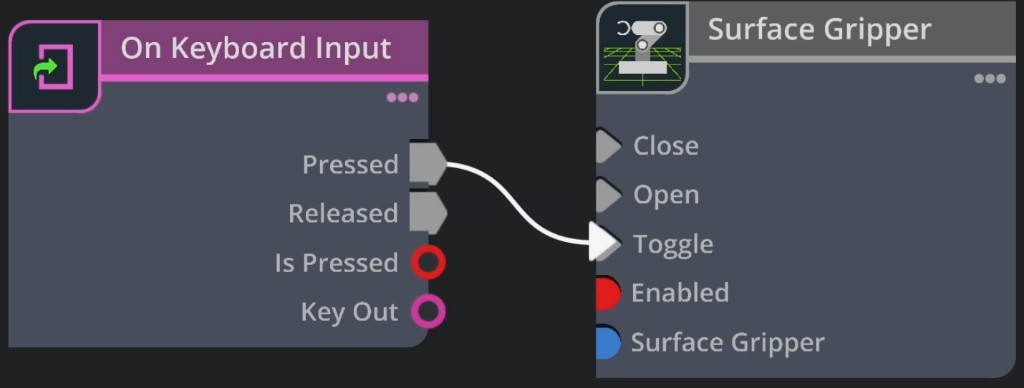
Surface Gripper node. See also Omniverse OmniGraph Node.#
Save the customized robot#
The stacking demo references your USD at /World/robot, so the robot must be the USD’s Default Prim
and must live at the root of the file — not nested under a /World scope.
In the Stage tree, drag
/World/ur10to the root so it becomes/ur10.Right-click
/ur10and choose Set as Default Prim.Delete the now-empty
/Worldand/EnvironmentXforms.Save the stage as a USD file.
Run the Demo#
Run with the packaged UR10
Isaac Sim is packaged with a UR10 USD file that includes a Surface Gripper prim and the necessary joints to control the gripper. Here we demonstrate a working pick-and-stack sequence with the packaged UR10. The example picks up two cubes and stacks them using the Surface Gripper.
From the Isaac Sim install folder (where python.sh lives), run:
./python.sh standalone_examples/api/isaacsim.robot.experimental.manipulators/universal_robots/stacking.py
This uses the stock UR10 USD so you can confirm the script and pick-and-stack sequence before you substitute your file.
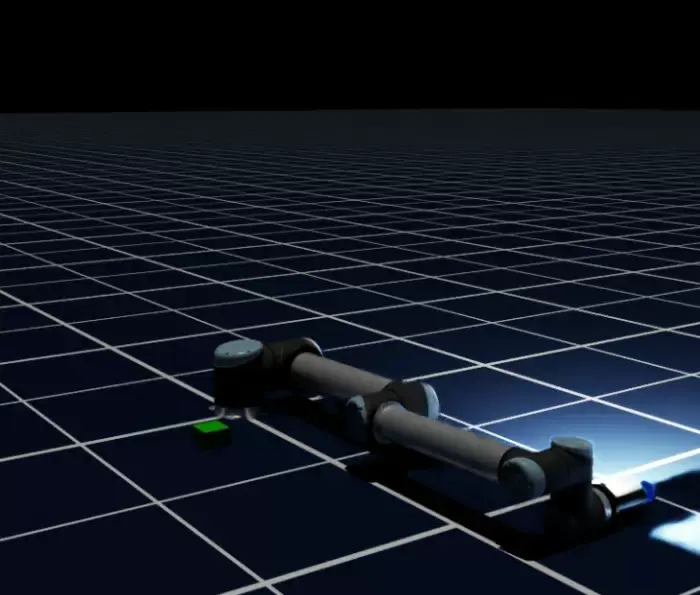
Pick-and-stack with the original packaged UR10.#
Run with your saved USD
Pass the USD file you saved earlier to the --usd-path argument:
./python.sh standalone_examples/api/isaacsim.robot.experimental.manipulators/universal_robots/stacking.py --usd-path /path/to/your/ur10_custom.usd
Use the real path to your USD. The sample expects the Surface Gripper and joint layout from this walkthrough; if your prim paths or articulation root differ from the defaults, update the script to match.
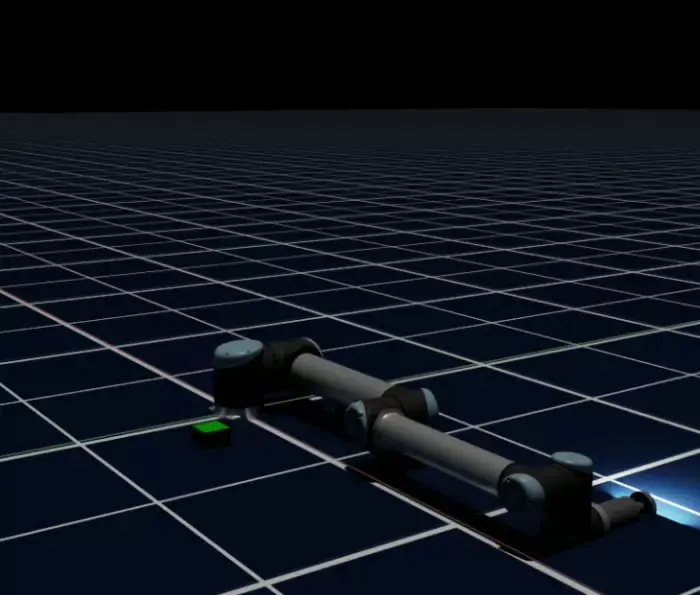
The same demo using the custom cylinder gripper and Surface Gripper setup.#