RTX Lidar Sensor#
RTX Lidar sensors are simulated at render time on the GPU with RTX hardware.
Their results are then copied to the GenericModelOutput AOV for use.
Warning
Multi-GPU setups and RTX Lidar
On systems with multiple GPUs (MGPU), some RTX Lidar assets can sometimes cause a fatal application crash accompanied by CUDA error 700 messages in the log.
If you encounter this issue, switch to single-GPU rendering by launching Isaac Sim with:
./isaac-sim.sh --/renderer/multiGpu/enabled=false
In standalone Python, pass multi_gpu=False to the SimulationApp constructor.
Overview#
RTX Lidars are rendered using OmniLidar prims, with the OmniSensorGenericLidarCoreAPI schema applied,
as configured by attributes on the prim. After attaching a render product to the OmniLidar prim, and setting
the GenericModelOutput AOV on the render product, the RTXSensor renderer will write Lidar render results to the AOV.
The OmniSensorGenericLidarCoreAPI schema is defined in the omni.usd.schema.omni_sensors extension, documented here.
How to Create an RTX Lidar#
The isaacsim.sensors.experimental.rtx extension provides Python APIs for creating RTX Lidars. In addition, the omni.replicator.core
extension provides even lower-level APIs for creating OmniLidar prims (including batch creation) and attaching render
products to them.
Create an RTX Lidar Using the Lidar Class#
The Lidar class provides a high-level Python interface for creating and wrapping OmniLidar prims.
Use Lidar.create() to create a new sensor from a known configuration name or USD file, or Lidar(path)
to wrap an existing OmniLidar prim on the stage.
Run this snippet in the Script Editor (Window > Script Editor).
import numpy as np
from isaacsim.sensors.experimental.rtx import Lidar

# Create an RTX Lidar from a known sensor configuration.
lidar = Lidar.create(
    path="/World/lidar",
    config="Example_Rotary",
    translations=np.array([0.0, 0.0, 1.0]),
    orientations=np.array([1.0, 0.0, 0.0, 0.0]),
    attributes={"omni:sensor:Core:scanRateBaseHz": 20},
)

The snippet above creates a reference to Example_Rotary.usda as an OmniLidar prim in the stage at the
specified translations with the specified orientations, at path /World/lidar. The Example_Rotary
config does not support variant sets, so variant is unused. The prim’s omni:sensor:Core:scanRateBaseHz
attribute is set from 10 Hz (default) to 20 Hz via the attributes dictionary.
Review the OmniSensorGenericLidarCoreAPI
schema and OmniSensorGenericLidarCoreEmitterStateAPI
schema in the omni.usd.schema.omni_sensors extension to learn what attributes can be set on the OmniLidar prim.
Note
Lidar.create() accepts either config (a registered configuration name from
isaacsim.sensors.experimental.rtx.SUPPORTED_LIDAR_CONFIGS) or usd_path (a direct path
to an OmniLidar USD asset) — the two are mutually exclusive. Both Lidar.create() and
Lidar(...) accept schemas (a list of additional USD schemas to apply) and attributes
(a dict of prim attributes to author). Transforms are passed as plural arrays
(positions=[[...]] / translations=[[...]] / orientations=[[...]] / scales=[[...]]);
only N=1 is supported per sensor.
Tick Rate#
The tick_rate parameter (Hz) controls how frequently the sensor renders. A value of 0
(the default) enables autotrigger mode, where the sensor renders every simulation frame. Setting a
nonzero value causes the sensor to render at the specified frequency independently of the simulation
step rate. This maps to the omni:sensor:tickRate prim attribute.
Run this snippet in the Script Editor (Window > Script Editor).
from isaacsim.sensors.experimental.rtx import Lidar

# Render at 10 Hz regardless of simulation frame rate.
lidar = Lidar.create("/World/Lidar", config="Example_Rotary", tick_rate=10.0)
Warning
For OmniLidar prims, tick_rate (i.e. omni:sensor:tickRate) must equal
omni:sensor:Core:scanRateBaseHz for scan accumulation and multi-tick rendering to behave
correctly. Mismatched values cause the lidar to emit partial scans every frame instead of
accumulating to a full scan, which silently breaks LaserScan publishing and any pipeline that
expects a full scan per tick. See
OmniLidar Tick Rate Must Equal scanRateBaseHz for details.
Note
tick_rate is the recommended replacement for the deprecated frameSkipCount parameter
on ROS2 helper nodes. For the full migration story, see
Multi-Tick Rendering.
Auxiliary Output Level#
RTX Lidar exposes auxiliary data through the aux_output_level constructor parameter.
Valid values are "NONE" (default), "BASIC", "EXTRA", "FULL".
Run this snippet in the Script Editor (Window > Script Editor).
from isaacsim.sensors.experimental.rtx import Lidar

lidar = Lidar.create("/World/Lidar", config="Example_Rotary", aux_output_level="BASIC")
See Auxiliary Output Level and the GenericModelOutput RenderVar for the full attribute-flow explanation and the
migration from the removed omni:sensor:Core:auxOutputType attribute, and
Known issue: last-attach-wins propagation of GMO channels for a known issue when multiple RTX sensors
with different auxiliary levels share a stage. See RTX Sensor Annotators for
the per-level field listing.
Scan Accumulation#
The accumulate_outputs parameter (default True) controls the
omni:sensor:Core:accumulateOutputs prim attribute. When True, the lidar accumulates data
over multiple frames until a full scan is complete. For rotary lidars, a full scan corresponds to a
360-degree rotation; for solid-state lidars, a full scan covers the full azimuth sweep.
Run this snippet in the Script Editor (Window > Script Editor).
from isaacsim.sensors.experimental.rtx import Lidar

# Disable accumulation to get per-frame partial scans.
lidar = Lidar.create("/World/Lidar", config="Example_Rotary", accumulate_outputs=False)
Warning
Scan accumulation only behaves correctly when omni:sensor:tickRate equals
omni:sensor:Core:scanRateBaseHz on the prim. With mismatched values the lidar produces
partial scans every frame regardless of accumulate_outputs. See
OmniLidar Tick Rate Must Equal scanRateBaseHz.
How to Collect Data from an RTX Lidar#
The recommended method for collecting data from an RTX Lidar is to use the LidarSensor runtime class,
which wraps a Lidar authoring object and manages Replicator Annotators.
Run this snippet in the Script Editor (Window > Script Editor).
from isaacsim.sensors.experimental.rtx import Lidar, LidarSensor, parse_generic_model_output_data

lidar = Lidar.create("/World/Lidar", config="Example_Rotary")

sensor = LidarSensor(lidar, annotators=["generic-model-output"])
data, info = sensor.get_data("generic-model-output")
gmo = parse_generic_model_output_data(data)
Isaac Sim also offers lower-level RTX Sensor Annotators that can be attached
directly to render products. Refer to Reading Data from the GenericModelOutput Buffer for
more details on how to use the GenericModelOutput annotator.
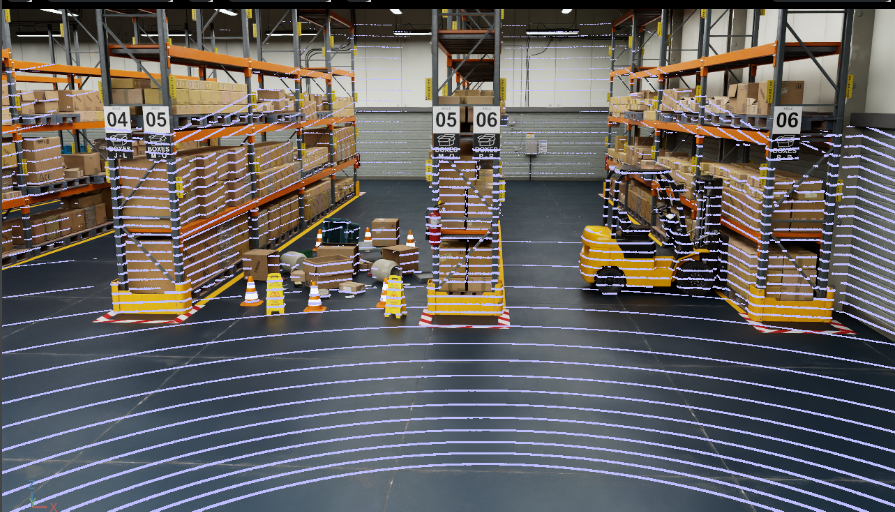
Visualizing RTX Lidar Output#
There are several ways to visualize RTX Lidar point cloud data in Isaac Sim:
Debug Draw#
The Debug Draw Extension provides a performance-efficient method for visualizing point clouds directly in the viewport. The geometry drawn with Debug Draw remains persistent across frames and does not interact with the physics scene.
The standalone example create_lidar_basic.py demonstrates using Debug Draw to visualize RTX Lidar output:
# Basic lidar creation with debug draw visualization
./python.sh standalone_examples/api/isaacsim.sensors.experimental.rtx/create_lidar_basic.py
For more information on Debug Draw APIs, refer to Debug Drawing Extension API and Util Snippets.
Viewport Debug Views#
You can visualize non-visual material IDs in the viewport by selecting RTX - Real-Time > Debug View > Non-Visual Material ID. This shows how materials appear to RTX sensors, which is useful for debugging material configurations. Refer to RTX Sensor Non-Visual Materials for details.
RViz2 Visualization#
When using ROS2, point cloud data can be visualized in RViz2. Refer to the ROS2 Integration section below.
ROS2 Integration#
Isaac Sim provides full support for publishing RTX Lidar data to ROS2 as standard message types.
Supported Message Types#
sensor_msgs/PointCloud2- Full 3D point cloud datasensor_msgs/LaserScan- 2D laser scan data (for 2D Lidar configurations)
For a comprehensive guide on integrating RTX Lidar sensors with ROS2, including:
Adding RTX Lidar ROS2 bridge nodes via OmniGraph
Publishing LaserScan and PointCloud2 messages
Using the menu shortcut to create RTX Lidar sensor publishers
Visualizing multiple sensors in RViz2
Exposing RTX Lidar metadata (intensity, object IDs) in PointCloud2 messages
Refer to the RTX Lidar ROS2 Tutorial.
Quick Start#
To add ROS 2 publishing for an RTX Lidar sensor:
Create an RTX Lidar sensor using the methods described above.
Go to Tools > Robotics > ROS 2 OmniGraphs > RTX Lidar.
Configure the graph path, Lidar prim, frame ID, and select the data types to publish.
Press Play to begin publishing.
RTX Lidar Asset Library#
Isaac Sim includes a library of RTX Lidars that can be loaded
onto the stage by specifying the config and variant parameters of Lidar.create(). The config parameter can be the following:
The exact name of a Lidar model USD file without extension, as provided in the Content Browser and noted in the RTX Lidars library (for example,
HESAI_XT32_SD10).The exact name of a Lidar model USD file as noted above, omitting the vendor name (for example,
XT32_SD10).
The optional variant parameter selects a specific variant of the provided Lidar configuration. variant accepts two forms:
A flat string for USDs that author a single variant set named
sensor(most configurations, including the Ouster OS family). The string is applied against thatsensorset.A
dict[str, str]mapping{variant_set: variant_name, ...}for USDs that author multiple variant sets (notably the SICK family, which usesProductandProfilesets). Pairs are applied in dict insertion order, so outer variant sets must come first.
The full set of supported configs and their variant shapes is exposed via isaacsim.sensors.experimental.rtx.SUPPORTED_LIDAR_CONFIGS; iterate over it to enumerate the available (config, variant) combinations programmatically.
The snippet below loads a SICK picoScan100 Lidar with the picoScan150Pro product and the Profile11_15Hz_1p0deg profile selected.
Run this snippet in the Script Editor (Window > Script Editor).
from isaacsim.sensors.experimental.rtx import Lidar

# The SICK picoScan100 USD authors two variant sets ("Product" and "Profile"),
# so the variant must be passed as a dict mapping each variant set to its
# selection. For configs whose USD authors a single "sensor" variant set
# (e.g. Ouster OS1), pass a flat string instead -- e.g. variant="OS1_REV6_32ch20hz1024res".
lidar = Lidar.create(
    path="/World/lidar",
    config="picoScan100",
    variant={"Product": "picoScan150Pro", "Profile": "Profile11_15Hz_1p0deg"},
)
Sensor Materials#
The material system for RTX Lidar allows content creators to assign sensor material types to partial material prim names on a USD stage. Lidar return behavior depends on material properties (for example, emissivity, reflectivity), as described below.
Standalone Examples#
For examples of creating and/or collecting data from a RTX Lidar, refer to the following:
Basic Creation and Visualization
# Basic lidar creation with debug draw visualization
./python.sh standalone_examples/api/isaacsim.sensors.experimental.rtx/create_lidar_basic.py

# Lidar with vendor configs (Ouster, SICK, HESAI) and variants
./python.sh standalone_examples/api/isaacsim.sensors.experimental.rtx/create_lidar_with_config_and_variants.py
Data Collection and Inspection
# Inspect GenericModelOutput (GMO) data at different auxiliary levels
./python.sh standalone_examples/api/isaacsim.sensors.experimental.rtx/inspect_lidar_gmo.py --aux-data-level FULL

# Resolve object IDs to USD prim paths for semantic segmentation
./python.sh standalone_examples/api/isaacsim.sensors.experimental.rtx/resolve_lidar_object_ids.py
Robot Integration
# Lidar + LidarSensor integration with a wheeled robot
./python.sh standalone_examples/api/isaacsim.sensors.experimental.rtx/lidar_robot_integration.py
ROS2 Integration
./python.sh standalone_examples/api/isaacsim.ros2.bridge/rtx_lidar.py
Note
Refer to the Isaac Sim Conventions documentation for a complete list of Isaac Sim conventions.