ROS2 Navigation#
Support Limitations
ROS 2 Navigation with Isaac Sim is fully supported on Linux. On Windows, ROS 2 Navigation with Isaac Sim is partially supported and could potentially produce errors.
Learning Objectives#
This ROS2 sample demonstrates NVIDIA Isaac Sim integrated with ROS2 Nav2.
Getting Started#
Prerequisite
You must source your ROS 2 installation from the terminal before running Isaac Sim.
The Nav2 project is required to run this sample. To install Nav2 refer to the Nav2 installation page.
Enable the
isaacsim.ros2.bridgeExtension in the Extension Manager window by navigating to Window > Extensions.This tutorial requires
carter_navigation,iw_hub_navigation, andisaac_ros_navigation_goalROS2 packages, which are provided as part of your NVIDIA Isaac Sim download. These ROS2 packages are located inside the appropriateros2_ws(humble_ws). They contain the required launch file, navigation parameters, and robot model. Complete ROS 2 Installation, make sure the ROS 2 workspace environment is setup correctly.
Note
In Windows 10 or 11, depending on your machine’s configuration, RViz2 may not open properly.
Nav2 Setup#
This block diagram shows the ROS2 messages required for Nav2:
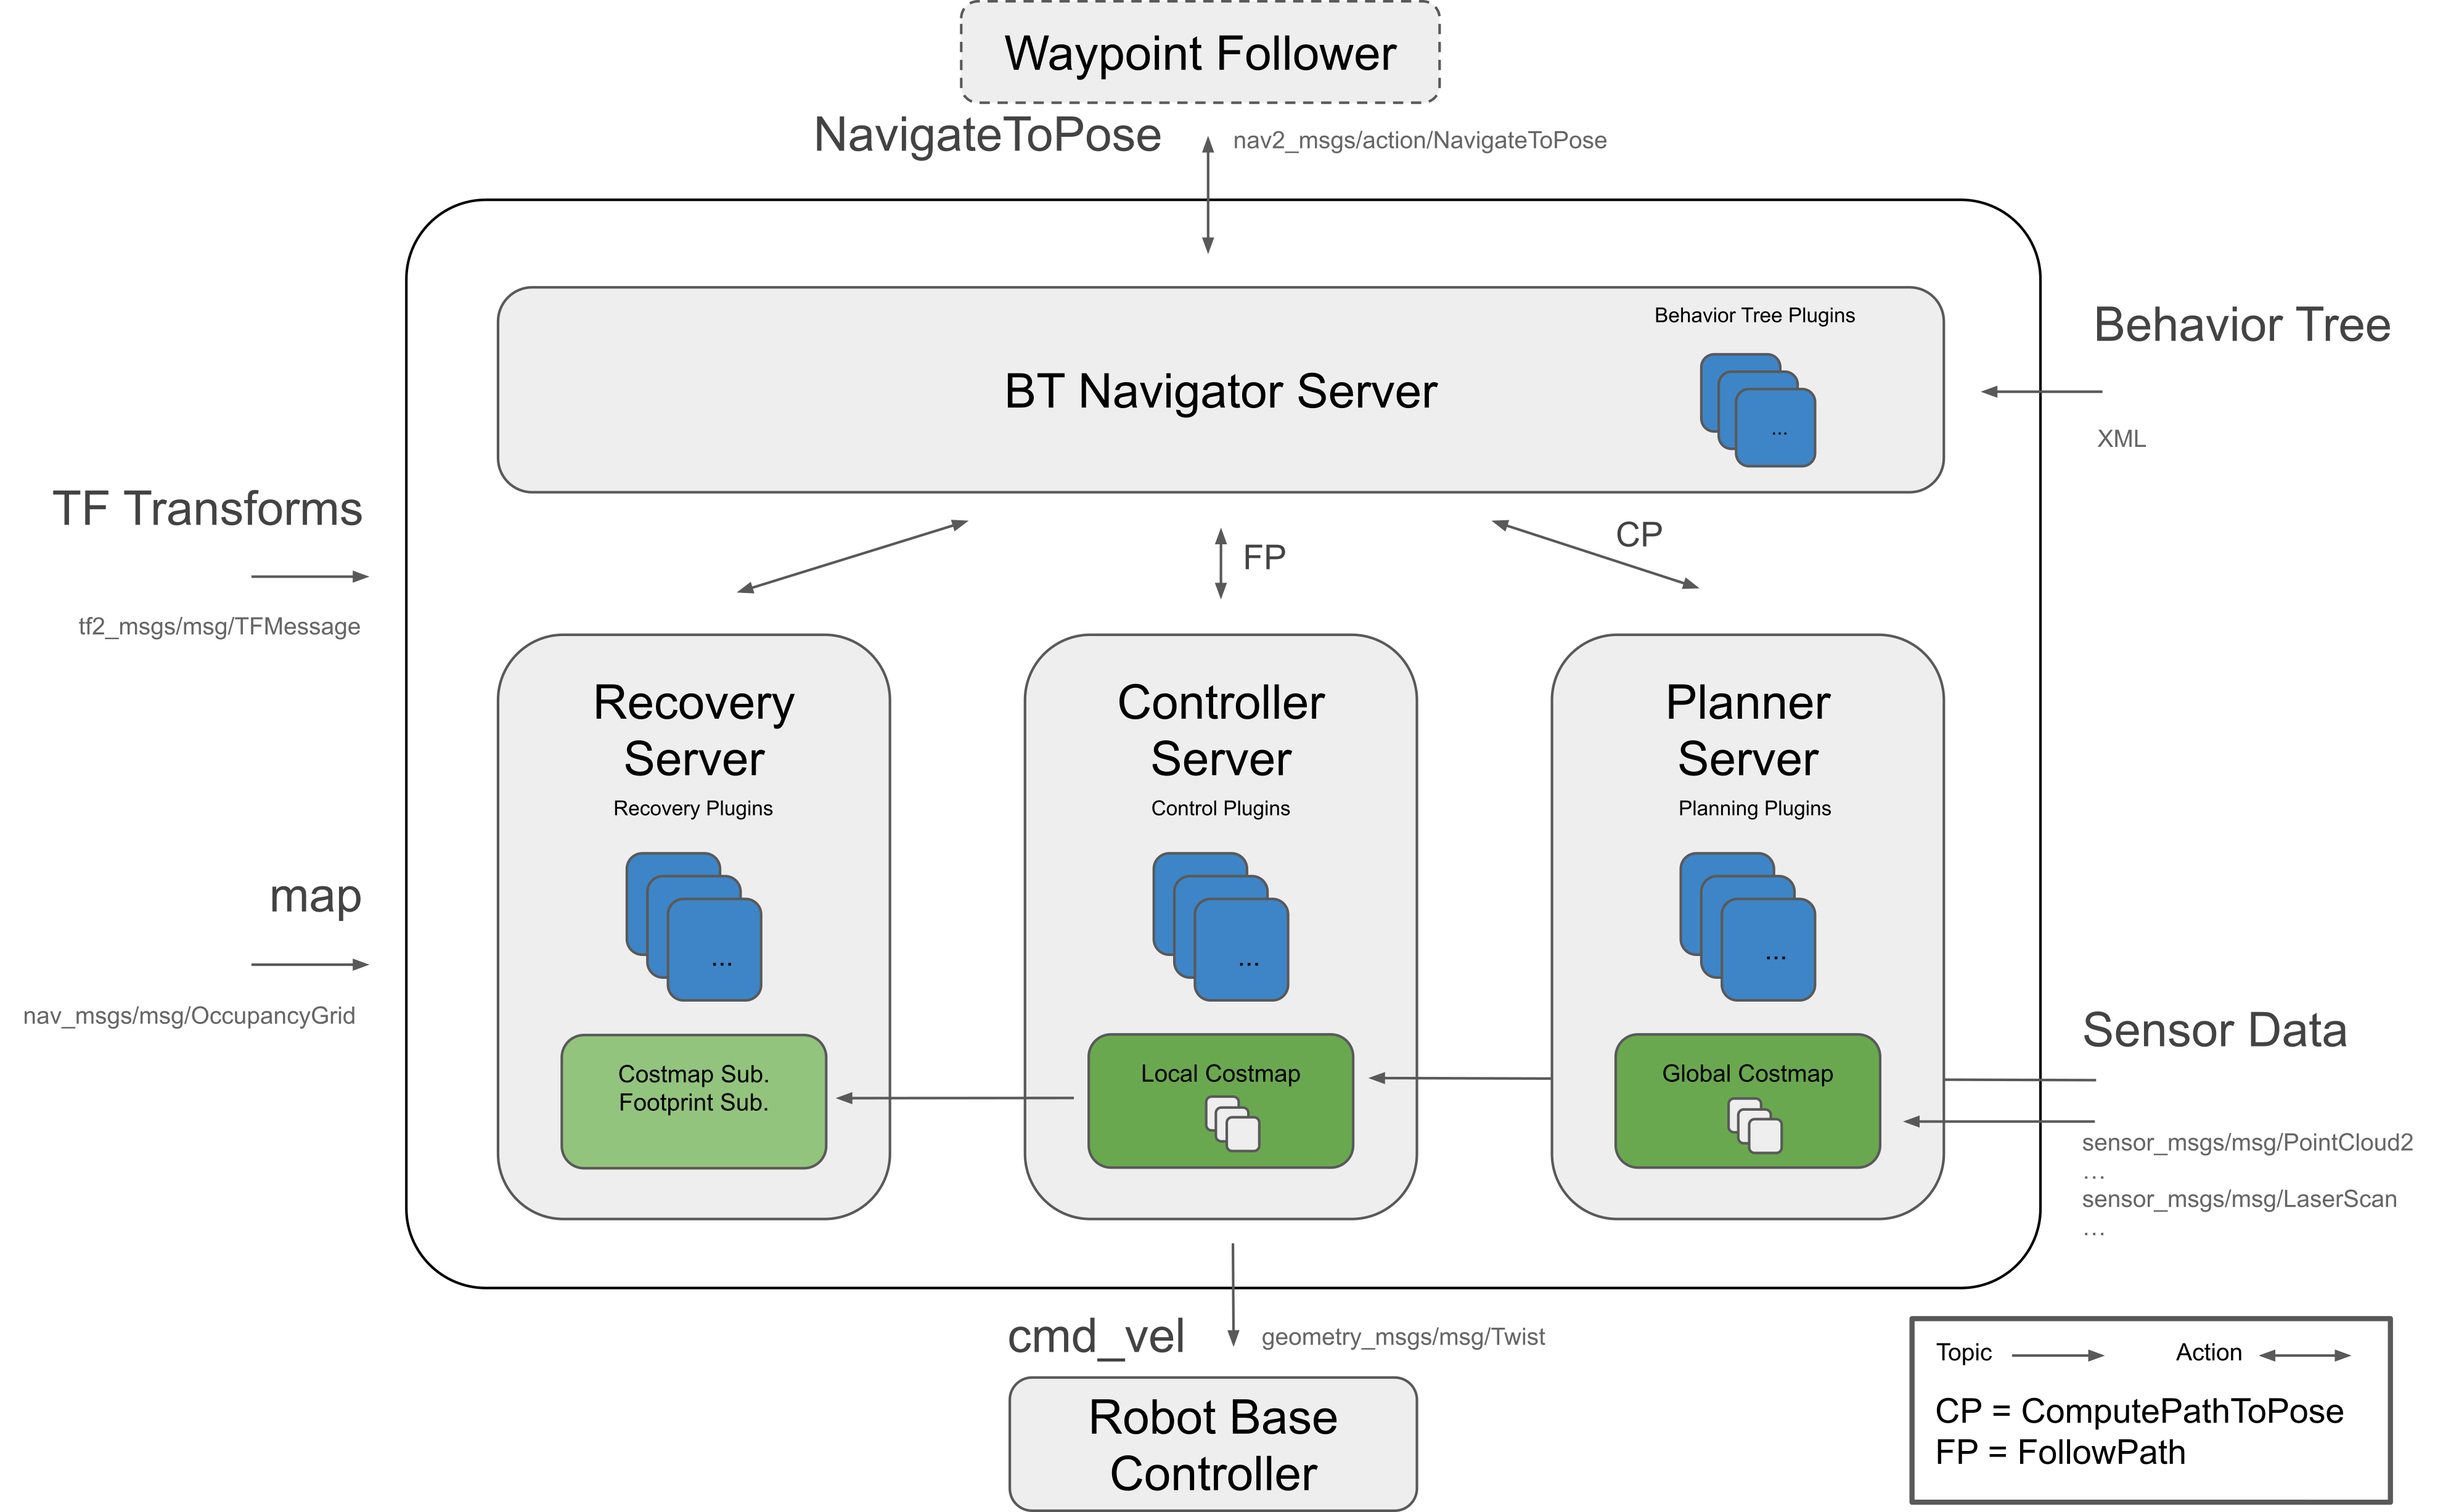
The following topics and message types being published to Nav2 in this scenario are:
ROS2 Topic
ROS2 Message Type
/tf
tf2_msgs/TFMessage
/odom
nav_msgs/Odometry
/map
nav_msgs/OccupancyGrid
/point_cloud
sensor_msgs/PointCloud
/scan
sensor_msgs/LaserScan (published by an external pointcloud_to_laserscan node)
Occupancy Map#
In this scenario, an occupancy map is required. For this sample, you are generating an occupancy map of the warehouse environment using the Occupancy Map Generator extension within NVIDIA Isaac Sim.
Go to Window > Examples > Robotics Examples. Click on the Robotics Examples tab. Expand the sections on the left hand side. Open the example: ROS2 > Navigation > Nova Carter to load the warehouse scenario with the Nova Carter robot.
At the upper left corner of the viewport, click on Camera. Select Top from the dropdown menu.
Go to Tools > Robotics > Occupancy Map.
In the Occupancy Map extension, ensure the Origin is set to
X: 0.0, Y: 0.0, Z: 0.0. For the lower bound, setZ: 0.1. For the Upper Bound, setZ: 0.62. Keep in mind, the upper bound Z distance has been set to 0.62 meters to match the vertical distance of the Lidar onboard Nova Carter with respect to the ground.Select the
warehouse_with_forkliftsprim in the stage. In the Occupancy Map extension, click on BOUND SELECTION. Verify that the bounds of the occupancy map are updated to incorporate the selected warehouse_with_forklifts prim. Verify that the map parameters now look similar to the following: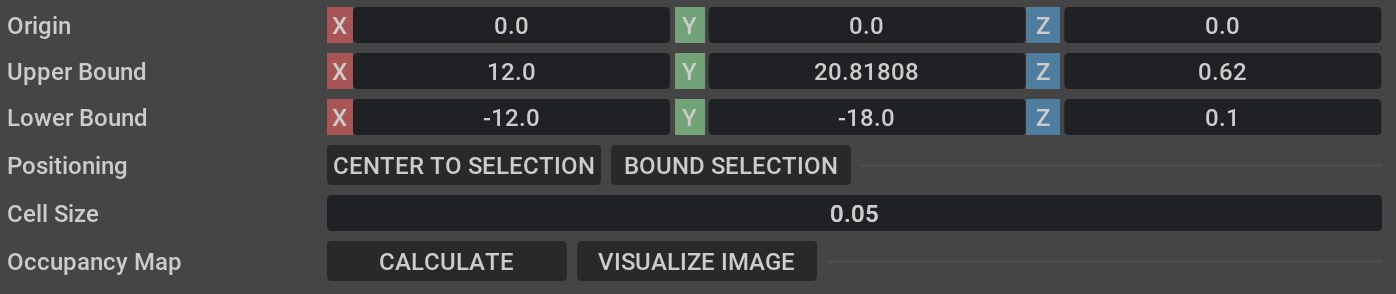
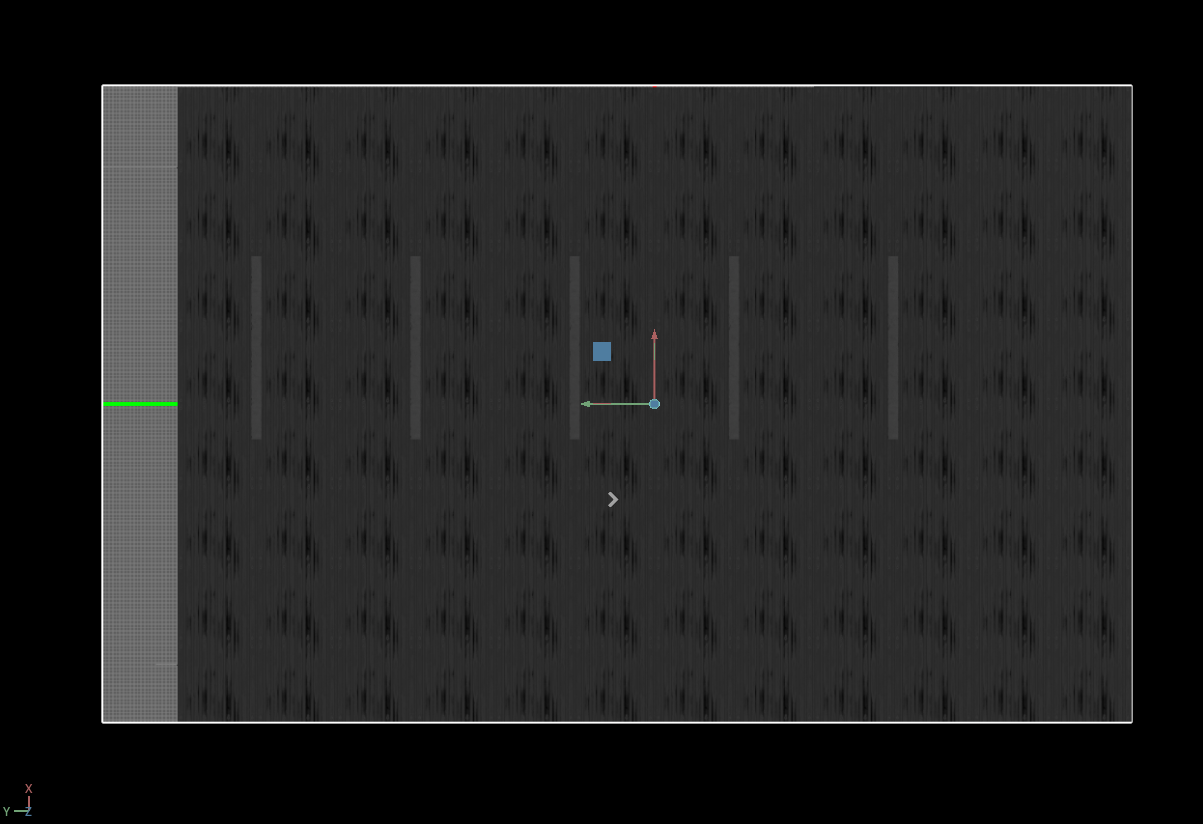
Verify that a perimeter is generated and that it resembles this Top View:
Deactivate the
Nova_Carter_ROSprim from the stage.After the setup is complete, click on CALCULATE followed by VISUALIZE IMAGE. A Visualization popup will appear.
For Rotate Image, select 180 degrees and for Coordinate Type select ROS Occupancy Map Parameters File (YAML). Click RE-GENERATE IMAGE. The ROS camera and Isaac Sim camera have different coordinates.
Occupancy map parameters formatted to YAML appear in the field below. Copy the full text.
Create a YAML file for the occupancy map parameters called
carter_warehouse_navigation.yamland place it in themapsdirectory, which is located in the samplecarter_navigationROS2 package (<ros2_ws>/src/navigation/carter_navigation/maps/carter_warehouse_navigation.yaml).Insert the previously copied text in the
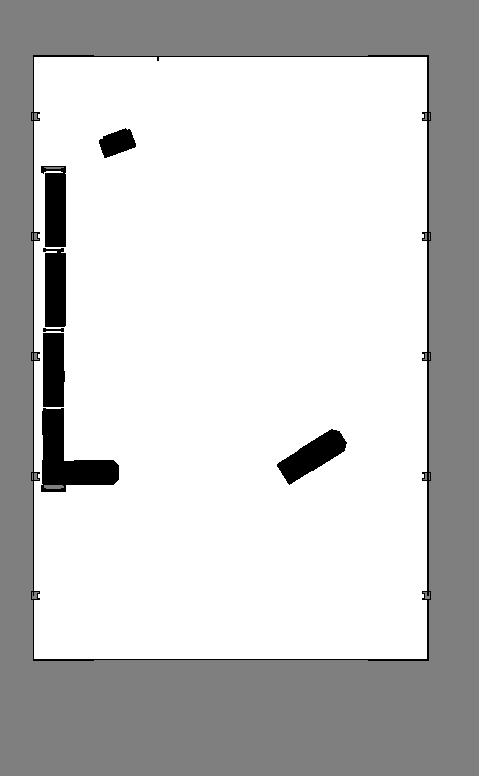
carter_warehouse_navigation.yamlfile.Back in the visualization tab in NVIDIA Isaac Sim, click Save Image. Name the image as
carter_warehouse_navigation.pngand choose to save it in the same directory as the map parameters file.Verify that the final saved image looks like the following:
An occupancy map is now ready to be used with Nav2.
Sending Goals Programmatically#
Note
The isaac_ros_navigation_goal package is fully supported on Linux. On Windows, running this package might produce errors.
The isaac_ros_navigation_goal ROS2 package can be used to set goal poses for the robot using a Python node. It is able to randomly generate and send goal poses to Nav2. It is also able to send user-defined goal poses if needed.
Make any changes to the parameters defined in the launch file found under
isaac_ros_navigation_goal/launchas required. Make sure to re-build and source the package and workspace after modifying its contents.The parameters are described below:
goal_generator_type: Type of the goal generator. Use
RandomGoalGeneratorto randomly generate goals or useGoalReaderfor sending user-defined goals in a specific order.map_yaml_path: The path to the occupancy map parameters YAML file. An example file is present at
isaac_ros_navigation_goal/assets/carter_warehouse_navigation.yaml. The map image is being used to identify the obstacles in the vicinity of a generated pose. Required if the goal generator type is set asRandomGoalGenerator.iteration_count: Number of times goal is to be set.
action_server_name: Name of the action server.
obstacle_search_distance_in_meters: Distance in meters in which a generated pose is free from obstacles of any kind.
goal_text_file_path: The path to the text file which contains user-defined static goals. Each line in the file has a single goal pose in the following format:
pose.x pose.y orientation.x orientation.y orientation.z orientation.w. A sample file is present at:isaac_ros_navigation_goal/assets/goals.txt. Required if goal generator type is set asGoalReader.initial_pose: If initial_pose is set, it will be published to the /initialpose topic and goal poses will be sent to action server after that. Format is
[pose.x, pose.y, pose.z, orientation.x, orientation.y, orientation.z, orientation.w].
Go to Window > Examples > Robotics Examples, and then click on the Robotics Examples tab and expand the sections on the left hand side and open the example: ROS2 > Navigation > Nova Carter to load the warehouse scenario.
Click on Play to begin simulation.
In a new terminal, run the ROS2 launch file to begin Nav2.
ros2 launch carter_navigation carter_navigation.launch.py
RViz2 opens and begins loading the occupancy map. If a map does not appear, repeat the previous step.
Run the isaac_ros_navigation_goal launch file, to start sending goals automatically:
ros2 launch isaac_ros_navigation_goal isaac_ros_navigation_goal.launch.py
Note
After any of the following conditions are met, the package stops processing (setting goals):
Number of goals published till now >= iteration_count.
If the
GoalReaderparameter is used and if all the goals from the config file are published.A goal is rejected by the action server.
In rare cases, a very dense map may cause
RandomGoalGeneratorto generate invalid poses. The package will stop processing if the number of invalid poses generated byRandomGoalGeneratorexceeds the maximum number of iteration.
To automatically launch Isaac Sim and Nav2, while programmatically sending navigation goals from a single launch process, refer to Launch Isaac Sim with Nav2.
To learn more about programmatically sending navigation goals to multiple robots simultaneously see Sending Goals Programmatically for Multiple Robots.
Sending Goals Using ActionGraph#
Important
Make sure Nav2 is installed and source your ROS2 installation from the terminal before running Isaac Sim. Currently, the following section will not work with internal libraries.
Go to Window > Examples > Robotics Examples to open Robotics Examples tab.
Go to Robotics Examples > ROS2 > Navigation > Nova Carter and click on Load Sample Scene button to load the warehouse scenario with the Nova Carter robot.
Go to Robotics Examples > ROS2 > Navigation > Add Waypoint Follower to open the waypoint follower parameter window.
Make changes to the waypoint follower parameters as required.
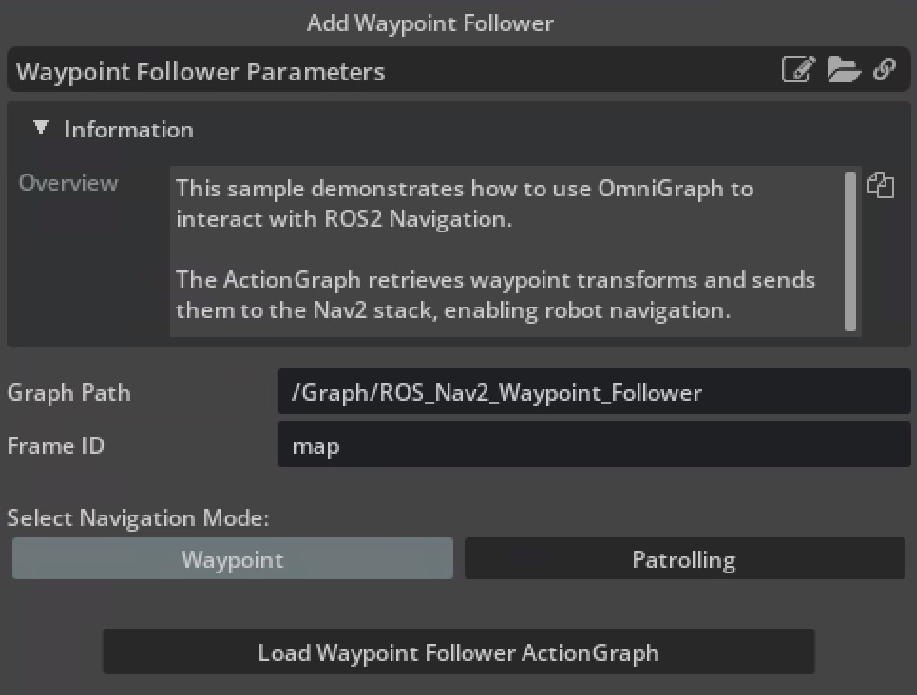
The parameters are described below:
Graph Path: Specify the path within the stage.
Frame ID: Specify the reference frame for navigation tasks.
- Navigation Modes:
Waypoint Mode: Creates a single waypoint to send as a navigation goal. The robot will navigate towards this waypoint.
Patrolling Mode: Creates multiple waypoints (between 2 to 50 inclusive) for continuous patrolling. The robot will navigate between these predefined waypoints continuously.
Waypoint Count: Number of waypoints to generate for Patrolling.
Click on Load Waypoint Follower ActionGraph to create waypoints and add the actiongraph at Graph Path in stage pane.
Click on Play to begin simulation.
In a new terminal, run the ROS2 launch file to begin Nav2.
ros2 launch carter_navigation carter_navigation.launch.py
RViz2 opens and begins loading the occupancy map. If a map does not appear, repeat the previous step.
Because the position of the robot is defined in the parameter file
carter_navigation_params.yaml, verify that the robot is properly localized. If required, the 2D Pose Estimate button can be used to re-set the position of the robot.Running navigation modes:
- Waypoint:
Adjust the waypoint (/World/Waypoints/waypoint_1) in xy plane of the scene to set the desired goal location.
Open the ROS_Nav2_Waypoint_Follower graph from the stage and click on Send Impulse in the OnImpulseEvent node.
Verify that the robot starts navigating towards the specified goal.
Repeat these steps after each goal is completed to set new waypoint.
- Patrolling:
Adjust the waypoints (/World/Waypoints/waypoint_n) in xy plane of the scene to define the patrol path.
Open the ROS_Nav2_Waypoint_Follower graph from the stage and click on Send Impulse in the OnImpulseEvent node.
Verify that the robot starts patrolling along the set waypoints.
Note
This tutorial uses the AMCL localizer and the action graph is fully supported for this localizer.
If you notice errors as shown below after deleting the graph, you can disregard them because they are harmless. To prevent these logs you can click the “reload node” button to clean up the script nodes before deleting the graph.
2024-12-03 13:55:27 [4,715,030ms] [Error] [omni.graph] Error executing python callback omni.graph.scriptnode.ScriptNode.release_instance
2024-12-03 13:55:27 [4,715,030ms] [Error] [omni.graph] Error executing python callback omni.graph.scriptnode.ScriptNode.release
Summary#
In this tutorial, you covered:
Occupancy map.
Running Isaac Sim with Nav2.
Running the Isaac ROS2 Navigation Goal package to send nav goals programmatically.
Running Waypoint Follower ActionGraph to send navigation goals.
Next Steps#
Continue on to the next tutorial in our ROS2 Tutorials series, Multiple Robot ROS2 Navigation to move multiple navigating robots with ROS2.
Further Learning#
To learn more about Nav2, refer to the project website.
More about Mapping.
Explore the inner workings of RTX Lidar sensors by learning Overview, and how to get RTX Sensor Annotators.