Gain Tuner Extension#
The Gain Tuner Extension is used to tune the stiffness and damping gains of a selected Articulation. This extension is useful when importing any new robot or when needing to fine tune the gains of an existing robot.
This page provides the explanation of the function behind the Gain Tuner. For more detail about the step-by-step usage of the Gain Tuner, please refer to Tutorial 11: Tuning Joint Drive Gains tutorial page.
Overview#
The purpose of the Gain Tuner is to find a pair of stiffness and damping gains for each robot joint so that the robot is able to follow commanded trajectories according to the robot’s expected behavior.
The Gain Tuner offers a set of tests that allow the user to quickly assess the quality of the current set of gains as well as a utility for tuning gains manually.
Tuning Gains: A utility for tuning the gains for the robot.
Gains Test: A utility for testing the robot’s behavior with a continuous sinusoidal or Step Function trajectory for each joint within the Robot’s Limits, maximum velocities and accelerations.
Test Results: A plot of the results of the gains tests on the tracked Joint Positions and Velocities, compared against the commanded trajectory.
Understanding Joint Drives#
Joint Drives are dual-proportional controllers used to set a joint to a given target. One proportional gain is moderating the error in position, while the other gain is moderating the error in velocity. For historical reasons, these gains are called Stiffness and Damping, respectively.
Note
These Joint drives are implicit - meaning the position and velocity constraints are imposed by the drive with respect to the current time-step, in contrast to how it is usually done in engineering where it uses a closed loop control with readings of the previous time-step of position and velocity and reacting to it for future control. See Articulation Joint Drives.
Stiffness is similar to a spring stiffness constant multiplying the error in position, as if the spring was stretched by that amount. Damping comes from the effect of targeting zero velocity - and therefore any movement would result in a reaction that attempts to stop it. In reality, we can actually have it track a velocity that is different than zero, and the effect is the same as stiffness would be in position.
where \(q\) and \(\dot{q}\) are the joint position and velocity, respectively. When \(\dot{q}_{target} = 0\), the system reduces to a conventional PD controller on the joint position.
This formula applies for both revolute and prismatic joints.
The joint max force will act as a clamp for \(\tau\), and finally, the drive type will dictate if the effort will be applied directly as a torque or force, or if it will be converted into an acceleration applied to the bodies connected to the joint.
Drive Modes#
This dual-proportional controller provides two main ways to control the robot:
Position target - used for controlled joints that are driven by defining a target distance/angle that the connected bodies should be.
Velocity target - usually done for wheels or other free-spinning objects.
To have a position-controlled joint: set Stiffness to something greater than zero, and Damping can be any value.
To have a velocity-controlled joint: set Stiffness to zero, and Damping to any value greater than zero.
Tools#
Tuning Gains#
The Joint Gains are a pair of Stiffness and Damping values that are used to drive the joint. They are applied to the joint in the form of a drive that applies an effort (Force/Torque) to the joint, based on the error between the desired position, velocity or both. This Effort is computed as:
Where \(K_p\) is the Stiffness and \(K_d\) is the Damping.
From this formula, we can describe the different modes of the joint drive:
Position Drive: When the joint drive is in position mode, the desired position is the target position. This requires the Stiffness to be Greater than 0, and damping to be any value
Velocity Drive: When the joint drive is in velocity mode, the desired position is the current position, and the desired velocity is the target velocity. This requires the Stiffness to be 0, and damping to be any value.
None: When the joint drive is in none mode, the joint drive is not active. The joint can still be controlled by applying a direct effort. This requires the Stiffness to be 0, and damping to be 0.
Mimic: When the joint drive is in mimic mode, the joint drive is driven by the mimic joint. This means that the joint drive will not be active, but the mimic joint’s attributes of Natural Frequency and Damping Ratio can still be configured through the Tuner.
This Dampener-Spring model can also be described in terms of the natural frequency and damping ratio:
Where \(\omega_n\) is the natural frequency and \(\zeta\) is the damping ratio, and \(m\) is the computed joint inertia based on the mass of the robot at both sides of the joint. The damping ratio is such that \(\zeta = 1.0\) is a critically damped system, \(\zeta < 1.0\) is underdamped, and \(\zeta > 1.0\) is overdamped.
From the above formula, we can see that there are Two Ways to Tune Gains:
Directly editing Stiffness and Damping values: On the joints table, You can directly edit the Stiffness and Damping values for each joint.
Natural Frequency: The Gain tuner can also automatically compute the Stiffness and Damping values for each joint based on the desired natural frequency and damping ratio.
Note
Because the robot is a structure that is made of multiple links and moving joints, the natural frequency of each joint is dependent on the robot’s configuration. To establish a standard, we use the natural frequency of the robot at its home configuration.
Tuning Options#
In the Tuning Options, users can select the tuning mode between Stiffness and Natural Frequency. On the joints table, users can see the following options:
Mode: The mode of the joint drive (Position, Velocity, None, Mimic)
Type: The type of the joint drive (Force, Acceleration). In Force, the effort is applied directly to the joint. In Acceleration, the effort is Normalized by the joint’s mass, and is thus invariant to the robot’s configuration, behaving as an ideal actuator.
Stiffness (Stiffness Mode): The stiffness of the joint drive. Changing this will lead to a change in the natural frequency of the joint.
Damping (Stiffness Mode): The damping of the joint drive. Changing this will lead to a change in the damping ratio of the joint.
Natural Frequency (Natural Frequency Mode): The natural frequency of the joint drive.
Damping Ratio (Natural Frequency Mode): The damping ratio of the joint drive.
The configurable Degrees of Freedom (DOF) of the robot are displayed in accordance with what is defined in the Robot’s Joints list.
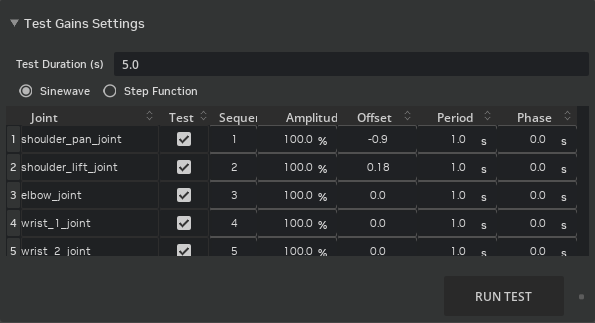
Gains Tests#
The Gains Tests are a set of tests that allow the user to test the robot’s behavior with a continuous sinusoidal or Step Function trajectory for each joint within the Robot’s Limits, maximum velocities and accelerations.
The test is divided by sequences, and each sequence is a group of joints to be tested together. The sequence is defined per joint, and is an index of the order in which the test will be run. For each sequence, the robot resets to the initial configuration, and then the test is run for the provided duration. In addition to that, each joint can be configured to have an individual test setting, which contains the following parameters:
Common Test Settings#
Test: Check to run the test.
Period: The period of the waveform.
Phase: The phase of the waveform.
Sinusoidal#
Amplitude: The amplitude of the waveform, from 0 to 100%
Offset: The offset of the waveform, from 0 to 100%.
Step Function#
Step Minimum: The minimum value of the waveform, in the joint value units of measurement.
Step Maximum: The maximum value of the waveform, in the joint value units of measurement.
In the tests, we are sending only Position commands for Position drives, and velocity commands for velocity Drives. In position commands, the target velocities are always zero, such that the joint damping is properly evaluated. In a real control scenario, a proper trajectory command should be ideally sent, where the velocity command is equivalent to the integrated positions of the designated trajectory.
Further Learning#
The Tutorial 11: Tuning Joint Drive Gains tutorial for detailed instructions on how to use the Gain Tuner.
Use Adding a Controller, if you wish to send direct effort commands and implement your own joint drives.