Physical Space Event Generation#
Overview#
Isaacsim.Replicator.Incident (IRI) is an extension that allows you to generate events
in urban simulation scenes. IRI also integrates with Isaacsim.Replicator.Agent (IRA) letting
the user specify events and event responses from actors in the scene.
Currently, IRI supports the following spontaneous event types,
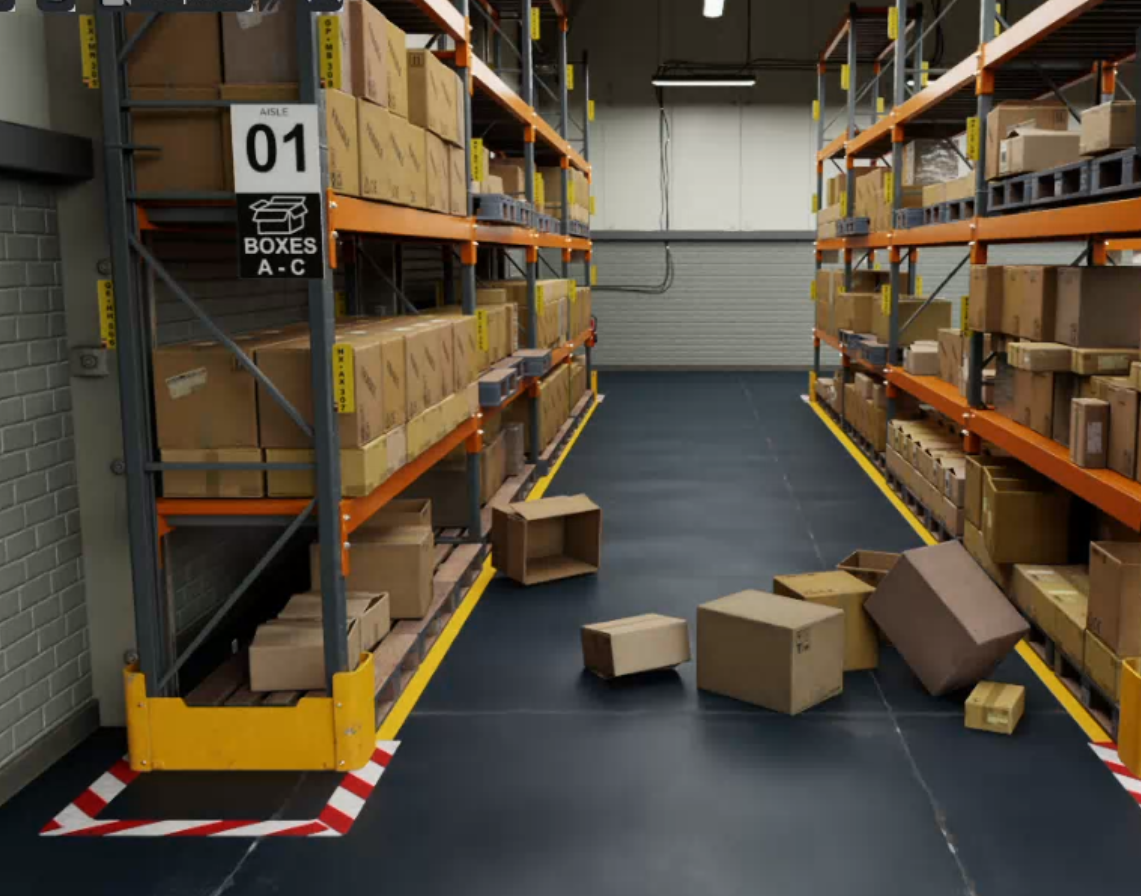
Box toppling events
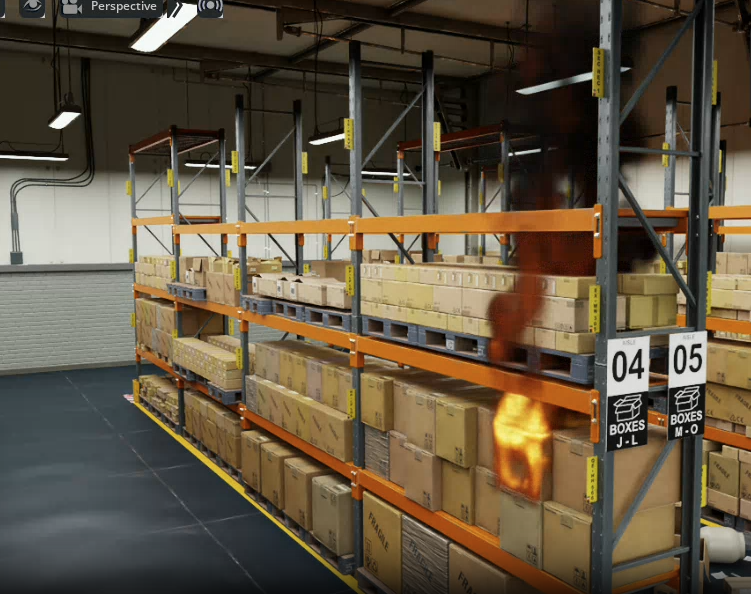
Fire and smoke events
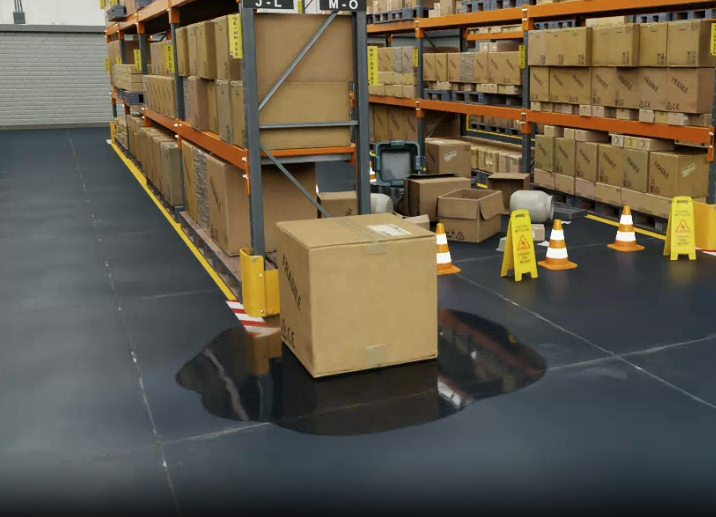
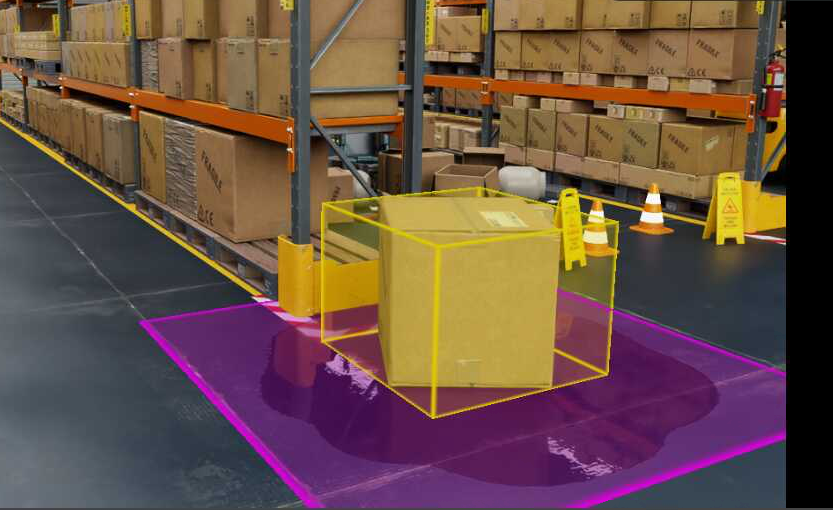
Liquid spills
To use IRI in a scene, follow this workflow:
1. To enable an item to be involved in an event, it must be tagged with an appropriate event type using the Event Scene Tagger window located in the menu Tools > Action and Event Data Generation > Event Scene Tagger. Items can be tagged, for instance, as ‘loose items’ that can be knocked over in a topple event, ‘spillable items’ that can leak or spill liquid in a spill event, or ‘flammable items’ that can catch fire in a fire event.
2. Save the scene to save the tagging information if you wish to save your progress, or use this scene in IRA. A sample scene with tags already applied is provided in the Content Browser
[Isaac Sim Assets Path]/Isaac/Samples/Replicator/Incidents/full_warehouse_with_incident_tags.usd.
Note
[Isaac Sim Assets Path] is the path to Isaac Sim Assets.3a. (IRI standalone) Set up an event configuration file which defines what events will occur in the scene by using the Event Config File window located in the menu Tools > Action and Event Data Generation > Event Config File. This configuration can also be saved and loaded later. Press Set Up Events to load the demons that will trigger the events at the specified times.
3b. (IRA integration) Alternatively, the same events can be triggered in an IRA simulation using the Events panel in the Actor SDG window located in the menu Tools > Action and Event Data Generation > Actor SDG. Agent responses can also be specified for individual events, or event categories in the Response panel of this same window.
4. Run the simulation with the play button to preview the scene. To generate SDG data you can also use the Record Events button in the Event Config File window, or the Start Data Generation button if using the IRA integration in the Actor SDG window. Event items are given semantic labels as the simulation runs to support replicator’s SDG collection. A separate event log is also generated to record the event details.
Note: Currently no adjustment is made to the viewport camera during an event, so the user must manually find the event in the scene and move the viewport camera there to view it.
IRI Standalone UI Example#
This walkthrough shows how to use the standalone IRI UI to set up boxes falling off a shelf at a specific time. This walkthrough starts with the warehouse scene from the isaac assets folder:
[Isaac Sim Assets Path]/Environments/Simple_Warehouse/full_warehouse.usd.

1. Begin by opening the warehouse scene and ensuring that the navmesh has been baked. This example uses the navmesh to determine the direction to topple the items. Now, open the Event Scene Tagger window by navigating to Tools > Action and Event Data Generation > Event Scene Tagger. Select boxes on a shelf and use the Tag Loose Items: Navmesh button to tag them as loose items. When toppled, these boxes will fall off the shelf towards the nearest navmesh point, which will automatically make them fall towards the walkable area of the scene.
If desired, you can save the scene to save your progress. This is required if you wish to use this scene in IRA in the following walkthrough.
3a. Bring up the Event Config File window located in the menu Tools > Action and Event Data Generation > Event Config File.
Remove the default Spill and Fire events, and examine the remaining default topple event settings. Note that the topple item is set to $random_loose_item$,
which will randomly select a loose item in the scene to topple. The trigger is a time based trigger, and the time is set to 3 seconds.
Hit Set Up Events to load the topple demon that will topple the item at the specified time.
4. You can now play the scene and collect event data with the Record Events button in the Event Config File window. Press Stop Record to stop the recording. An event report will be generated in the specified output directory.
IRA Integration#
This walkthrough will show how to use the same event setup in an IRA simulation. First, follow steps 1. and 2. of the IRI standalone walkthrough above.
3b. Bring up the Actor SDG window located in the menu Tools > Action and Event Data Generation > Actor SDG. Enter the path of the scene you saved in 2. into the scene asset path field. Follow the same steps as in the IRI standalone walkthrough to add a topple event, but this time in the Events panel within the Actor SDG window. Click the Save As button to save the scene configuration. Now you can press Set Up Simulation to load the actors and demons. You can press play in the scene view panel to preview the scene, or press Start Data Generation to record the events with IRA’s SDG writers.
Optionally, you can add agent responses to the event in the Response panel. In our case, we will add a physical_event response to the topple event,
which has the same name as the topple event’s name. This response will move the agent to the toppled item and look around. Now enter the
following 2 commands into the commands field:
GoToResponse
LookAround 10
These instruct the selected agent to move to the toppled item and look around. Now press Save and then Set Up Simulation to load the demons that will trigger the events at the specified times.
4. You can now preview the events by hitting the play button in the scene view window or record the scene and collect event data with the Record Events button in the Event Config File window. After recording, a report will be generated in the specified output directory.
For more information on configuring the Actor SDG scene, refer to Actor SDG Overview.
Scene Tagging#
To begin using IRI in a scene, first tag the desired possible event items using the custom UI and then save the scene.
Open the UI by navigating to Tools > Action and Event Data Generation > Event Scene Tagger. Select items in the scene and
use the buttons to tag them as loose items, spillable items, or flammable items.
Loose items#
To topple items in a scene, forces are applied in a particular direction that depends on the type of tag the loose item was given.
Random direction#
Items tagged as ‘random direction’ will have a force applied in a random direction.
Closest Waypoint Direction#
The UI allows you to add ‘Waypoints’ to the scene. Waypoints are modeled as boxes that can be placed anywhere in the scene and resized to outline walking paths or aisles. After adding a waypoint, you can make it invisible by unchecking the ‘visible’ checkbox in the scene panel. Items tagged as ‘closest waypoint direction’ will have a force applied in the direction of the nearest point on the nearest waypoint.
Untag loose items#
This button will remove any loose item tags from the currently selected items, and any items nested within them. To clear the entire scene for instance, you may select all top level items in the scene and untag them with this button.
Add Waypoint Prim#
This button will add a waypoint to the scene for use with closest waypoint loose items. This prim must be moved to the desired location manually, but it may be resized and duplicated to create more complex structures like walking paths.
Flammable Items#
Flammable items are any items that can catch fire. When a flammable item is tagged as such, it can be a target for a pyro event. The item’s prim must have a visible mesh under it’s hierarchy to act as the fuel source.
Spillable Items#
Spillable items are any items that can leak or spill liquid. When a spillable item is tagged as such, it can be a target for a spill event. Item’s currently leak by instantiating a flat liquid surface onto prims in the scene marked as ‘spillable area’ and which reside underneath the spillable item.
Spillable Area Floor#
This button will tag the selected prims as ‘spillable area’ floor. When a spill event occurs, the liquid will be instantiated on a prim below the spilling item with this tag. If no such prim exists, the liquid will be instantiated on the ground at height 0.0.
Event Configuration in IRI UI#
IRI has a standalone UI for configuring events. This UI is accessed by navigating to Tools > Action and Event Data Generation > Event Config File. Here, the user can add and configure events in the scene and record them with the click of a button.
The commands are generated as a yaml file, which can be saved and loaded later, or edited directly to change the events configuration.
Event Configuration in IRI Script#
IRI saves the event configuration to the script file, which can be edited directly to change the event configuration.
isaacsim.replicator.incident:
version: 0.1.0
global:
    report_dir:
    seed: 654321
event:
    event_list:
    - ToppleEvent:
        name: my topple event
        topple_item:
            item: $random_loose_item$
            topple_nearby_radius: 1.5
        trigger:
            type: time
            time: 3
    - FireEvent:
        name: my fire event
        flammable_item:
            item: $random_flammable_item$
        trigger:
            type: time
            time: 6
    - SpillEvent:
        name: my spill event
        leakable_item:
            item: $random_leakable_item$
            target_size: 1.5
            leak_duration: 5.0
        trigger:
            type: time
            time: 9
In this example, three events are defined: a topple event, a fire event, and a spill event. Each event has a name, and a simple time based trigger that will be trigger the event at the specified time.
Event Configuration in IRA Script#
The same event configuration can be added to the IRA script by editing the event section of the script.
isaacsim.replicator.agent:
version: 0.6.0
global:
    seed: 12312
    simulation_length: 1800
scene:
    asset_path: [Isaac Sim Assets Path]/Isaac/Samples/Replicator/Incidents/full_warehouse_with_incident_tags.usd
sensor:
    camera_num: 1
character:
    asset_path: [Isaac Sim Assets Path]/Isaac/People/Characters/
    command_file: default_command.txt
    filters: []
    navigation_area: []
    num: 1
    spawn_area: []
replicator:
    writer: IRABasicWriter
    parameters:
    semantic_filter_predicate: class:character|robot|incident_leaking_item|incident_liquid_spill|incident_flaming_item|incident_toppled_item;id:*
event:
    event_list:
    - ToppleEvent:
        name: my topple event
        topple_item:
            item: $random_loose_item$
            topple_nearby_radius: 1.5
        trigger:
            type: time
            time: 1.0
    - FireEvent:
        name: my fire event
        flammable_item:
            item: $random_flammable_item$
        trigger:
            type: time
            time: 2.0
    - SpillEvent:
        name: my spill event
        leakable_item:
            item: $random_leakable_item$
            target_size: 3.0
            leak_duration: 5.0
        trigger:
            type: time
            time: 1.5
response:
    response_list:
    - CommandResponse:
        name: check out topple
        priority: 1
        pick_agent: nearest
        resume: true
        position: null
        commands:
            - GoToResponse
            - LookAround 1
        trigger:
            type: physical_event
            event_name: my topple event
    - CommandResponse:
        name: check out pyro
        priority: 1
        pick_agent: nearest
        resume: true
        position: null
        commands:
            - GoToResponse
            - LookAround 10
        trigger:
            type: physical_event
            event_name: my fire event
    - CommandResponse:
        name: check out spill
        priority: 1
        pick_agent: nearest
        resume: true
        position: null
        commands:
            - GoToResponse
            - LookAround 10
        trigger:
            type: physical_event
            event_name: my spill event
In this example, three events are defined: a topple event, a fire event, and a spill event.
Agent responses are defined in the response section of the script. Each response has a name, priority, and a trigger.
The trigger is an event trigger, which will trigger the response when the event with the specified name occurs.
The next few sections will go over the various event types and the parameters available for each.
Topple Event#
A topple event has the following required fields:
name: the name of the event
- topple_item: the item to topple. Can be a specific tagged item prim path, or a random tagged item given by $random_loose_item$
topple_nearby_radius: Other loose items within this radius will also be toppled.
trigger: the trigger for the event. Can be a time based trigger. Triggers are defined in the trigger section Trigger Fields.
- ToppleEvent:
    name: my topple event
    topple_item:
        item: $random_loose_item$
        topple_nearby_radius: 1.5
    trigger:
        type: time
        time: 1.0
Toppled items in the scene will be given the semantic label ‘incident_toppled_item’.
Topple events can be responded to by adding a command response to the event in the IRA configuration file. Refer to Actor Response and Triggers for more information.
Fire Event#
A fire event has the following required fields:
name: the name of the event
flammable_item: the item to catch fire. Can be a specific tagged item prim path, or a random tagged item given by $random_flammable_item$
trigger: the trigger for the event. Can be a time based trigger. Triggers are defined in the trigger section Trigger Fields.
- FireEvent:
    name: my fire event
    flammable_item:
        item: $random_flammable_item$
    trigger:
        type: time
        time: 2.0
Flammable items in the scene will be given the semantic label ‘incident_flaming_item’. The flame itself will require a custom replicator writer to be written, which is planned for a future release.
Fire events can be responded to by adding a command response to the event in the IRA configuration file. Refer to Actor Response and Triggers for more information.
Spill Event#
A spill event has the following required fields:
name: the name of the event
- leakable_item: the item to spill. Can be a specific tagged item prim path, or a random tagged item given by $random_leakable_item$
target_size: the size of the spill area.
leak_duration: the duration of the spill.
trigger: the trigger for the event. Can be a time based trigger. Triggers are defined in the trigger section Trigger Fields.
- SpillEvent:
    name: my spill event
    leakable_item:
        item: $random_leakable_item$
        target_size: 3.0
        leak_duration: 5.0
    trigger:
        type: time
        time: 1.5
Leaking items in the scene will be given the semantic label ‘incident_leaking_item’. The liquid itself is given a separate semantic label, ‘incident_liquid_spill’.
Spill events can be responded to by adding a command response to the event in the IRA configuration file. Refer to Actor Response and Triggers for more information.
Triggers#
Each event type has a trigger field, which is used to specify when the event should occur. Refer to Actor Response and Triggers for more information.
SDG Collection#
SDG collection is handled by the replicator’s SDG writers based on the semantic labels of the event items. Additional information is collected in the event log, which is a yaml file in the output directory.
Agent Response#
Agent responses are defined in the response section of the IRA configuration file. Refer to Actor Response and Triggers for more information.