Tutorial 6: Setup a Manipulator#
Learning Objectives#
This is the first manipulator tutorial in a series of four tutorials. This tutorial shows how to import the UR10e robot from Universal Robots and the 2F-140 gripper from Robotiq into NVIDIA Isaac Sim from URDF files and connect them together under one articulation.
30 Minutes Tutorial
Prerequisites#
If you are new to NVIDIA Isaac Sim, please complete the Wheeled Robot Set Up Tutorials tutorial prior to beginning this tutorial.
Review the ROS 2 installations ROS 2 Installation prior to beginning this tutorial.
Review the URDF importer URDF Importer Extension tutorial.
In a ROS sourced terminal, install xacro using the following command (Linux only):
sudo apt install ros-$ROS_DISTRO-xacro
Locate the
import_manipulatorfolder in the content browser atIsaac Sim/Samples/Rigging/Manipulator/import_manipulator/
Note
The ROS URDF import steps are tested on linux only, it may not work on Windows. If you are using Windows, you can skip the ROS import steps and use the USD files provided in the content browser.
Build and Install the UR description package (linux only)#
Isaac Sim 5.0 requires Python 3.11, which is not natively supported by the ROS 2 UR description package, so we need to build the package from source.
Clone the UR description package#
Clone the UR description package from the Universal Robots ROS 2 Description repository.
git clone https://github.com/UniversalRobots/Universal_Robots_ROS2_Description.git
Switch to the branch that matches your ROS distribution.
git checkout humble
git checkout jazzy
Copy the repository into your Isaac Sim ROS Workspace
srcfolder.
Build the UR description package using Python 3.11#
Go to the Isaac Sim ROS Workspace, and run the following command to build the UR description package using Python 3.11.
./build_ros.sh
Source the Python 3.11 ROS environment and launch Isaac Sim. Replace
<ROS distro>with your ROS distribution (for example,humbleorjazzy).source build_ws/<ROS distro>/<ROS distro>_ws/install/local_setup.bash source build_ws/<ROS distro>/isaac_sim_ros_ws/install/local_setup.bash ./path/to/isaac-sim.sh
Build the UR description package using System ROS#
Source your system ROS environment. Refer to Setting Up Workspaces for more information on setting up your ROS 2 workspace.
Navigate to your Isaac Sim ROS Workspace and run the following commands to build it:
rosdep install -i --from-path src --rosdistro $ROS_DISTRO -y
colcon build
source install/setup.sh
Import the UR10e Robot (linux only)#
Enable the ROS 2 Robot Description URDF Importer Extension#
Go to
Window>Extensions.Type
URDFin the search box, and find theROS 2 Robot Description URDF Importer Extension.If you can’t find it, remove the
@featurefilter from the search box.If you still can’t find it, make sure Isaac Sim was launched from the same terminal where ROS was sourced.
Enable the extension by clicking the toggle button labeled
ENABLE.Check the box for
AUTOLOAD, just to the right ofENABLE.
Launch the URDF Publisher Topic#
In the system ROS sourced terminal that you created earlier, launch the UR10e description by running:
ros2 launch ur_description view_ur.launch.py ur_type:=ur10e
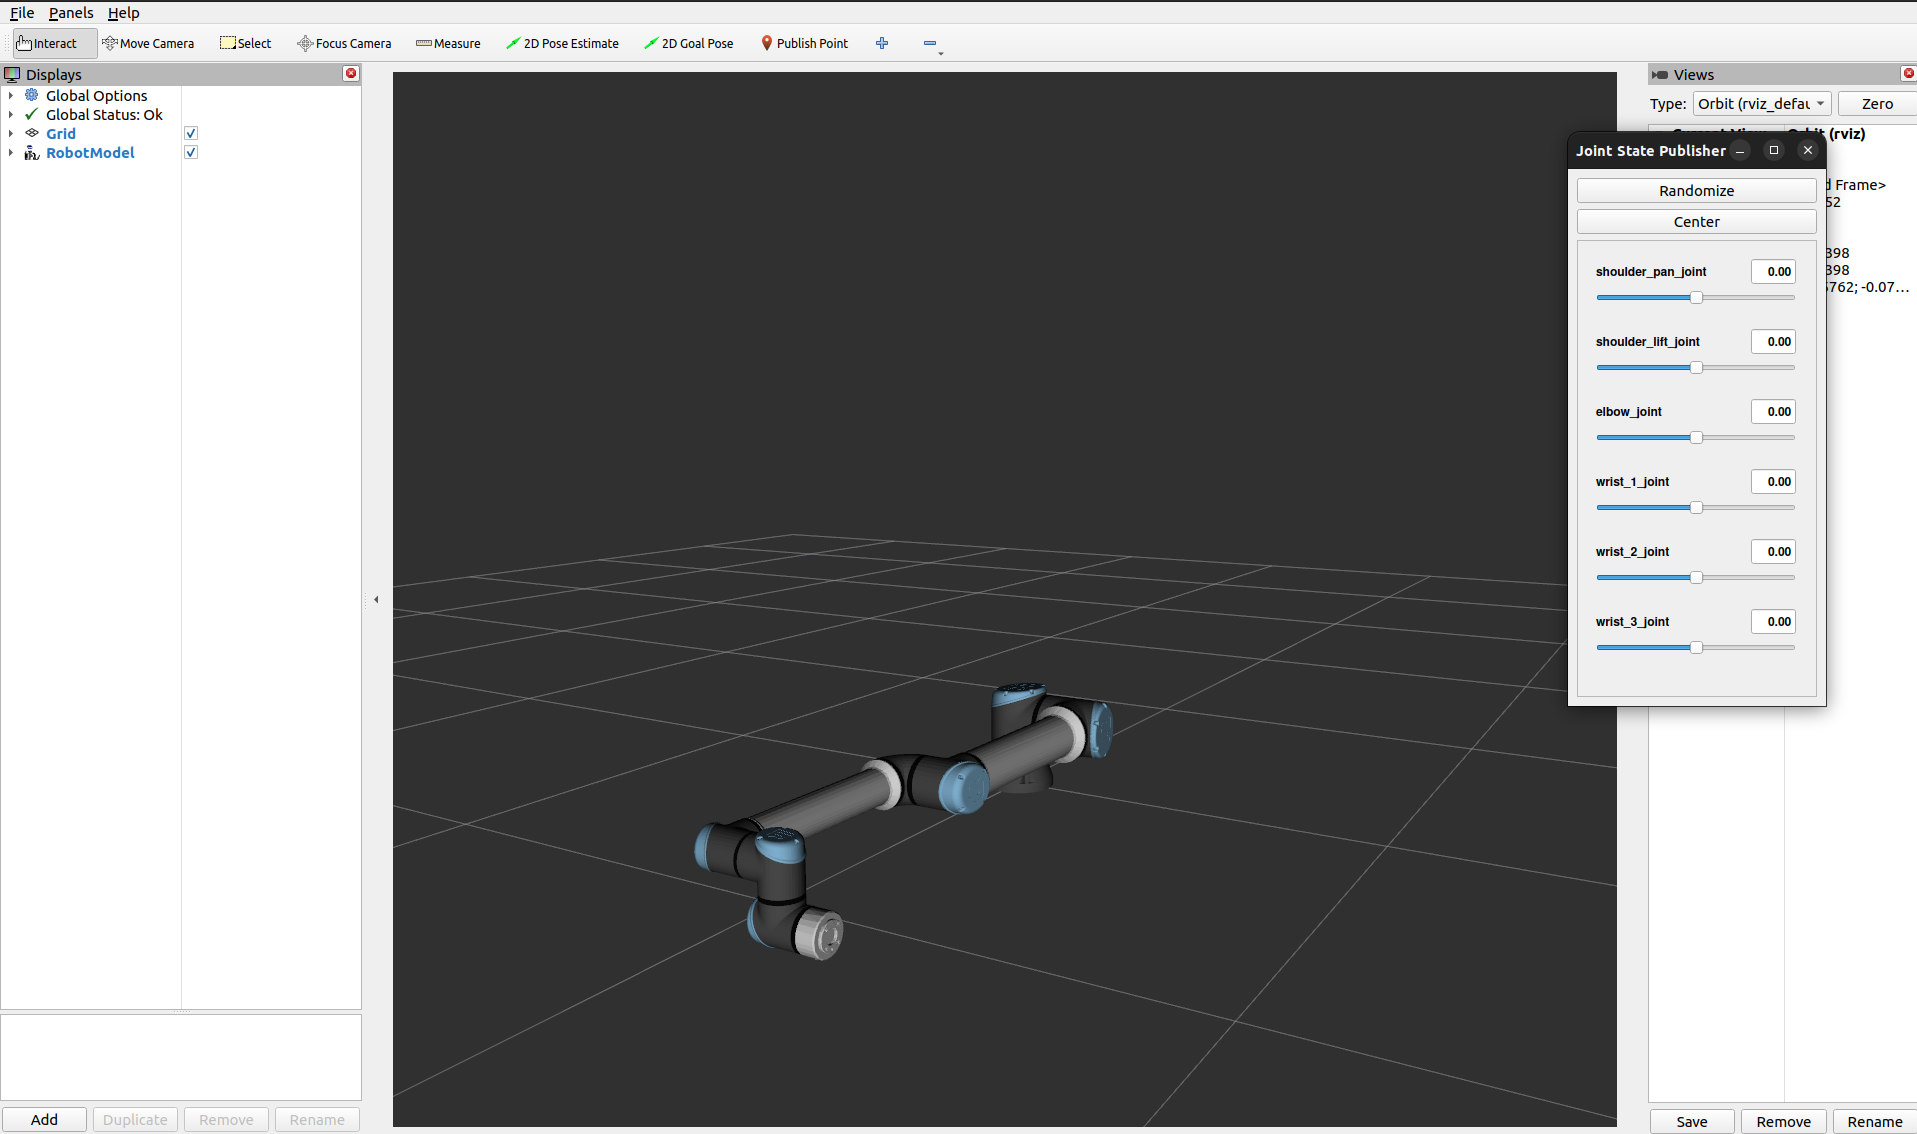
Verify that you see a window similar to the image below:
Set up one more terminal for
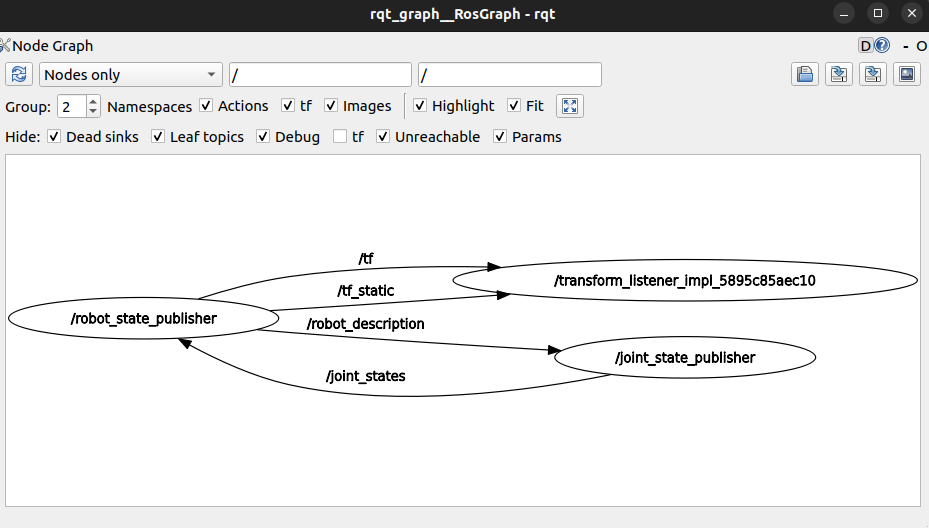
rqt_graph, to see ROS nodes and topics being published:rqt_graph
Verify that you see a window similar to the image below:
Hint
If the nodes are not showing up in rqt_graph, press the refresh button next to the drop down menu.
Import the UR10e Robot into Isaac Sim#
Go to Isaac Sim.
Navigate to File > Import from the ROS 2 URDF Node.
In the Node field, type
robot_state_publisher, click Refresh.In the Model field, select the desired output (for example,
~/Desktop).Select Natural Frequency for joint configuration.
Select all the joints listed below, then set the Natural Frequency to
300to ensure the joints are sufficiently stiff.
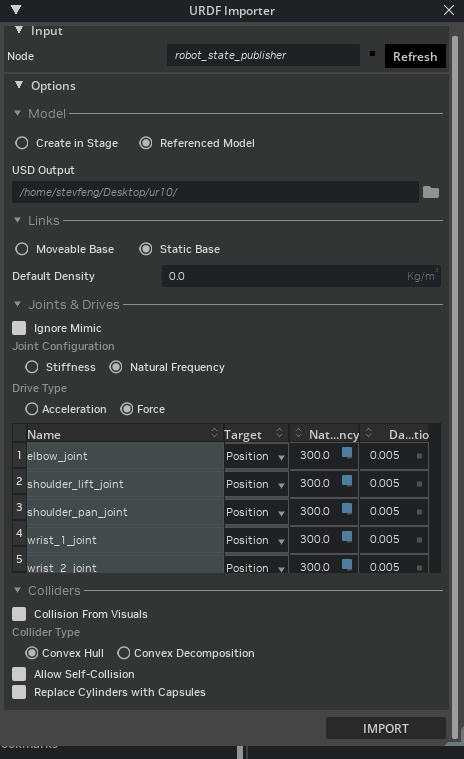
Click Import.
For reference, we also provide the resulting USD file, it is available in the content browser at Isaac Sim/Samples/Rigging/Manipulator/import_manipulator/ur10e/ur/ur.usd.
Import the Robotiq 2F-140 Gripper (linux only)#
Use the URDF file provided by ros-industrial-attic. Even though this package is built for ROS1 and is deprecated, we can still adopt the URDF files and import the gripper for NVIDIA Isaac Sim.
Convert XACRO to URDF#
Download the Repository from here.
git clone https://github.com/ros-industrial-attic/robotiq.git
Navigate to the
robotiq/robotiq_2f_140_gripper_visualization/urdffolder, open each xacro file.Replace
$(find robotiq_2f_140_gripper_visualization)with relative path to the target file (for example,robotiq_arg2f_transimission.xacro) from the current xacro file.For example, in
robotiq_arg2f_140_model.xacro, replace:<xacro:include filename="$(find robotiq_2f_140_gripper_visualization)/urdf/robotiq_arg2f_transmission.xacro" />
With:
<xacro:include filename="./robotiq_arg2f_transmission.xacro" />
Replace
package://with relative path to the target file (for example,robotiq_arg2f_${stroke}_inner_finger.stl) from the current xacro file.For example, in
robotiq_arg2f_140_model.xacro, replace:<mesh filename="package://robotiq_2f_140_gripper_visualization/meshes/visual/robotiq_arg2f_${stroke}_inner_finger.stl" />
With:
<mesh filename="../meshes/visual/robotiq_arg2f_${stroke}_inner_finger.stl" />
Convert the xacro files to URDF format:
xacro robotiq_arg2f_140_model.xacro > robotiq_2f_140.urdf
If you encounter the error
xacro: command not found, you need to install xacro.Install xacro using the following command:
sudo apt install ros-$ROS_DISTRO-xacro
For reference, we also provide the resulting URDF files in Content Browser at Isaac Sim/Samples/Rigging/Manipulator/import_manipulator/robotiq_2f_140_urdf/urdf/robotiq_2f_140.urdf.
Import Robotiq 2F-140 Gripper into Isaac Sim#
Go to Isaac Sim.
Let’s create a new stage by going to File > New.
Navigate to File > Import.
Select the
robotiq_2f_140.urdffile that you imported from the previous step.In the import settings:
For USD Output, navigate to your desktop using file browser and select Desktop this will be the output location of the gripper USD.
For
finger_joint, set the Natural Frequency to300.For the other joints of target
Mimic, set the Natural Frequency to2500.
Click
Importto complete the process.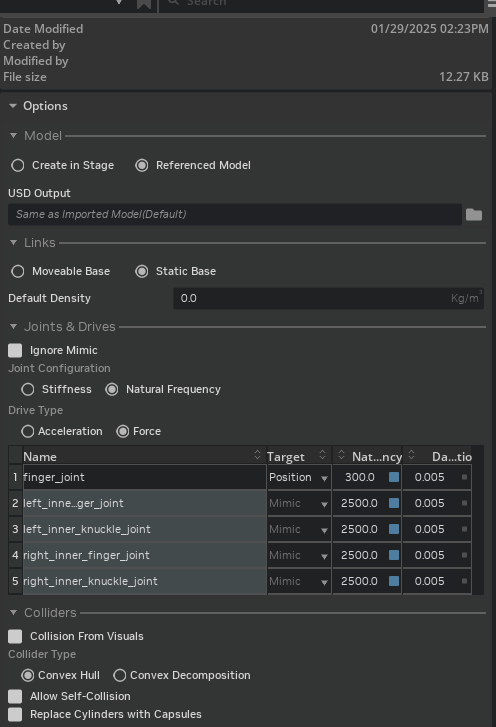
For reference, we also provide the resulting USD file, it is available in the content browser at Isaac Sim/Samples/Rigging/Manipulator/import_manipulator/robotiq_2f_140/robotiq_2f_140.usd.
Expected Parameters for Finger and Knuckle Joints#
Joint Name |
Lower Limit |
Upper Limit |
Gearing |
Stiffness |
Damping |
Max Force |
|---|---|---|---|---|---|---|
Finger Joint |
0 |
40.107 |
N/A |
37.51957 |
0.00125 |
1000 |
Left inner Finger |
-8.021 |
48.128 |
-1 |
N/A |
N/A |
N/A |
Left Inner Knuckle |
-48.128 |
8.021 |
1 |
N/A |
N/A |
N/A |
Right inner Knuckle |
-48.128 |
8.021 |
1 |
N/A |
N/A |
N/A |
Right outer knuckle |
-48.128 |
8.021 |
1 |
N/A |
N/A |
N/A |
Right inner Finger |
-8.021 |
48.128 |
-1 |
N/A |
N/A |
N/A |
Expected Parameters for Mimic Joints#
Reference Joint:
/robotiq_arg2f_140_model/joints/finger_jointReference Joint Axis:
rotXNatural Frequency:
2500Damping Ratio:
0.005
Connect the UR10e Robot with the Robotiq 2F-140 Gripper#
Much like a real robot can have its tools changed for different tasks, simulated robots benefit from the same capability. In this section, we will outline two methods to connect the UR10e robot with the Robotiq 2F-140 gripper:
Option 1, shows how to connect the gripper to the robot directly using a fixed joint with a shared articulation.
Option 2, shows how to use the robot assembler and variant to connect the end effectors to the robot. Depending on the variant selected, the gripper will be added as a payload, which allows us to load or unload the different end effectors depending on which variant is enabled.
Option 1: Connect the UR10e with the Robotiq 2F-140 Gripper using the GUI#
Open the UR10e USD file created from the last activity (
ur.usd).Drag and drop the
robotiq_2f_140.usdfile, we created earlier, into the stage.Rename the
robotiq_2f_140.usdprim toee_link.Set the
ee_linkxform to the position and orientation ofwrist_3_link.Translate (1.18425, 0.2907, 0.06085) Orient (-90, 0, -90)
Select
ee_link/root_joint.Go to the
Physics Articulation Rootsection in the Property Editor, remove theArticulation Root.We only want a single articulation for the robot.
Go down to the
Jointssection in the Property Editor.Set
Body0to/ur/wrist_3_link, to joint the end effector to the robot.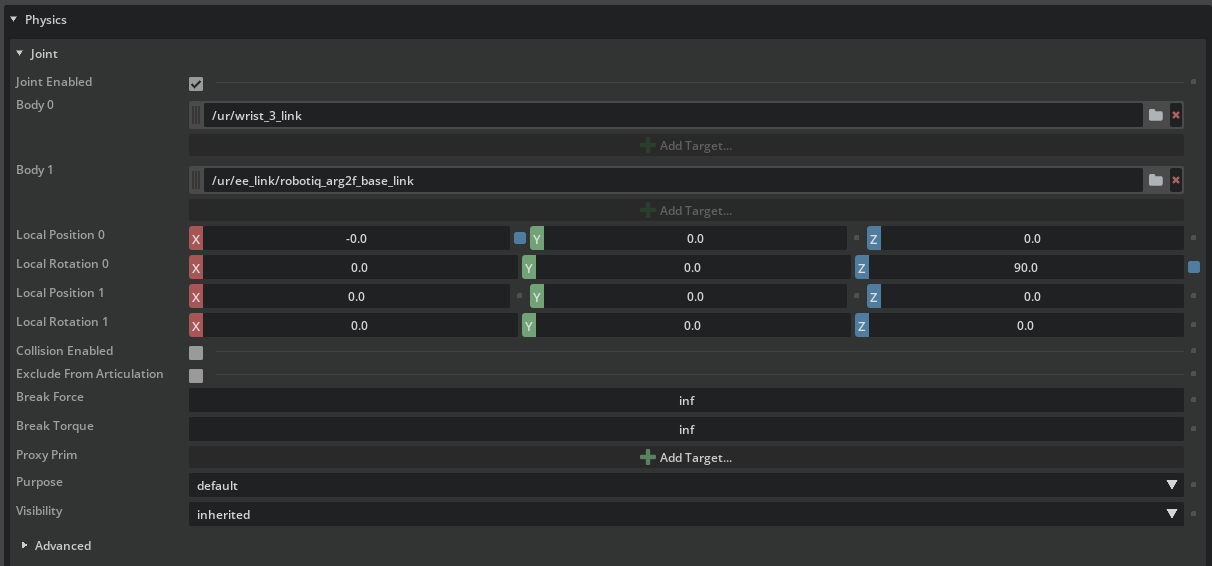
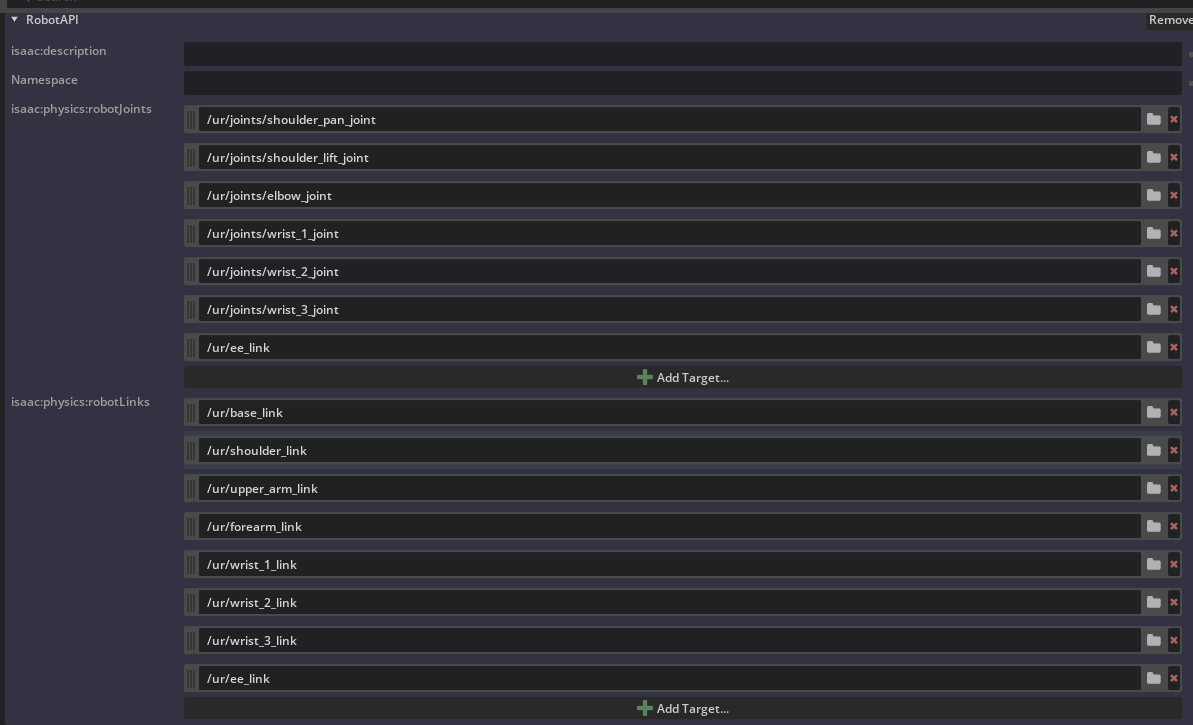
Nest the UR10e robot schema into the 2F-140 gripper’s robot schema:
Select the
urprim.Go down to the
IsaacRobotAPIsection in the Property Editor, and add/ur/ee_linkto both theisaac:physics:robotjointsandisaac:physics:robotLinksfields, to make sure that the UR10e robot’s robot schema includes the 2F-140 gripper’s robot schema.
Your robot is now connected to the gripper, and you can test your robot in Tutorial 6: Setup a Manipulator.
For reference, we also provide the resulting USD file in Content Browser at Isaac Sim/Samples/Rigging/Manipulator/import_manipulator/ur10e/ur/ur_gripper_manual.usd.
Option 2: Connect the UR10e with the Robotiq 2F-140 Gripper using the Robot Assembler#
Alternatively, you can use the Robot Assembler to connect the UR10e with the Robotiq 2F-140 gripper. The robot assembler will add the gripper as a variant to a sublayer of the base robot, giving you greater flexibility to switch between different end effectors.
Open the UR10e USD file created from the last activity (
ur.usd).Drag and drop the
robotiq_2f_140.usdfile we created earlier into the stage.Rename the
robotiq_2f_140prim toee_link.Open the robot assembler by going to Tools > Robotics > Asset Editor > Robot Assembler.
In Base Robot, set Select Base Robot to
/ur, Attach Point towrist_3_link.In Attach Robot, set Select Attach Robot to
/ur/ee_link, Attach Point torobotiq_arg2f_base_link.Set Assembly Namespace to
ee_link.
Click Begin Assembling Process to start the process.

Adjust the attachment point orientation to make sure the end effector is attached to the gripper correctly. Rotate the gripper 90 degrees around the z-axis by clicking Z +90.
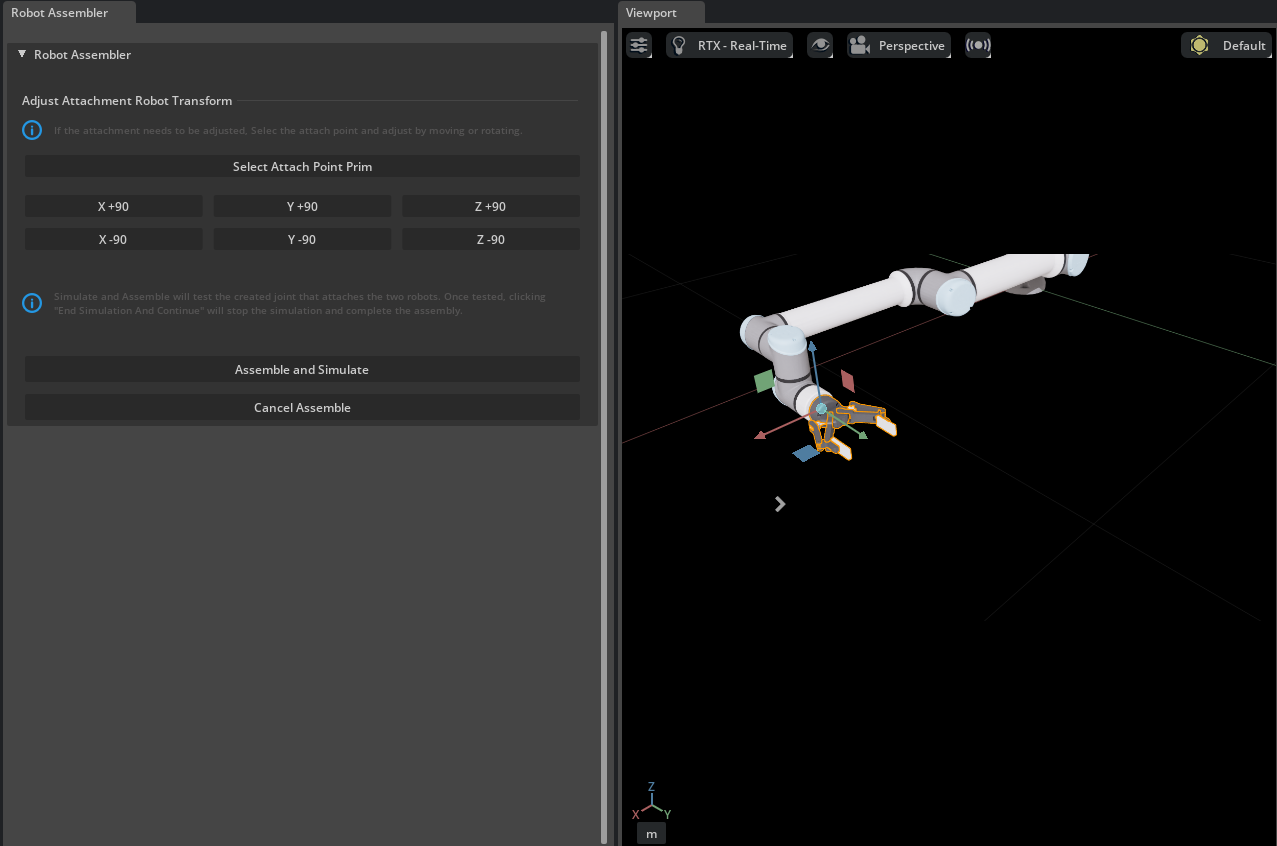
Click Assemble and Simulate to test the process.
Click End Simulation And Finish to complete the process.
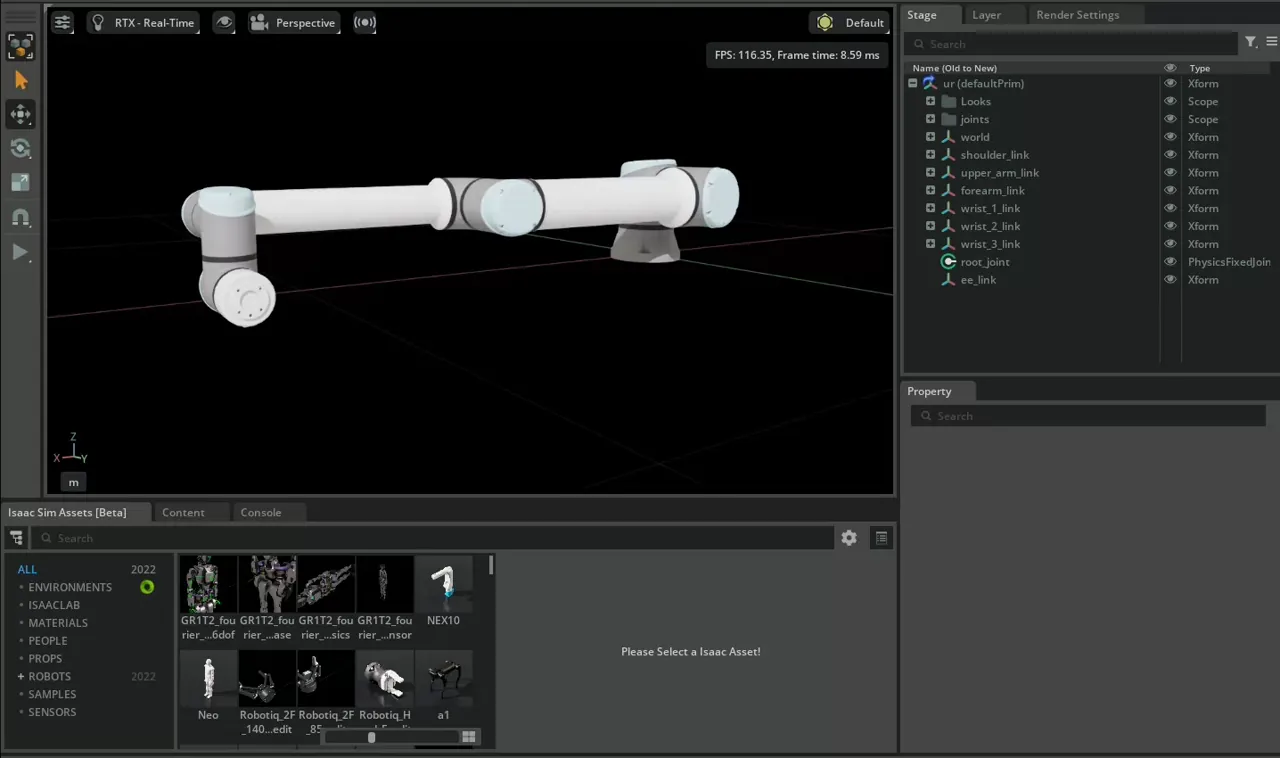
Run the Simulation#
In the Stage panel, select the ur prim.
In the Property Editor at the bottom right, find the Variants section.
Beside ee_link, select None and the gripper will be removed from the robot.
Beside ee_link, select robotiq_2f_140 and the gripper will be added to the robot.
Save the asset by going to File > Save or press Ctrl+S.
Note
The completed robotics arm asset is available in the content browser at Isaac Sim/Samples/Rigging/Manipulator/import_manipulator/ur10e/ur/ur_gripper.usd.
Summary#
In this tutorial, you took the UR10e robot from Universal Robots and the 2F-140 gripper from Robotiq and imported them into NVIDIA Isaac Sim from URDF files and connected them together under one articulation using the GUI and Robot Assembler.