ROS 2 Ackermann Controller#
Learning Objectives#
In this example, you learn to drive a Leatherback car by subscribing to a AckermannDriveStamped message through the ROS network. You will learn to:
Setup Articulation and Ackermann Controllers to a Leatherback
Setup the robot to be driven by a ROS 2
AckermannDriveStampedmessageControl an Ackermann base robot with a Twist message
Getting Started#
Prerequisite
The ackermann_msgs ROS 2 package is required to run this sample. To install this package run the following command:
sudo apt install ros-humble-ackermann-msgs
Enable the
isaacsim.ros2.bridgeExtension in the Extension Manager window by navigating to Window > Extensions.This tutorial requires
isaac_tutorialsandcmdvel_to_ackermannROS 2 packages which are provided in IsaacSim-ros_workspaces repo. Complete ROS 2 Installation to make sure the ROS 2 workspace environment is setup correctly.
Ackermann Controller and Drive Setup#
In a new stage, create the Flat Grid environment by going to Create > Environments > Flat Grid.
Add the Leatherback robot by going to the Content Browser, click Isaac Sim>ROBOTS>NVIDIA>Leatherback.
Drag and drop the leatherback.usd asset in scene/stage window. Ensure that it is placed at the origin by zero’ing out all the Translate components in the Transform Property.
Create a new action graph by navigating to Window > Graph Editors > Action Graph.
In the Action Graph panel, select New Action Graph.
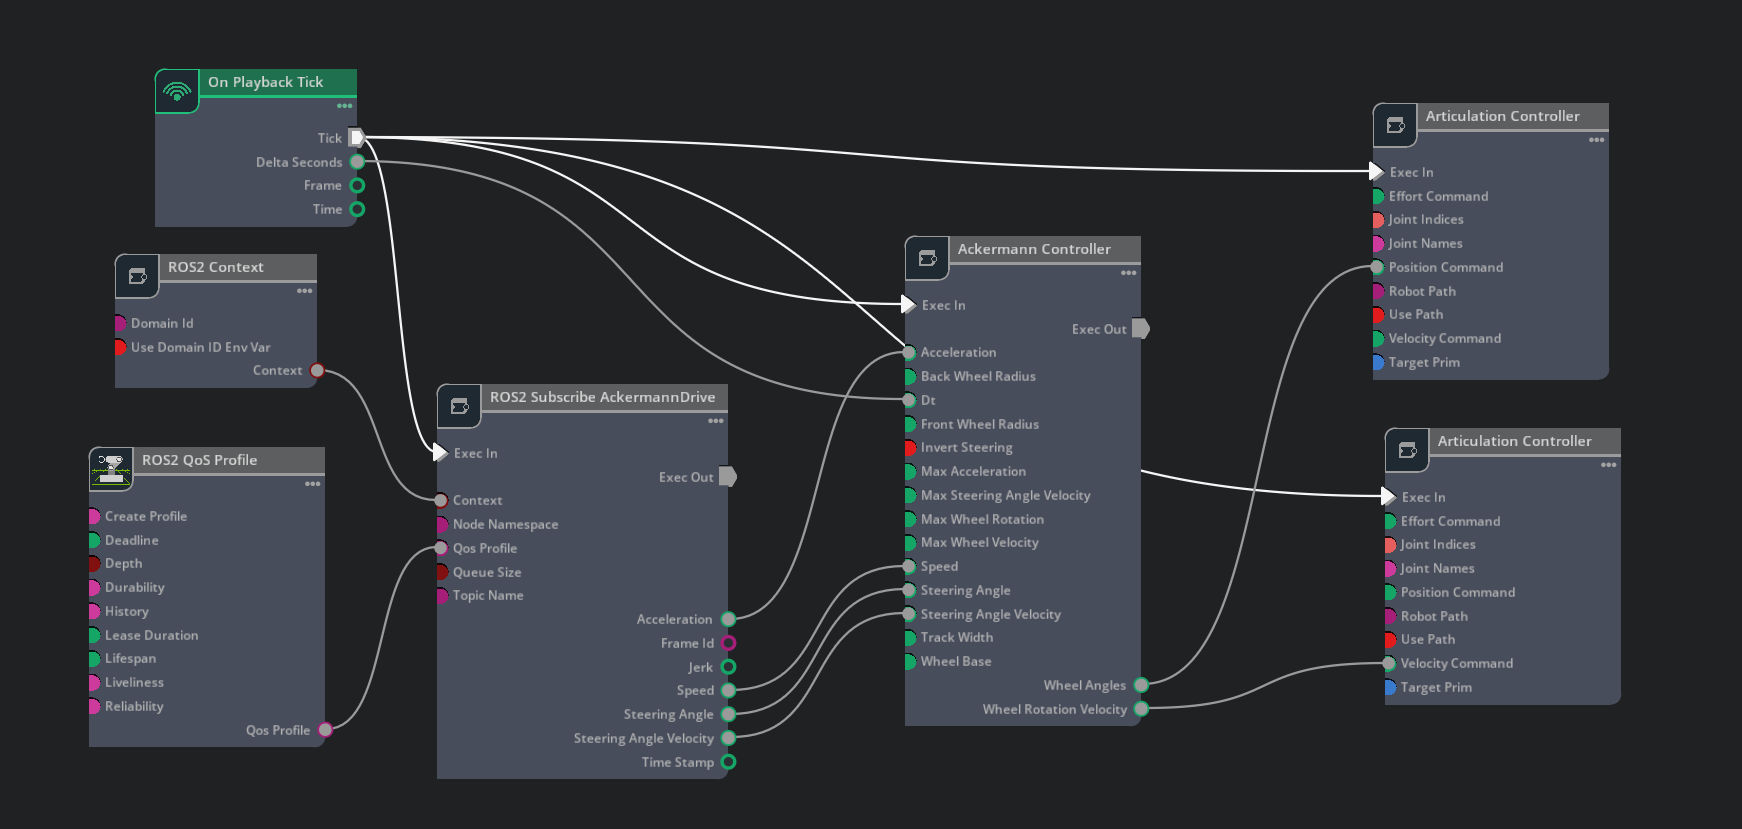
Add the following nodes to the graph and connect them as shown:
On Playback Tick node to execute other graph nodes every simulation frame.
ROS 2 Context node to create a context using either the given Domain ID or the
ROS_DOMAIN_IDenvironment variable.Ackermann Controller node to compute individual wheel steering angles and wheel speed.
ROS 2 Subscribe AckermannDrive node to subscribe to Ackermann drive commands.
ROS 2 QoS Profile node to create a QoS profile.
Articulation Controller node to manipulate the steering joints of the Leatherback. In the Property tab:
Add the Leatherback prim (that is.
/Leatherback) to its targetPrim input field.For the jointNames input field:
Click Add Element and enter
Knuckle__Upright__Front_Leftin the text field that appears.Click Add Element again and enter
Knuckle__Upright__Front_Rightin the text field that appears.
Articulation Controller_01 node to manipulate the wheels of the Leatherback. In the Property tab:
Add the Leatherback prim (that is.
/Leatherback) to its targetPrim input field.For the jointNames input field:
Click Add Element and enter
Wheel__Upright__Rear_Leftin the text field that appears.Click Add Element again and enter
Wheel__Upright__Rear_Rightin the text field that appears.Click Add Element again and enter
Wheel__Knuckle__Front_Leftin the text field that appears.Click Add Element again and enter
Wheel__Knuckle__Front_Rightin the text field that appears.
ActionGraph setup#
In the Property tab for the ROS 2 Subscribe AckermannDrive node:
Ensure the topicName input field is set to
ackermann_cmd.
In the Property tab for the Ackermann Controller node set inputs as shown in the table below:
Input Field
Value
backWheelRadius
0.052
frontWheelRadius
0.052
maxWheelRotation
0.7854
maxWheelVelocity
20.0
trackWidth
0.24
wheelBase
0.32
maxAcceleration
1.0
maxSteeringAngleVelocity
1.0
Hit Play in Isaac Sim to start simulation.
In a new terminal, verify that your Isaac Sim ROS workspace is sourced and run the following node to start publishing Ackermann commands:
ros2 run isaac_tutorials ros2_ackermann_publisher.py
Verify that the Leatherback car moves similarly to the one below:

Note
Preconfigured Leatherback Assets
Leatherback asset with action graph is located at Isaac Sim>Sample>ROS2>Robots>Leatherback_ROS in the Content Browser.
Leatherback warehouse with race track scene is located at Isaac Sim>Sample>ROS2>Scenario>leatherback_ackermann in the Content Browser.
Converting Twist Messages to AckermannDriveStamped Messages#
To control the Leatherback robot using your keyboard by translating command velocity to Ackermann drive stamped messages:
Open the Leatherback warehouse with race track scene by going to the Content Browser Isaac Sim>Sample>ROS2>Scenario>leatherback_ackermann.
Press PLAY to start the simulation.
Stop the previous publisher.
In a new terminal, verify that your Isaac Sim ROS workspace is sourced and run the following node to start publishing Ackermann commands from
cmd_vel.ros2 launch cmdvel_to_ackermann cmdvel_to_ackermann.launch.py acceleration:=0.5 steering_velocity:=0.5
Note
launch parameters
publish_period_ms(default_value=20): publishing dt (ms)track_width(default_value=0.2): wheel separation distance (m)acceleration(default_value=0.0): acceleration, 0 means change speed as quickly as possible (ms^-2)steering_velocity(default_value=0.0): delta steering angle, 0 means change angle as quickly as possible (radians/s)
In a separate terminal, source ROS and launch
teleop_twist_keyboardor another desired package to publish Twist messages:ros2 run teleop_twist_keyboard teleop_twist_keyboard
You can now control the Leatherback robot using your keyboard. Try the controls. For example, test that you can stay on the racetrack.
Forward: i
Backward: ,
Forward Left: u
Forward Right: o
Backward Left: m
Backward Right: .
Stop: k

Summary#
This tutorial covered:
Creating and setting up an Ackermann Controller node and with articulation controller nodes.
Adding a ROS 2
AckermannDriveStampedsubscriber node, which feeds commands into the Ackermann Controller node.Translating the command velocity to
AckermannDriveStampedmessage and control an Ackermann based robot with keyboard.
Next Steps#
Continue on to the next tutorial in our ROS 2 Tutorials series, Running a Reinforcement Learning Policy through ROS2 and Isaac Sim to learn how to configure a robot to run a locomotion policy in Isaac Sim with ROS 2.