Asset Structure#
The Isaac Sim Imported assets are organized in a specific structure to make it easier to manage, reuse, and simulate them. Each asset is broken down into multiple components, which can be categorized as follows:
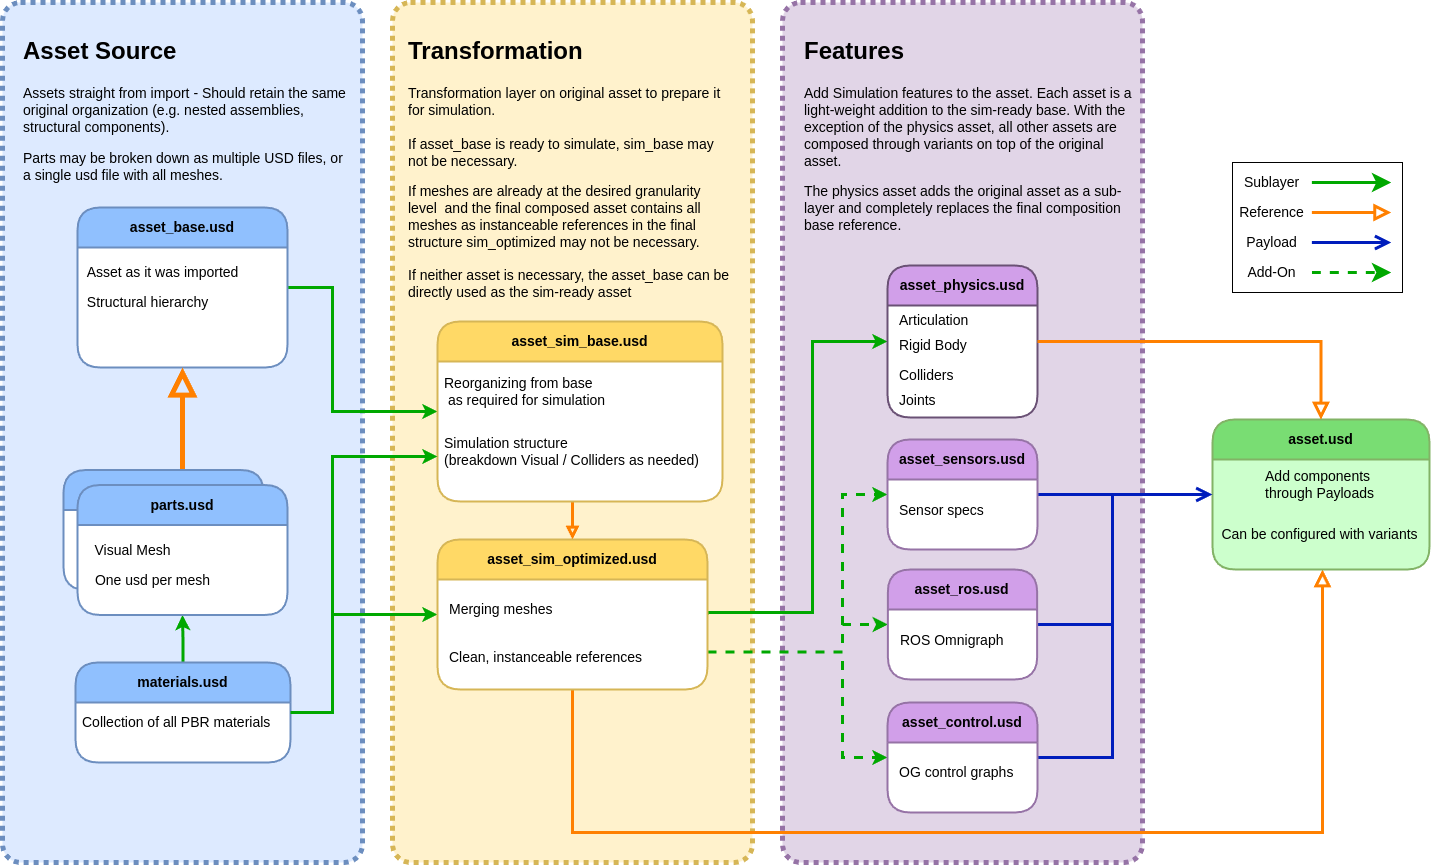
For an example of an asset following these guidelines check Nova carter at Robots/NVIDIA/Carter/nova_carter/ in Isaac Sim assets.
Asset Source#
Assets in this stage represent their raw form as imported from their original file format. They are typically organized into:
Base Asset (
asset_base.usd): Contains the full structural hierarchy of the asset, such as robot assemblies.Parts (
parts.usd): Includes individual components, with one USD file per mesh. This modular breakdown ensures easy access and management.Materials (
materials.usd): A collection of Physically Based Rendering (PBR) materials used by the asset.
Guidelines:#
The source assets should remain unchanged to ensure that they can be re-imported seamlessly without losing downstream modifications.
Consistency is critical: the structural hierarchy, naming conventions, and part assemblies must remain intact.
Transformation#
This stage prepares the asset for simulation by reorganizing and optimizing it. This transformation is necessary when the source asset contains nested rigid bodies or a complex structure that doesn’t meet the requirements of simulation. The structure must be flattened with rigid bodies organized into a simple list, and meshes should be simplified to minimize their total count. The transformation process includes:
Reorganizing Structure: - Create the simulation structure (e.g., separating visuals and colliders as needed). - Adjust the hierarchy to fit simulation requirements.
Optimizing Meshes: - Merge meshes that will function as a single rigid body. - Simplify the material count into a single visual material list. - Clean and format meshes as instanceable references to enhance performance.
Note
If the asset source is already in a format suitable for simulation, this step or parts of it can be skipped.
Features#
Simulation features are added in this stage, and each feature is defined as a separate lightweight layer that builds on top of the transformed asset. These features include, but are not limited to, physics setups, sensor configurations, and control graphs.
Workflow for Adding/Modifying Features:#
Create a new empty stage or open the existing feature stage.
Add the optimized asset (
asset_sim_optimized.usd) as a sub-layer.Modify the root layer to add/modify the feature.
Remove or disable the sub-layer (optimized asset) from the stage composition before saving.
Add the feature to the final asset as a payload. Optionally, a Variant set can be configured to enable quick switching between different feature sets by selecting them on a list.
Example Features:#
Physics (
asset_physics.usd): Adds rigid bodies, colliders, joints, and articulations.Sensors (
asset_sensors.usd): Defines sensor specifications.Control Graphs (
asset_control.usd): Adds control features for simulations.ROS Integration (
asset_ros.usd): Configures ROS Omnigraph functionalities.
Note
The Physics feature is an exception and is added as a reference to the default prim, while other features are added as payloads. and it maintains the layer connection to the optimized asset.
Composition of Final Asset#
The final composed asset is represented in the asset.usd file, which integrates all the necessary components for simulation. This is achieved through the following composition process:
Sublayers: - The base or optimized asset (
asset_sim_optimized.usd) is included as a sublayer to provide the core structural and visual elements.Payloads: - Features such as sensors (
asset_sensors.usd) and control graphs (asset_control.usd) are dynamically added as payloads. This allows for flexible and efficient loading of components.References: - The physics setup (
asset_physics.usd) is added as a reference to the default prim, ensuring a consistent simulation-ready configuration.Variants: - Variants can be configured in the
asset.usdfile to enable different feature sets, such as alternative sensor configurations or control setups, without duplicating the asset.
This modular approach ensures that the final asset file is both lightweight and highly flexible, making it easy to adapt to different simulation scenarios.
To keep assets organized and maintainable, it is recommended to follow the structure and guidelines outlined above. This will help streamline the asset creation process and improve overall simulation performance.
It is also suggested to keep the assets organized in folders, with the source assets in their own folder, and all features in a features folder, while the final asset is saved in the root folder. By default Isaac Sim importers for robots follow this structure.
Robot Schema#
The Robot Schema provides a way to describe the robot structure agnostic of the simulation asset structure. The robot schema should be included as a sublayer on the robot asset.
Key Definitions and Notes#
Add-ons: - Features that have the simulation asset as a temporary sublayer used during feature creation - We call this the Add-on. The sublayer connection is broken before saving the feature asset.
Payloads: Dynamically loadable components that reduce memory overhead and improve modularity.