

与可变形对象交互#
可变形物体有时泛指布料、流体和软体等对象;Isaac Lab 则将其表示为表面可变形物体或体积可变形物体。与刚性物体不同,软体会在外力和碰撞下变形。本教程关注体积可变形物体。表面可变形物体(布料)的示例可通过运行 deformables 查看。
可变形物体 API 以及模式定义、修改函数由各后端共享,而可变形属性和材料配置类因后端而异。PhysX 使用有限元法(FEM)仿真软体;实验性 Newton 后端使用 isaaclab_newton.physics 的核心 VBD 求解器,以及 isaaclab_newton.assets 的可变形物体集成。体积可变形物体由两个四面体网格组成:仿真网格和碰撞网格。前者用于计算软体变形,后者用于检测与场景中其他物体的碰撞。PhysX 专用细节见 PhysX 文档 。
本教程展示了如何在仿真中与可变形对象进行交互。我们将生成一组软体立方体,并了解如何设置它们的节点位置和速度,以及如何对网格节点应用运动学命令以移动软体。
备注
本教程会自动对体积可变形物体进行四面体化,默认可视化器为 Kit。运行时选择 isaacsim 和 tetrahedralization 可选依赖组:
uv run --extra isaacsim --extra tetrahedralization python scripts/tutorials/01_assets/run_deformable_object.py --visualizer kit
使用传统安装程序时,先安装可选依赖:
./isaaclab.sh -i tetrahedralization
代码#
该教程对应于 run_deformable_object.py 脚本,在 scripts/tutorials/01_assets 目录中。
run_deformable_object.py 的代码
  1# Copyright (c) 2022-2026, The Isaac Lab Project Developers (https://github.com/isaac-sim/IsaacLab/blob/main/CONTRIBUTORS.md).
  2# All rights reserved.
  3#
  4# SPDX-License-Identifier: BSD-3-Clause
  5
  6"""
  7This script demonstrates how to work with the deformable object and interact with it.
  8
  9.. code-block:: bash
 10
 11    # Usage with default PhysX physics and default kit visualizer.
 12    uv run --extra isaacsim --extra tetrahedralization python scripts/tutorials/01_assets/run_deformable_object.py
 13
 14    # Usage with Newton VBD physics and default kit visualizer.
 15    uv run --extra isaacsim --extra tetrahedralization python scripts/tutorials/01_assets/run_deformable_object.py \
 16        --backend newton_vbd
 17
 18    # Usage with OvPhysX physics without a visualizer.
 19    uv run --extra ovphysx --extra tetrahedralization python scripts/tutorials/01_assets/run_deformable_object.py \
 20        --backend ovphysx
 21
 22"""
 23
 24"""Parse CLI first so we can decide whether to launch Isaac Sim Kit."""
 25
 26import argparse
 27from typing import TYPE_CHECKING
 28
 29from isaaclab.app import add_launcher_args, launch_simulation
 30
 31# add argparse arguments
 32parser = argparse.ArgumentParser(description="Tutorial on interacting with a deformable object.")
 33parser.add_argument(
 34    "--backend", type=str, default="physx", choices=["physx", "newton_vbd", "ovphysx"], help="Physics backend."
 35)
 36# append simulation launcher CLI arguments
 37add_launcher_args(parser)
 38# Kit cannot be combined with OvPhysX, so use no visualizer by default for that backend
 39backend_args, _ = parser.parse_known_args()
 40parser.set_defaults(visualizer=None if backend_args.backend == "ovphysx" else ["kit"])
 41# parse the arguments
 42args_cli = parser.parse_args()
 43args_cli.physics = args_cli.backend
 44
 45"""Rest everything follows."""
 46
 47import torch
 48
 49import isaaclab.sim as sim_utils
 50import isaaclab.utils.math as math_utils
 51from isaaclab.assets import AssetBaseCfg, DeformableObjectCfg
 52from isaaclab.cloner import CloneCfg
 53from isaaclab.physics import PhysicsCfg
 54from isaaclab.scene import InteractiveSceneCfg
 55from isaaclab.utils import configclass, index_fill_, instantiate
 56
 57if TYPE_CHECKING:
 58    from isaaclab.assets import DeformableObject
 59    from isaaclab.scene import InteractiveScene
 60
 61
 62youngs_modulus = 1e5
 63poissons_ratio = 0.4
 64density = 500.0
 65if args_cli.backend == "newton_vbd":
 66    from isaaclab_newton.sim.schemas import NewtonDeformableBodyPropertiesCfg
 67    from isaaclab_newton.sim.spawners.materials import NewtonDeformableBodyMaterialCfg
 68
 69    deformable_props = NewtonDeformableBodyPropertiesCfg()
 70    # Newton's VBD path skips the simulation mesh collider, so collision offsets do not apply
 71    collision_props = None
 72    physics_material = NewtonDeformableBodyMaterialCfg(
 73        k_mu=youngs_modulus / (2.0 * (1.0 + poissons_ratio)),
 74        k_lambda=youngs_modulus * poissons_ratio / ((1.0 + poissons_ratio) * (1.0 - 2.0 * poissons_ratio)),
 75        density=density,
 76    )
 77else:
 78    from isaaclab_physx.sim.schemas import PhysxCollisionCfg, PhysxDeformableBodyPropertiesCfg
 79    from isaaclab_physx.sim.spawners.materials import PhysxDeformableBodyMaterialCfg
 80
 81    deformable_props = PhysxDeformableBodyPropertiesCfg()
 82    collision_props = [PhysxCollisionCfg(rest_offset=0.0, contact_offset=0.001)]
 83    physics_material = PhysxDeformableBodyMaterialCfg(
 84        poissons_ratio=poissons_ratio, youngs_modulus=youngs_modulus, density=density
 85    )
 86
 87
 88@configclass
 89class DeformableSceneCfg(InteractiveSceneCfg):
 90    """Soft cubes on a shared ground plane."""
 91
 92    filter_collisions = False
 93    clone_cfg = CloneCfg(clone_template="/World/env_{}")
 94
 95    ground = AssetBaseCfg(prim_path="/World/defaultGroundPlane", spawn=sim_utils.GroundPlaneCfg())
 96    light = AssetBaseCfg(
 97        prim_path="/World/Light", spawn=sim_utils.DomeLightCfg(intensity=2000.0, color=(0.8, 0.8, 0.8))
 98    )
 99
100    # 3D Deformable Object
101    cube_object = DeformableObjectCfg(
102        prim_path="{ENV_REGEX_NS}/Cube",
103        # PhysX deformables must be parsed from USD while other assets retain native replication.
104        cloning_contexts=("isaaclab.cloner:UsdReplicateContext",) if args_cli.backend == "physx" else None,
105        spawn=sim_utils.MeshCuboidCfg(
106            size=(0.2, 0.2, 0.2),
107            deformable_props=deformable_props,
108            collision_props=collision_props,
109            visual_material=sim_utils.PreviewSurfaceCfg(diffuse_color=(0.5, 0.1, 0.0)),
110            physics_material=physics_material,
111        ),
112        init_state=DeformableObjectCfg.InitialStateCfg(pos=(0.0, 0.0, 1.0)),
113        debug_vis=True,
114    )
115
116
117def run_simulator(sim: sim_utils.SimulationContext, scene: "InteractiveScene"):
118    """Runs the simulation loop."""
119    # Extract scene entities
120    cube_object: DeformableObject = scene["cube_object"]
121
122    # Define simulation stepping
123    sim_dt = sim.get_physics_dt()
124    sim_time = 0.0
125    count = 0
126
127    # Nodal kinematic targets of the deformable bodies
128    nodal_kinematic_target = cube_object.data.nodal_kinematic_target.torch.clone()
129
130    # Simulate physics
131    while sim.is_running():
132        # reset at start and after 3 seconds
133        if count % int(3.0 / sim_dt) == 0:
134            # reset counters
135            count = 0
136
137            # reset the nodal state of the object
138            nodal_state = cube_object.data.default_nodal_state_w.torch.clone()
139            # apply random pose to the object
140            pos_w = torch.rand(cube_object.num_instances, 3, device=sim.device) * 0.1 + scene.env_origins
141            quat_w = math_utils.random_orientation(cube_object.num_instances, device=sim.device)
142            nodal_state[..., :3] = cube_object.transform_nodal_pos(nodal_state[..., :3], pos_w, quat_w)
143
144            # write nodal state to simulation
145            cube_object.write_nodal_state_to_sim_index(nodal_state)
146
147            # Write the nodal state to the kinematic target and free all vertices
148            nodal_kinematic_target[..., :3] = nodal_state[..., :3]
149            nodal_kinematic_target[..., 3] = 1.0
150            cube_object.write_nodal_kinematic_target_to_sim_index(nodal_kinematic_target)
151
152            # reset buffers
153            cube_object.reset()
154
155            print("----------------------------------------")
156            print("[INFO]: Resetting object state...")
157
158        # update the kinematic target for cubes at the positive and negative diagonal corners
159        kinematic_cubes = [1, 2]
160        # we slightly move the cube in the z-direction by picking the vertex at index 0
161        nodal_kinematic_target[kinematic_cubes, 0, 2] += 0.2 * sim_dt
162        # set vertex at index 0 to be kinematically constrained
163        # 0: constrained, 1: free
164        index_fill_(nodal_kinematic_target[:, 0, 3], kinematic_cubes, 0.0)
165        # write kinematic target to simulation
166        cube_object.write_nodal_kinematic_target_to_sim_index(nodal_kinematic_target)
167
168        # write internal data to simulation
169        cube_object.write_data_to_sim()
170        # perform step
171        sim.step()
172        # update sim-time
173        sim_time += sim_dt
174        count += 1
175        # update buffers
176        cube_object.update(sim_dt)
177
178        # print the root positions every second
179        if count % int(1.0 / sim_dt) == 0:
180            print(f"Time {sim_time:.2f}s: \tRoot position (in world): {cube_object.data.root_pos_w.torch[:, :3]}")
181
182
183def main():
184    """Main function."""
185    with launch_simulation(cfg=PhysicsCfg(), launcher_args=args_cli) as physics_cfg:
186        if args_cli.backend == "newton_vbd":
187            physics_cfg.solver_cfg.iterations = 10
188            physics_cfg.num_substeps = 4
189        sim_cfg = sim_utils.SimulationCfg(dt=0.01, device=args_cli.device, physics=physics_cfg)
190        sim = sim_utils.SimulationContext(sim_cfg)
191        # Set main camera
192        sim.set_camera_view(eye=[2.0, 2.0, 2.0], target=[0.0, 0.0, 0.75])
193        scene_cfg = DeformableSceneCfg(num_envs=4, env_spacing=0.5)
194        scene = instantiate(scene_cfg)
195        # Play the simulator
196        sim.reset()
197        # Now we are ready!
198        print("[INFO]: Setup complete...")
199        # Run the simulator
200        run_simulator(sim, scene)
201        print("[INFO]: Simulation complete...")
202
203
204if __name__ == "__main__":
205    # run the main function
206    main()
代码解释#
设计场景#
我们在 scene.InteractiveSceneCfg 的子类中声明地面、灯光和可变形立方体。 scene.InteractiveScene 在内部构建资产并处理复制。 DeformableSceneCfg(num_envs=4, env_spacing=0.5) 在以中心对齐的网格上设置四个环境原点,间距为 0.5 m。
在本教程中,我们使用与 Spawn Objects 教程中的可变立方体类似的 spawn 配置来创建一个立方体软体对象。唯一的区别是我们现在将 spawn 配置包装到 assets.DeformableObjectCfg 类中。这个类包含有关资产的 spawn 策略和默认初始状态的信息。当这个类传递给 assets.DeformableObject 类时,它会在仿真播放时生成对象并初始化相应的物理句柄。
备注
可变形物体需要生成网格对象,并赋予后端专用的可变形体物理属性和匹配的可变形物理材料。PhysX 实现使用 --backend physx ;实验性 Newton 实现使用 --backend newton_vbd 。
场景根据配置构建可变形物体,并管理其克隆生命周期。仿真循环通过 scene["cube_object"] 访问构建出的资产。
@configclass
class DeformableSceneCfg(InteractiveSceneCfg):
    """Soft cubes on a shared ground plane."""

    filter_collisions = False
    clone_cfg = CloneCfg(clone_template="/World/env_{}")

    ground = AssetBaseCfg(prim_path="/World/defaultGroundPlane", spawn=sim_utils.GroundPlaneCfg())
    light = AssetBaseCfg(
        prim_path="/World/Light", spawn=sim_utils.DomeLightCfg(intensity=2000.0, color=(0.8, 0.8, 0.8))
    )

    # 3D Deformable Object
    cube_object = DeformableObjectCfg(
        prim_path="{ENV_REGEX_NS}/Cube",
        # PhysX deformables must be parsed from USD while other assets retain native replication.
        cloning_contexts=("isaaclab.cloner:UsdReplicateContext",) if args_cli.backend == "physx" else None,
        spawn=sim_utils.MeshCuboidCfg(
            size=(0.2, 0.2, 0.2),
            deformable_props=deformable_props,
            collision_props=collision_props,
            visual_material=sim_utils.PreviewSurfaceCfg(diffuse_color=(0.5, 0.1, 0.0)),
            physics_material=physics_material,
        ),
        init_state=DeformableObjectCfg.InitialStateCfg(pos=(0.0, 0.0, 1.0)),
        debug_vis=True,
    )
运行仿真循环#
继续刚体教程,我们在定期间隔内重置仿真,对可变形物体应用运动学命令,推进仿真,并更新可变形对象的内部缓冲区。
重置仿真状态#
与刚体和关节不同,可变形物体具有不同的状态表示。可变形物体的状态由网格的节点位置和速度定义。节点位置和速度定义在 simulation world frame 中,并存储在 assets.DeformableObject.data 属性中。
通过 assets.DeformableObject.data.default_nodal_state_w 属性,获取所生成物体 prim 的默认节点状态。该状态可通过 assets.DeformableObjectCfg.init_state 配置;本教程将立方体放在环境原点上方 1 m 处。
注意
配置中的初始状态 assets.DeformableObjectCfg 指定了在生成时变形对象的姿态。根据这个初始状态,当仿真第一次播放时,会得到默认的节点状态。
我们对节点位置应用变换,以随机化可变形物体的初始状态。
            # reset the nodal state of the object
            nodal_state = cube_object.data.default_nodal_state_w.torch.clone()
            # apply random pose to the object
            pos_w = torch.rand(cube_object.num_instances, 3, device=sim.device) * 0.1 + scene.env_origins
            quat_w = math_utils.random_orientation(cube_object.num_instances, device=sim.device)
            nodal_state[..., :3] = cube_object.transform_nodal_pos(nodal_state[..., :3], pos_w, quat_w)
要重置可变形对象,我们首先通过调用 assets.DeformableObject.write_nodal_state_to_sim() 方法来设置节点状态。此方法将可变形对象原始的节点状态写入仿真缓冲区。此外,我们通过调用 assets.DeformableObject.write_nodal_kinematic_target_to_sim() 方法来释放在上一个仿真步骤中为节点设置的所有运动学目标。我们将在下一节中解释运动学目标。
最后,我们调用 assets.DeformableObject.reset() 方法来重置任何内部缓冲区和缓存。
            # write nodal state to simulation
            cube_object.write_nodal_state_to_sim_index(nodal_state)

            # Write the nodal state to the kinematic target and free all vertices
            nodal_kinematic_target[..., :3] = nodal_state[..., :3]
            nodal_kinematic_target[..., 3] = 1.0
            cube_object.write_nodal_kinematic_target_to_sim_index(nodal_kinematic_target)

            # reset buffers
            cube_object.reset()
推进仿真#
可变形体支持用户控制的运动学操作:用户为部分网格节点指定目标位置,其余节点仍由当前可变形求解器仿真。这种 部分运动学控制 适合需要以受控方式与可变形物体交互的应用。
在本教程中,我们将运动学命令应用于场景中的四个立方体中的两个。我们设置索引为 0(左下角)的节点的位置目标,使立方体沿 z 轴移动。
在每一步中,我们通过一个小值来增加节点的运动学位置目标。此外,我们设置标志以指示该目标是仿真缓冲区中该节点的运动学目标。这些设置通过调用 assets.DeformableObject.write_nodal_kinematic_target_to_sim() 方法来写入仿真缓冲区。
        # update the kinematic target for cubes at the positive and negative diagonal corners
        kinematic_cubes = [1, 2]
        # we slightly move the cube in the z-direction by picking the vertex at index 0
        nodal_kinematic_target[kinematic_cubes, 0, 2] += 0.2 * sim_dt
        # set vertex at index 0 to be kinematically constrained
        # 0: constrained, 1: free
        index_fill_(nodal_kinematic_target[:, 0, 3], kinematic_cubes, 0.0)
        # write kinematic target to simulation
        cube_object.write_nodal_kinematic_target_to_sim_index(nodal_kinematic_target)
类似于刚体和关节,我们在进行仿真步进之前执行 assets.DeformableObject.write_data_to_sim() 方法。对于可变形对象,此方法不会对对象施加任何外部力。然而,我们保留此方法以便于完整性和未来扩展。
        # write internal data to simulation
        cube_object.write_data_to_sim()
更新状态#
在运行仿真后,我们更新可变对象 prims 的内部缓冲区,以反映它们在 assets.DeformableObject.data 属性中的新状态。这是通过 assets.DeformableObject.update() 方法完成的。
在固定的间隔下,我们将可变形物体的根位置打印到终端。如前所述,对于可变形物体来说,没有根状态的概念。然而,我们计算根位置的方法是所有网格节点的平均位置。
        # update buffers
        cube_object.update(sim_dt)

        # print the root positions every second
        if count % int(1.0 / sim_dt) == 0:
            print(f"Time {sim_time:.2f}s: \tRoot position (in world): {cube_object.data.root_pos_w.torch[:, :3]}")
代码执行#
现在我们已经浏览了代码,让我们运行脚本并查看结果:
uv run --extra isaacsim --extra tetrahedralization python scripts/tutorials/01_assets/run_deformable_object.py --visualizer kit
./isaaclab.sh -p scripts/tutorials/01_assets/run_deformable_object.py --visualizer kit
使用实验性 Newton 可变形后端运行同一教程:
uv run --extra isaacsim --extra tetrahedralization python scripts/tutorials/01_assets/run_deformable_object.py --backend newton_vbd --visualizer kit
./isaaclab.sh -p scripts/tutorials/01_assets/run_deformable_object.py --backend newton_vbd --visualizer kit
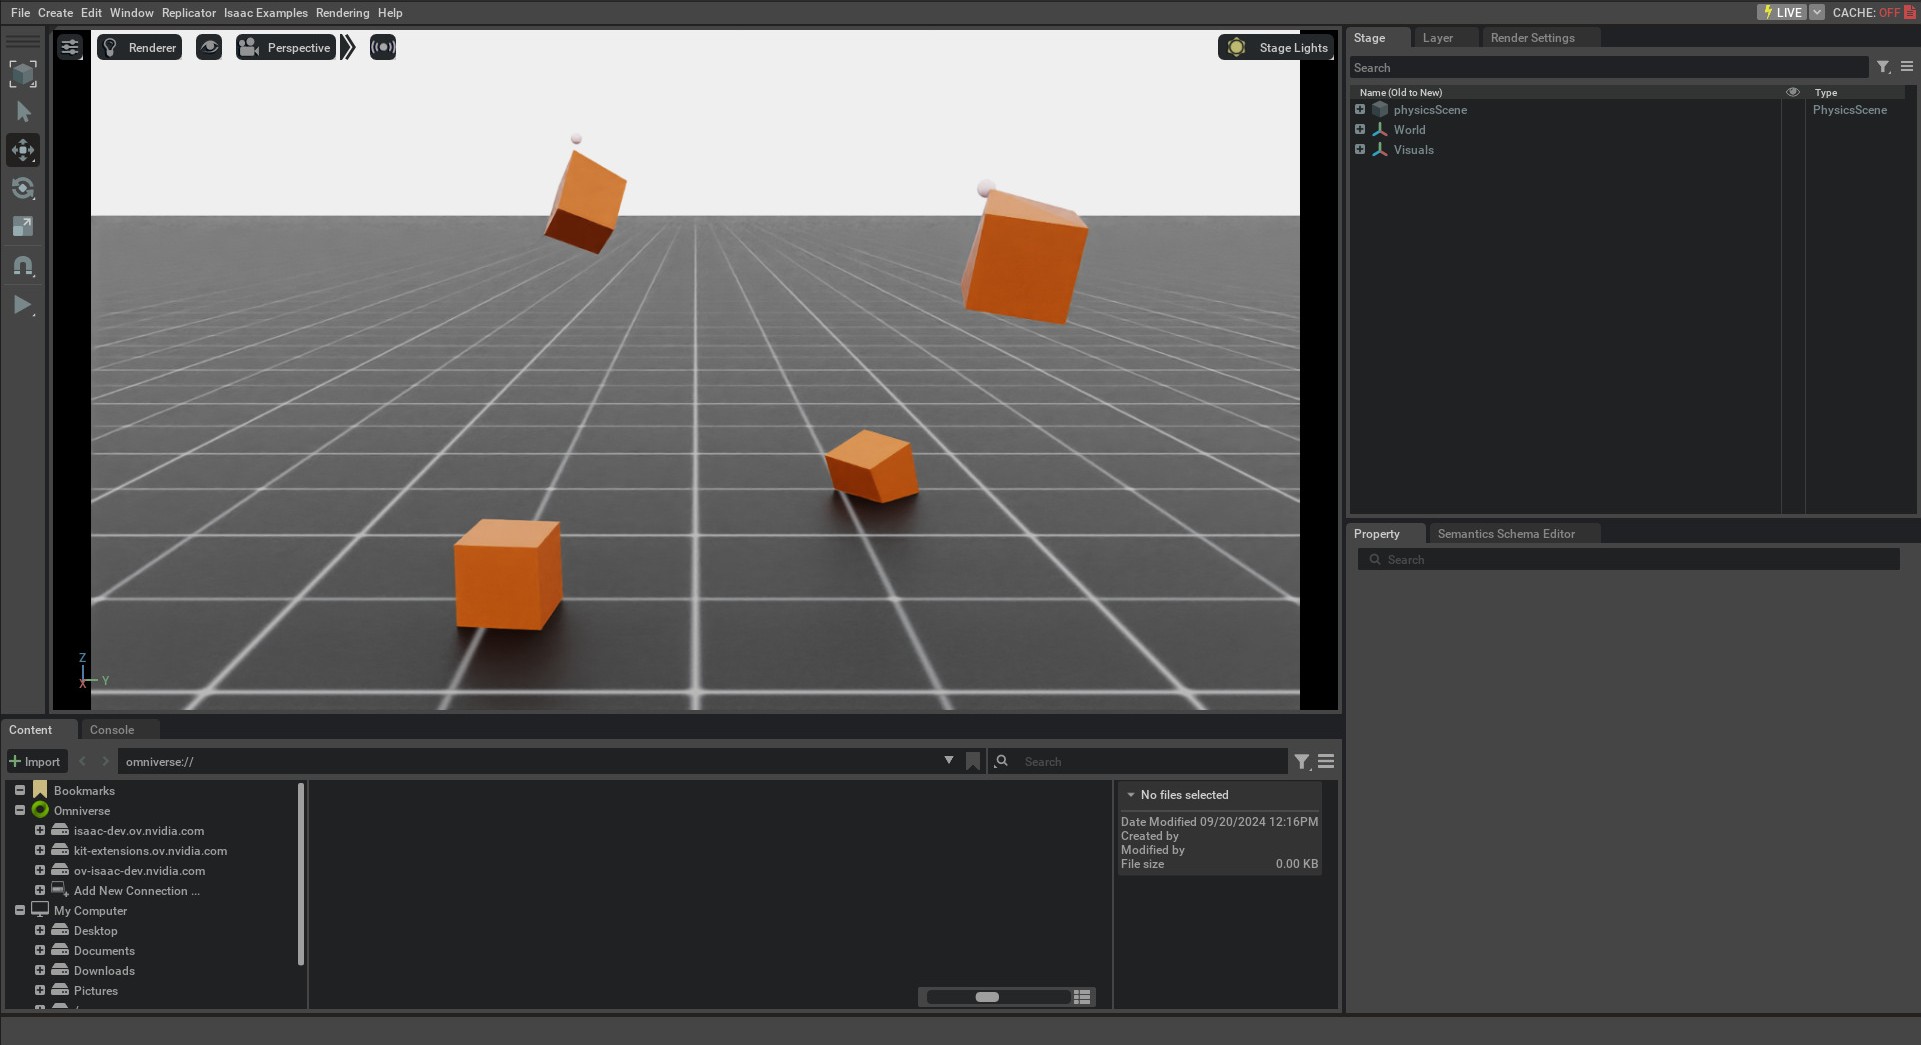
这应打开一个包含地面、灯光和若干立方体的舞台。四个立方体中,两个从高处落下并停在地面,另外两个沿 z 轴运动。立方体左下角的节点应显示运动学目标位置标记。关闭窗口或在终端按 Ctrl+C 可停止仿真。
本教程展示了如何生成可变形物体,并用 DeformableObject 类封装它们、初始化物理句柄,从而设置和读取状态。还展示了如何施加运动学命令,以受控方式移动网格节点。 deformables 示例提供了更进阶的用法,包括表面可变形物体、加载 USD 资产和应用可变形材料。