

生成基本物体到场景中#
本教程探讨了如何从 Python 在 Isaac Lab 中将各种对象(或基本物体)生成到场景中。它基于先前的教程,演示了如何从独立脚本运行仿真器,并演示了如何生成地面平面、灯光、基本形状和来自 USD 文件的网格。
备注
本教程会自动对体积可变形物体进行四面体化。运行时选择 tetrahedralization 可选依赖组:
uv run --extra tetrahedralization python scripts/tutorials/00_sim/spawn_prims.py
使用传统安装程序时,先安装可选依赖:
./isaaclab.sh -i tetrahedralization
代码#
该教程对应于 scripts/tutorials/00_sim 目录中的 spawn_prims.py 脚本。让我们看一下 Python 脚本:
spawn_prims.py 的代码
  1# Copyright (c) 2022-2026, The Isaac Lab Project Developers (https://github.com/isaac-sim/IsaacLab/blob/main/CONTRIBUTORS.md).
  2# All rights reserved.
  3#
  4# SPDX-License-Identifier: BSD-3-Clause
  5
  6"""This script demonstrates how to spawn prims into the scene.
  7
  8.. code-block:: bash
  9
 10    # Usage
 11    uv run python scripts/tutorials/00_sim/spawn_prims.py
 12
 13"""
 14
 15"""Parse the command-line arguments first."""
 16
 17
 18import argparse
 19
 20from isaaclab.app import add_launcher_args, launch_simulation
 21
 22# create argparser
 23parser = argparse.ArgumentParser(description="Tutorial on spawning prims into the scene.")
 24# append simulation launcher cli args
 25add_launcher_args(parser)
 26# parse the arguments
 27args_cli = parser.parse_args()
 28
 29"""Rest everything follows."""
 30
 31from isaaclab_physx.sim.schemas import PhysxDeformableBodyPropertiesCfg
 32from isaaclab_physx.sim.spawners.materials import PhysxDeformableBodyMaterialCfg
 33
 34import isaaclab.sim as sim_utils
 35from isaaclab.utils.assets import ISAAC_NUCLEUS_DIR
 36
 37
 38def design_scene():
 39    """Designs the scene by spawning ground plane, light, objects and meshes from usd files."""
 40    # Ground-plane
 41    cfg_ground = sim_utils.GroundPlaneCfg()
 42    cfg_ground.func("/World/defaultGroundPlane", cfg_ground)
 43
 44    # spawn distant light
 45    cfg_light_distant = sim_utils.DistantLightCfg(
 46        intensity=3000.0,
 47        color=(0.75, 0.75, 0.75),
 48    )
 49    cfg_light_distant.func("/World/lightDistant", cfg_light_distant, translation=(1, 0, 10))
 50
 51    # create a new xform prim for all objects to be spawned under
 52    sim_utils.create_prim("/World/Objects", "Xform")
 53    # spawn a red cone
 54    cfg_cone = sim_utils.ConeCfg(
 55        radius=0.15,
 56        height=0.5,
 57        visual_material=sim_utils.PreviewSurfaceCfg(diffuse_color=(1.0, 0.0, 0.0)),
 58    )
 59    cfg_cone.func("/World/Objects/Cone1", cfg_cone, translation=(-1.0, 1.0, 1.0))
 60    cfg_cone.func("/World/Objects/Cone2", cfg_cone, translation=(-1.0, -1.0, 1.0))
 61
 62    # spawn a green cone with colliders and rigid body
 63    cfg_cone_rigid = sim_utils.ConeCfg(
 64        radius=0.15,
 65        height=0.5,
 66        rigid_props=sim_utils.RigidBodyPropertiesCfg(),
 67        mass_props=sim_utils.MassPropertiesCfg(mass=1.0),
 68        collision_props=sim_utils.CollisionPropertiesCfg(),
 69        visual_material=sim_utils.PreviewSurfaceCfg(diffuse_color=(0.0, 1.0, 0.0)),
 70    )
 71    cfg_cone_rigid.func(
 72        "/World/Objects/ConeRigid", cfg_cone_rigid, translation=(-0.2, 0.0, 2.0), orientation=(0.5, 0.0, 0.5, 0.0)
 73    )
 74
 75    # spawn a blue cuboid with deformable body
 76    cfg_cuboid_deformable = sim_utils.MeshCuboidCfg(
 77        size=(0.2, 0.5, 0.2),
 78        deformable_props=PhysxDeformableBodyPropertiesCfg(),
 79        visual_material=sim_utils.PreviewSurfaceCfg(diffuse_color=(0.0, 0.0, 1.0)),
 80        physics_material=PhysxDeformableBodyMaterialCfg(),
 81    )
 82    cfg_cuboid_deformable.func("/World/Objects/CuboidDeformable", cfg_cuboid_deformable, translation=(0.15, 0.0, 2.0))
 83
 84    # spawn a usd file of a table into the scene
 85    cfg = sim_utils.UsdFileCfg(usd_path=f"{ISAAC_NUCLEUS_DIR}/Props/Mounts/SeattleLabTable/table_instanceable.usd")
 86    cfg.func("/World/Objects/Table", cfg, translation=(0.0, 0.0, 1.05))
 87
 88
 89def main():
 90    """Main function."""
 91
 92    # Configure the simulation
 93    sim_cfg = sim_utils.SimulationCfg(dt=0.01, device=args_cli.device)
 94    # Launch the simulator runtime that the configuration needs
 95    with launch_simulation(sim_cfg, args_cli):
 96        # Initialize the simulation context
 97        sim = sim_utils.SimulationContext(sim_cfg)
 98        # Set main camera
 99        sim.set_camera_view([2.0, 0.0, 2.5], [-0.5, 0.0, 0.5])
100        # Design scene
101        design_scene()
102        # Play the simulator
103        sim.reset()
104        # Now we are ready!
105        print("[INFO]: Setup complete...")
106
107        # Simulate physics
108        while sim.is_running():
109            # perform step
110            sim.step()
111
112
113if __name__ == "__main__":
114    # run the main function
115    main()
代码解释#
Omniverse 中的场景设计是建立在名为 USD(Universal Scene Description)的软件系统和文件格式周围的。它允许以层次结构方式描述 3D 场景,类似于文件系统。由于 USD 是一个全面的框架,我们建议阅读 USD文档 以了解更多信息。
为了完整起见,在本教程中我们介绍 USD 的必要概念。
基本形状(Prims): 这些是 USD 场景的基本构建块。它们可以被视为场景图中的节点。每个节点可以是网格、光源、相机或变换。它也可以是其下其他基本物体的组。
属性: 这些是基本物体的属性。可以将它们看作是键-值对。例如,一个基本物体可以有一个名为
color的属性,其值为red。关系: 这些是基本物体之间的连接。可以将它们视为指向其他基体的指针。例如,一个网格基本体可以与一个用于着色的材质基本体建立关系。
这些基本物体、其属性和关系的集合被称为一个 USD 场景 。可以将其看作是场景中所有基本物体的容器。当我们说我们正在设计一个场景时,我们实际上正在设计一个 USD 场景。
使用直接的 USD API 提供了很大的灵活性,但学习和使用起来可能很麻烦。为了更轻松地设计场景,Isaac Lab 建立在 USD API 之上,提供了一个基于配置的接口来将基本物体生成到场景中。这些包含在 sim.spawners 模块中。
当将基本物体生成到场景中时,每个基本物体都需要一个定义其属性和关系(通过材质和着色信息)的配置类实例。然后将配置类传递给其相应的函数,其中指定了基本物体名称和变换。该函数然后将基本物体生成到场景中。
在高层次上,它是如何工作的:
# Create a configuration class instance
cfg = MyPrimCfg()
prim_path = "/path/to/prim"

# Spawn the prim into the scene using the corresponding spawner function
spawn_my_prim(prim_path, cfg, translation=[0, 0, 0], orientation=[1, 0, 0, 0], scale=[1, 1, 1])
# OR
# Use the spawner function directly from the configuration class
cfg.func(prim_path, cfg, translation=[0, 0, 0], orientation=[1, 0, 0, 0], scale=[1, 1, 1])
在本教程中,我们演示将各种不同的基本物体生成到场景中。有关可用的生成器的更多信息,请参考 Isaac Lab 中的 sim.spawners 模块 .
注意
所有的场景设计必须在仿真开始之前进行。一旦仿真开始,我们建议保持场景冻结,并仅更改基本物体的属性。这对于 GPU 仿真特别重要,因为在仿真过程中添加新的基本物体可能会改变 GPU 上的物理仿真缓冲区,并导致意外行为。
生成地面平面#
GroundPlaneCfg 配置了一个类似网格的地面平面,其外观和大小等属性可修改。
    # Ground-plane
    cfg_ground = sim_utils.GroundPlaneCfg()
    cfg_ground.func("/World/defaultGroundPlane", cfg_ground)
生成灯光#
可以将 不同类型的灯光基本体 生成到场景中。这些包括远光灯、球形灯、圆盘灯和圆柱灯。在本教程中,我们生成一个远光灯,这是一种远离场景无限远的灯,只朝一个方向发光。
    # spawn distant light
    cfg_light_distant = sim_utils.DistantLightCfg(
        intensity=3000.0,
        color=(0.75, 0.75, 0.75),
    )
    cfg_light_distant.func("/World/lightDistant", cfg_light_distant, translation=(1, 0, 10))
生成基本形状#
在生成基本形状之前,我们介绍了一个变换基本体或 Xform 的概念。变换基本体是一个仅包含变换属性的基本体。它用于将其他基本体分组,并作为一个组对其进行变换。在这里,我们创建一个 Xform 基本体,将所有的基本形状分组在其中。
    # create a new xform prim for all objects to be spawned under
    sim_utils.create_prim("/World/Objects", "Xform")
接下来,我们使用 ConeCfg 类生成一个圆锥体。可以指定圆锥体的半径、高度、物理属性和材质属性。默认情况下,物理和材质属性是禁用的。
我们生成的前两个圆锥 Cone1 和 Cone2 是视觉元素,不启用物理属性。
    # spawn a red cone
    cfg_cone = sim_utils.ConeCfg(
        radius=0.15,
        height=0.5,
        visual_material=sim_utils.PreviewSurfaceCfg(diffuse_color=(1.0, 0.0, 0.0)),
    )
    cfg_cone.func("/World/Objects/Cone1", cfg_cone, translation=(-1.0, 1.0, 1.0))
    cfg_cone.func("/World/Objects/Cone2", cfg_cone, translation=(-1.0, -1.0, 1.0))
对于第三个圆锥 ConeRigid ,我们在配置类中设置刚体物理属性。通过这些属性,我们可以指定圆锥体的质量、摩擦力和弹性。如果未指定,它们将默认为 USD Physics 设置的默认值。
    # spawn a green cone with colliders and rigid body
    cfg_cone_rigid = sim_utils.ConeCfg(
        radius=0.15,
        height=0.5,
        rigid_props=sim_utils.RigidBodyPropertiesCfg(),
        mass_props=sim_utils.MassPropertiesCfg(mass=1.0),
        collision_props=sim_utils.CollisionPropertiesCfg(),
        visual_material=sim_utils.PreviewSurfaceCfg(diffuse_color=(0.0, 1.0, 0.0)),
    )
    cfg_cone_rigid.func(
        "/World/Objects/ConeRigid", cfg_cone_rigid, translation=(-0.2, 0.0, 2.0), orientation=(0.5, 0.0, 0.5, 0.0)
    )
最后,生成包含可变形体物理属性的长方体 CuboidDeformable 。与刚体仿真不同,可变形体的顶点之间可以发生相对运动,适用于仿真布料、橡胶或果冻等软体。可变形体只支持 GPU 仿真,需要生成网格对象,并赋予可变形体物理属性和可变形物理材料。本例使用 PhysX 专用的可变形属性与材料配置。
    # spawn a blue cuboid with deformable body
    cfg_cuboid_deformable = sim_utils.MeshCuboidCfg(
        size=(0.2, 0.5, 0.2),
        deformable_props=PhysxDeformableBodyPropertiesCfg(),
        visual_material=sim_utils.PreviewSurfaceCfg(diffuse_color=(0.0, 0.0, 1.0)),
        physics_material=PhysxDeformableBodyMaterialCfg(),
    )
    cfg_cuboid_deformable.func("/World/Objects/CuboidDeformable", cfg_cuboid_deformable, translation=(0.15, 0.0, 2.0))
从另一个文件生成#
最后,可以从其他文件格式生成基本体,例如其他 USD、URDF 或 OBJ 文件。在本教程中,我们将一个表的 USD 文件生成到场景中。这个表是一个网格基本体,并且有一个与之关联的材质基本体。所有这些信息都存储在其 USD 文件中。
    # spawn a usd file of a table into the scene
    cfg = sim_utils.UsdFileCfg(usd_path=f"{ISAAC_NUCLEUS_DIR}/Props/Mounts/SeattleLabTable/table_instanceable.usd")
    cfg.func("/World/Objects/Table", cfg, translation=(0.0, 0.0, 1.05))
上面的桌子通过引用加入场景。简单来说,场景中添加的是指向桌子资产的“指针”,并未复制资产本身。因此,我们可以在不破坏原资产的情况下调整桌子,使改动反映在场景中。例如,可以更改桌子的材质,而无需直接修改桌子资产的底层文件;USD 舞台中仅存储这些改动。
执行脚本#
与之前的教程类似,要运行脚本,请执行以下命令:
uv run --extra tetrahedralization python scripts/tutorials/00_sim/spawn_prims.py
./isaaclab.sh -p scripts/tutorials/00_sim/spawn_prims.py
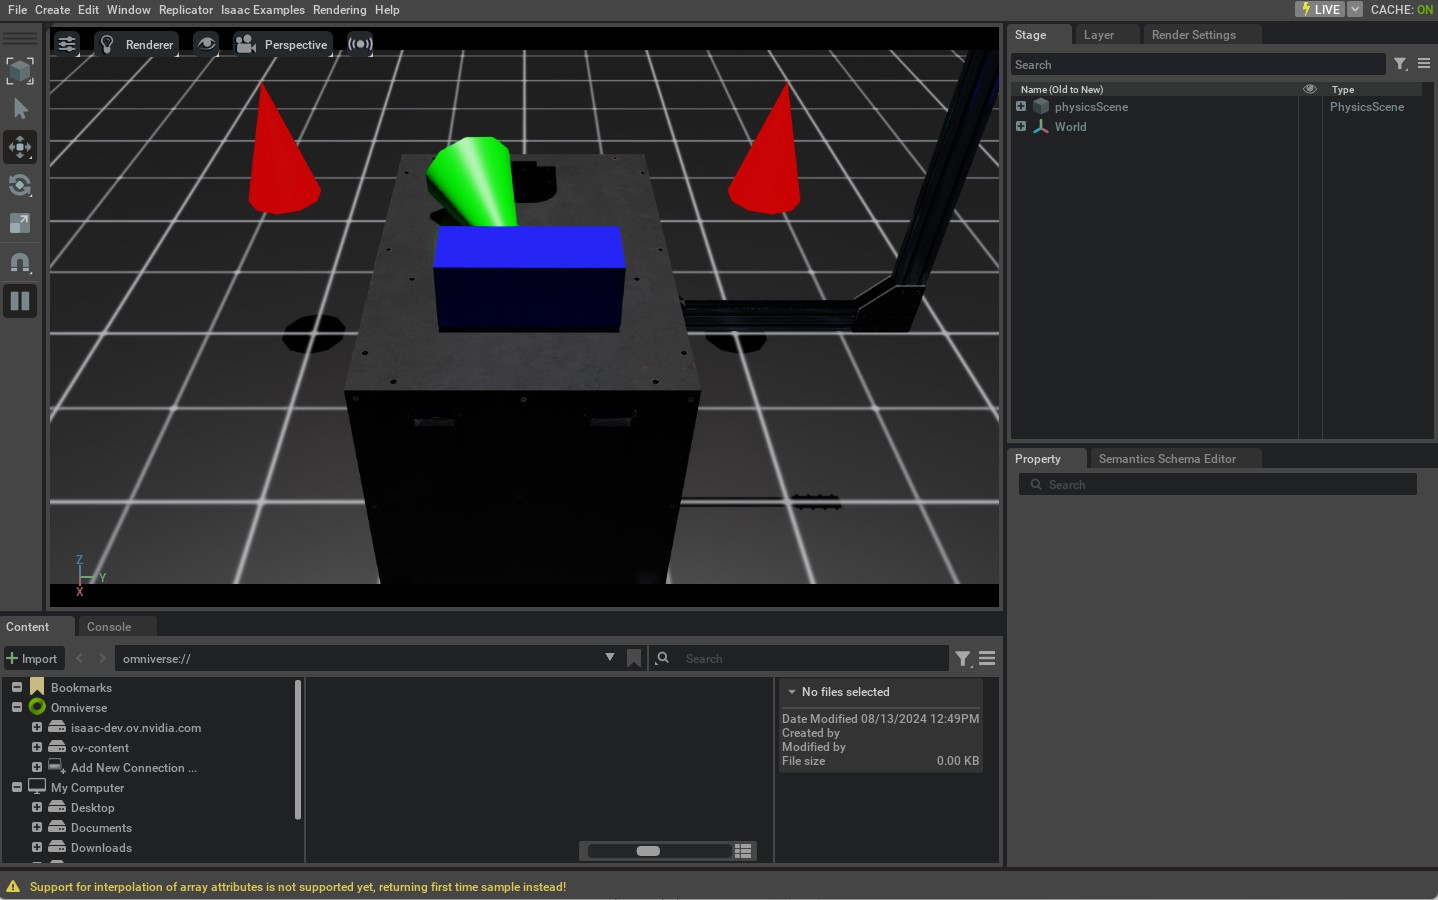
一旦仿真开始,您应该看到一个具有地面平面、灯光、一些圆锥体和一个表的窗口。启用刚体物理属性的绿色圆锥体应该会掉落并与表和地面平面碰撞。其他圆锥体是视觉元素,不应该移动。要停止仿真,您可以关闭窗口,或在终端中按 Ctrl+C 。
本教程为在 Isaac Lab 中生成各种基本体提供了一个基础。虽然简单,但它展示了在 Isaac Lab 中设计场景的基本概念以及如何使用生成器。在接下来的教程中,我们将看看如何与场景和仿真进行交互。