

与关节交互#
本运行示例补充了 资产 。它使用已有的机器人配置;创建配置见 机器人与关节体配置 ,为 PhysX 或 Newton 调整生成属性见 选择共享设置与后端专用设置 。
本教程展示了如何与仿真中的关节机器人进行交互。这是 与刚性物体交互 教程的延续,其中我们学习了如何与刚体对象交互。除了设置根状态外,我们还将看到如何设置关节状态并向关节机器人应用命令。
代码#
该教程对应于 scripts/tutorials/01_assets 目录中的 run_articulation.py 脚本。
代码 run_articulation.py 的内容
  1# Copyright (c) 2022-2026, The Isaac Lab Project Developers (https://github.com/isaac-sim/IsaacLab/blob/main/CONTRIBUTORS.md).
  2# All rights reserved.
  3#
  4# SPDX-License-Identifier: BSD-3-Clause
  5
  6"""This script demonstrates how to spawn a cart-pole and interact with it.
  7
  8.. code-block:: bash
  9
 10    # Usage
 11    uv run python scripts/tutorials/01_assets/run_articulation.py
 12
 13"""
 14
 15"""Parse the command-line arguments first."""
 16
 17
 18import argparse
 19
 20from isaaclab.app import add_launcher_args, launch_simulation
 21from isaaclab.utils import clone
 22
 23# add argparse arguments
 24parser = argparse.ArgumentParser(description="Tutorial on spawning and interacting with an articulation.")
 25# append simulation launcher cli args
 26add_launcher_args(parser)
 27# parse the arguments
 28args_cli = parser.parse_args()
 29
 30"""Rest everything follows."""
 31
 32import torch
 33
 34import isaaclab.sim as sim_utils
 35from isaaclab.assets import Articulation
 36from isaaclab.sim import SimulationContext
 37
 38##
 39# Pre-defined configs
 40##
 41from isaaclab_assets import CARTPOLE_CFG  # isort:skip
 42
 43
 44def design_scene() -> tuple[dict, list[list[float]]]:
 45    """Designs the scene."""
 46    # Ground-plane
 47    cfg = sim_utils.GroundPlaneCfg()
 48    cfg.func("/World/defaultGroundPlane", cfg)
 49    # Lights
 50    cfg = sim_utils.DomeLightCfg(intensity=3000.0, color=(0.75, 0.75, 0.75))
 51    cfg.func("/World/Light", cfg)
 52
 53    # Create separate groups called "Origin1", "Origin2"
 54    # Each group will have a robot in it
 55    origins = [[0.0, 0.0, 0.0], [-1.0, 0.0, 0.0]]
 56    # Origin 1
 57    sim_utils.create_prim("/World/Origin1", "Xform", translation=origins[0])
 58    # Origin 2
 59    sim_utils.create_prim("/World/Origin2", "Xform", translation=origins[1])
 60
 61    # Articulation
 62    cartpole_cfg = clone(CARTPOLE_CFG)
 63    cartpole_cfg.prim_path = "/World/Origin.*/Robot"
 64    cartpole = Articulation(cfg=cartpole_cfg)
 65
 66    # return the scene information
 67    scene_entities = {"cartpole": cartpole}
 68    return scene_entities, origins
 69
 70
 71def run_simulator(sim: sim_utils.SimulationContext, entities: dict[str, Articulation], origins: torch.Tensor):
 72    """Runs the simulation loop."""
 73    # Extract scene entities
 74    # note: we only do this here for readability. In general, it is better to access the entities directly from
 75    #   the dictionary. This dictionary is replaced by the InteractiveScene class in the next tutorial.
 76    robot = entities["cartpole"]
 77    # Define simulation stepping
 78    sim_dt = sim.get_physics_dt()
 79    count = 0
 80    # Simulation loop
 81    while sim.is_running():
 82        # Reset
 83        if count % 500 == 0:
 84            # reset counter
 85            count = 0
 86            # reset the scene entities
 87            # root state
 88            # we offset the root state by the origin since the states are written in simulation world frame
 89            # if this is not done, then the robots will be spawned at the (0, 0, 0) of the simulation world
 90            root_pose = robot.data.default_root_pose.torch.clone()
 91            root_pose[:, :3] += origins
 92            robot.write_root_pose_to_sim_index(root_pose=root_pose)
 93            root_vel = robot.data.default_root_vel.torch.clone()
 94            robot.write_root_velocity_to_sim_index(root_velocity=root_vel)
 95            # set joint positions with some noise
 96            joint_pos, joint_vel = (
 97                robot.data.default_joint_pos.torch.clone(),
 98                robot.data.default_joint_vel.torch.clone(),
 99            )
100            joint_pos += torch.rand_like(joint_pos) * 0.1
101            robot.write_joint_position_to_sim_index(position=joint_pos)
102            robot.write_joint_velocity_to_sim_index(velocity=joint_vel)
103            # clear internal buffers
104            robot.reset()
105            print("[INFO]: Resetting robot state...")
106        # Apply random action
107        # -- generate random joint efforts
108        efforts = torch.randn_like(robot.data.joint_pos.torch) * 5.0
109        # -- apply action to the robot
110        robot.actuators.target_command.set_effort_index(value=efforts)
111        # -- write data to sim
112        robot.write_data_to_sim()
113        # Perform step
114        sim.step()
115        # Increment counter
116        count += 1
117        # Update buffers
118        robot.update(sim_dt)
119
120
121def main():
122    """Main function."""
123    # Configure the simulation
124    sim_cfg = sim_utils.SimulationCfg(device=args_cli.device)
125    # Launch the simulator runtime that the configuration needs
126    with launch_simulation(sim_cfg, args_cli):
127        # Initialize the simulation context
128        sim = SimulationContext(sim_cfg)
129        # Set main camera
130        sim.set_camera_view([2.5, 0.0, 4.0], [0.0, 0.0, 2.0])
131        # Design scene
132        scene_entities, scene_origins = design_scene()
133        scene_origins = torch.tensor(scene_origins, device=sim.device)
134        # Play the simulator
135        sim.reset()
136        # Now we are ready!
137        print("[INFO]: Setup complete...")
138        # Run the simulator
139        run_simulator(sim, scene_entities, scene_origins)
140
141
142if __name__ == "__main__":
143    # run the main function
144    main()
代码解释#
设计场景#
与上一个教程相似,我们在场景中添加了地面平面和远程光线。现在,我们不再产生刚性物体,而是从其 USD 文件中生成一个车杆关节。车杆是一个简单的机器人,由一个小车和一个连接到它的杆组成。小车可以沿 x 轴自由移动,而杆可以围绕小车自由旋转。车杆的 USD 文件包含了机器人的几何形状、关节和其他物理性质。
对于车杆,我们使用其预定义的配置对象,这是 assets.ArticulationCfg 类的一个实例。这个类包含关于关节产生策略、默认初始状态、不同关节的执行器模型和其他元信息的信息。如何创建这个配置对象的更深入介绍在 机器人与关节体配置 教程中提供。
正如在上一个教程中看到的,我们可以通过创建 assets.Articulation 类的实例并将配置对象传递给它的构造函数的方式类似地将关节放入场景中。
    # Create separate groups called "Origin1", "Origin2"
    # Each group will have a robot in it
    origins = [[0.0, 0.0, 0.0], [-1.0, 0.0, 0.0]]
    # Origin 1
    sim_utils.create_prim("/World/Origin1", "Xform", translation=origins[0])
    # Origin 2
    sim_utils.create_prim("/World/Origin2", "Xform", translation=origins[1])

    # Articulation
    cartpole_cfg = clone(CARTPOLE_CFG)
    cartpole_cfg.prim_path = "/World/Origin.*/Robot"
    cartpole = Articulation(cfg=cartpole_cfg)
运行仿真循环#
继续从前一教程开始,我们定期重置仿真,为关节设置指令,执行仿真步骤,并更新关节的内部缓冲区。
重置仿真#
与刚体物体类似,关节机器人也有一个根状态。这个状态对应于关节机器人树中的根体。在根状态之上,关节机器人还有关节状态。这些状态对应于关节的位置和速度。
为了重置关节机器人,我们首先通过调用 Articulation.write_root_pose_to_sim() 和 Articulation.write_root_velocity_to_sim() 方法设置根状态。类似地,我们通过调用 Articulation.write_joint_state_to_sim() 方法设置关节状态。最后,我们调用 Articulation.reset() 方法重置任何内部缓冲区和缓存。
            # reset the scene entities
            # root state
            # we offset the root state by the origin since the states are written in simulation world frame
            # if this is not done, then the robots will be spawned at the (0, 0, 0) of the simulation world
            root_pose = robot.data.default_root_pose.torch.clone()
            root_pose[:, :3] += origins
            robot.write_root_pose_to_sim_index(root_pose=root_pose)
            root_vel = robot.data.default_root_vel.torch.clone()
            robot.write_root_velocity_to_sim_index(root_velocity=root_vel)
            # set joint positions with some noise
            joint_pos, joint_vel = (
                robot.data.default_joint_pos.torch.clone(),
                robot.data.default_joint_vel.torch.clone(),
            )
            joint_pos += torch.rand_like(joint_pos) * 0.1
            robot.write_joint_position_to_sim_index(position=joint_pos)
            robot.write_joint_velocity_to_sim_index(velocity=joint_vel)
            # clear internal buffers
            robot.reset()
推进仿真#
向关节机器人应用命令涉及两个步骤:
设置执行器命令:以关节侧坐标向执行器模型提供期望位置、速度或驱动力。
将数据写入仿真:根据关节体配置执行所需的 驱动转换 ,并将转换后的值写入仿真缓冲区。
在本教程中,我们使用关节努力命令来控制关节机器人。为此工作,我们需要将关节机器人的刚度和阻尼参数设置为零。这是在车杆的预定义配置对象内部预先完成的。
每一步,我们随机采样关节驱动力,调用 robot.actuators.target_command.set_effort_index 将其设置到关节体的执行器集合。设置命令后,调用 Articulation.write_data_to_sim() ,将数据写入仿真缓冲区,最后推进仿真。
        # Apply random action
        # -- generate random joint efforts
        efforts = torch.randn_like(robot.data.joint_pos.torch) * 5.0
        # -- apply action to the robot
        robot.actuators.target_command.set_effort_index(value=efforts)
        # -- write data to sim
        robot.write_data_to_sim()
更新状态#
每个关节机器人类包含一个 assets.ArticulationData 对象。这个对象保存了关节机器人的状态。为了更新缓冲区内的状态,我们调用 assets.Articulation.update() 方法。
        # Update buffers
        robot.update(sim_dt)
代码执行#
此脚本使用 Isaac Sim PhysX,需要安装 Isaac Sim。以下命令使用下图所示的 Isaac Sim 视口显示仿真:
uv run isaaclab -p scripts/tutorials/01_assets/run_articulation.py --viz kit
./isaaclab.sh -p scripts/tutorials/01_assets/run_articulation.py --viz kit
该命令应打开一个包含地面、灯光和两个随机运动倒立摆的舞台。在终端按 Ctrl+C 可停止仿真。
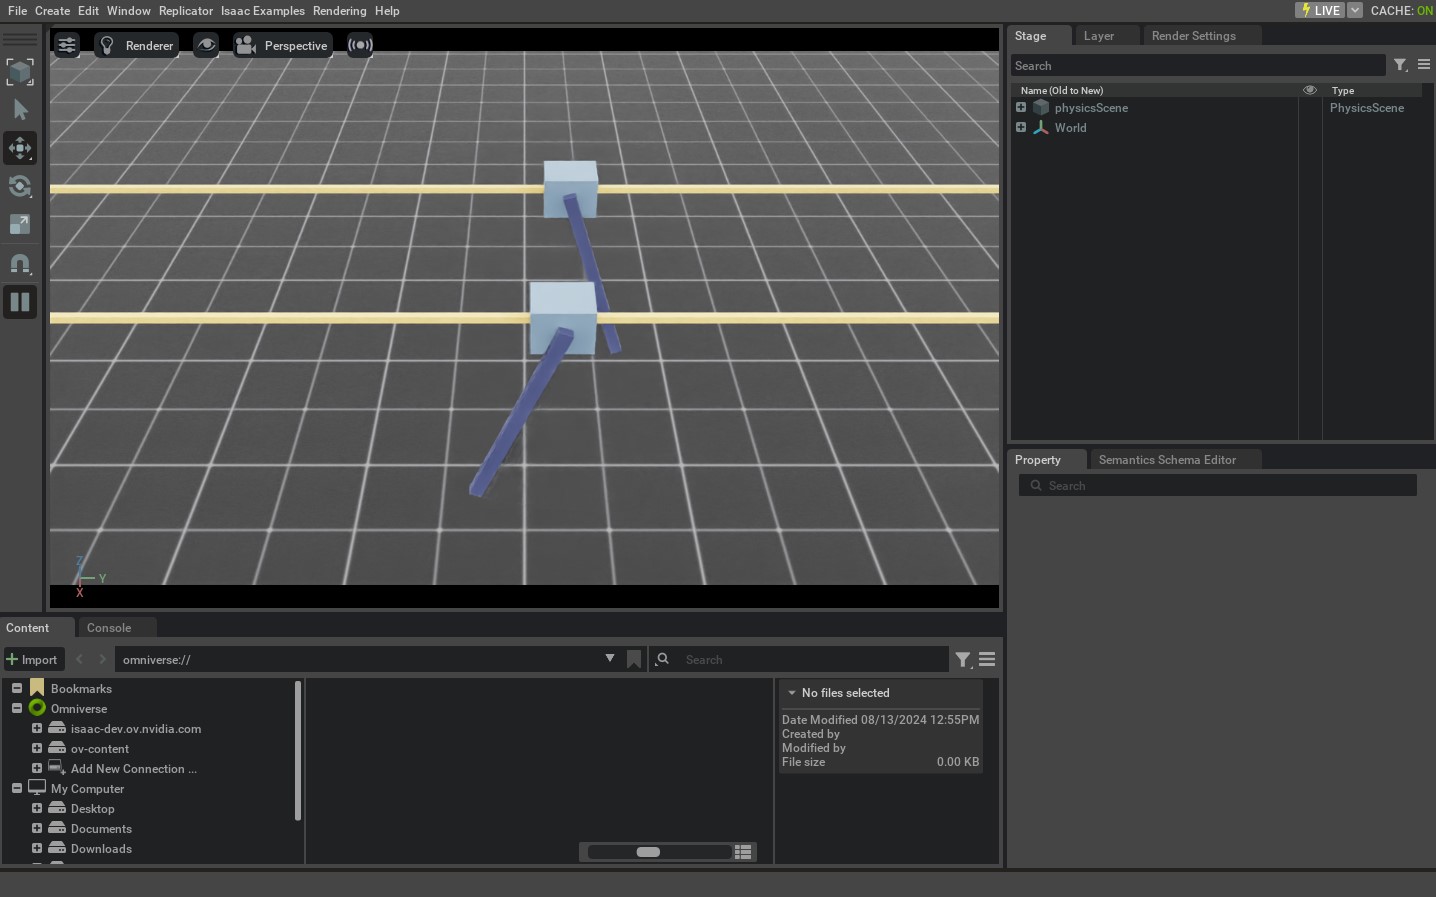
在本教程中,我们学会了如何创建和交互一个简单的关节机器人。我们看到了如何设置关节机器人的状态(其根和关节状态),以及如何对其应用命令。我们还看到了如何更新其缓冲区,以从仿真中读取最新状态。
打包提供的 Zoo 演示也会在同一场景中驱动多个机器人系列:
uv run --extra isaacsim isaaclab demo zoo --viz kit
./isaaclab.sh demo zoo --viz kit