

深入了解仿真启动器#
本教程深入介绍独立脚本如何启动仿真器,并通过命令行参数和环境变量进行配置。我们将重点展示如何用 app.add_launcher_args() 和 app.launch_simulation() 启用实时串流、配置运行 Isaac Sim 的 isaacsim.simulation_app.SimulationApp 实例,同时支持用户自定义选项。
启动分为两步。首先, app.add_launcher_args() 向脚本自身的 argparse.ArgumentParser 添加启动相关选项。随后, app.launch_simulation() 上下文管理器接收仿真配置和已解析的参数,只启动实际需要的运行时。默认 PhysX 物理后端、基于 Kit 的 RTX 相机、Kit 可视化器( --visualizer kit )和实时串流都运行在 Isaac Sim(Kit)内,因此这些情况会由 launch_simulation() 启动 SimulationApp 。不依赖 Kit 的配置,例如不使用 Kit 可视化器的 Newton 物理,则完全不会启动 Isaac Sim。离开 with 块时,运行时自动关闭。
SimulationApp 必须加载相应扩展才能启用不同功能,有些扩展还存在加载顺序要求或相互依赖。此外, headless 等启动选项必须在实例化时设置,并与某些扩展(例如实时串流扩展)存在关联。启动器以适用于多种场景的统一方式处理这些扩展和启动选项。为此,我们提供可与用户自定义命令行参数合并的命令行和环境变量选项,并转交面向 SimulationApp 的参数。
代码#
该教程对应于 scripts/tutorials/00_sim 目录中的 launch_app.py 脚本。
launch_app.py 的代码
 1# Copyright (c) 2022-2026, The Isaac Lab Project Developers (https://github.com/isaac-sim/IsaacLab/blob/main/CONTRIBUTORS.md).
 2# All rights reserved.
 3#
 4# SPDX-License-Identifier: BSD-3-Clause
 5
 6"""
 7This script demonstrates how to configure the simulator launch through command-line arguments.
 8
 9.. code-block:: bash
10
11    # Usage
12    uv run python scripts/tutorials/00_sim/launch_app.py
13
14"""
15
16"""Parse the command-line arguments first."""
17
18
19import argparse
20
21from isaaclab.app import add_launcher_args, launch_simulation
22
23# create argparser
24parser = argparse.ArgumentParser(description="Tutorial on configuring the simulator launch.")
25parser.add_argument("--size", type=float, default=1.0, help="Side-length of cuboid")
26# SimulationApp arguments https://docs.omniverse.nvidia.com/py/isaacsim/source/isaacsim.simulation_app/docs/index.html?highlight=simulationapp#isaacsim.simulation_app.SimulationApp
27parser.add_argument(
28    "--width", type=int, default=1280, help="Width of the viewport and generated images. Defaults to 1280"
29)
30parser.add_argument(
31    "--height", type=int, default=720, help="Height of the viewport and generated images. Defaults to 720"
32)
33
34# append simulation launcher cli args
35add_launcher_args(parser)
36# parse the arguments
37args_cli = parser.parse_args()
38
39"""Rest everything follows."""
40
41import isaaclab.sim as sim_utils
42
43
44def design_scene():
45    """Designs the scene by spawning ground plane, light, objects and meshes from usd files."""
46    # Ground-plane
47    cfg_ground = sim_utils.GroundPlaneCfg()
48    cfg_ground.func("/World/defaultGroundPlane", cfg_ground)
49
50    # spawn distant light
51    cfg_light_distant = sim_utils.DistantLightCfg(
52        intensity=3000.0,
53        color=(0.75, 0.75, 0.75),
54    )
55    cfg_light_distant.func("/World/lightDistant", cfg_light_distant, translation=(1, 0, 10))
56
57    # spawn a cuboid
58    cfg_cuboid = sim_utils.CuboidCfg(
59        size=[args_cli.size] * 3,
60        visual_material=sim_utils.PreviewSurfaceCfg(diffuse_color=(1.0, 1.0, 1.0)),
61    )
62    # Spawn cuboid, altering translation on the z-axis to scale to its size
63    cfg_cuboid.func("/World/Object", cfg_cuboid, translation=(0.0, 0.0, args_cli.size / 2))
64
65
66def main():
67    """Main function."""
68
69    # Configure the simulation
70    sim_cfg = sim_utils.SimulationCfg(device=args_cli.device, dt=0.01)
71    # Launch the simulator runtime that the configuration needs; the launcher arguments
72    # (including --width and --height) configure it, and it is closed when the block exits
73    with launch_simulation(sim_cfg, args_cli):
74        # Initialize the simulation context
75        sim = sim_utils.SimulationContext(sim_cfg)
76        # Set main camera
77        sim.set_camera_view([2.0, 0.0, 2.5], [-0.5, 0.0, 0.5])
78
79        # Design scene by adding assets to it
80        design_scene()
81
82        # Play the simulator
83        sim.reset()
84        # Now we are ready!
85        print("[INFO]: Setup complete...")
86
87        # Simulate physics
88        while sim.is_running():
89            # perform step
90            sim.step()
91
92
93if __name__ == "__main__":
94    # run the main function
95    main()
代码解释#
向 argparser 添加参数#
启动器兼容用户脚本所需的自定义命令行参数,同时提供统一的命令行接口。
在本教程中,实例化了一个标准的 argparse.ArgumentParser ,并赋予了特定脚本的 --size 参数,以及参数 --height 和 --width 。后者被 SimulationApp 所列取。
启动器不使用 --size 参数,但它可以直接与启动器接口共同使用。通过 add_launcher_args() ,可将启动器参数添加到给定的 ArgumentParser 中,与脚本内参数合并。随后使用标准 argparse.ArgumentParser.parse_args() 方法,解析为 argparse.Namespace 。
import argparse

from isaaclab.app import add_launcher_args, launch_simulation

# create argparser
parser = argparse.ArgumentParser(description="Tutorial on configuring the simulator launch.")
parser.add_argument("--size", type=float, default=1.0, help="Side-length of cuboid")
# SimulationApp arguments https://docs.omniverse.nvidia.com/py/isaacsim/source/isaacsim.simulation_app/docs/index.html?highlight=simulationapp#isaacsim.simulation_app.SimulationApp
parser.add_argument(
    "--width", type=int, default=1280, help="Width of the viewport and generated images. Defaults to 1280"
)
parser.add_argument(
    "--height", type=int, default=720, help="Height of the viewport and generated images. Defaults to 720"
)

# append simulation launcher cli args
add_launcher_args(parser)
# parse the arguments
args_cli = parser.parse_args()
启动仿真器#
已解析的参数与仿真配置一起传给 launch_simulation() 。配置决定需要哪种运行时(这里是运行于 Isaac Sim 中的默认 PhysX 物理后端),参数则配置该运行时。所有使用仿真器的代码均位于 with 块内。
    # Configure the simulation
    sim_cfg = sim_utils.SimulationCfg(device=args_cli.device, dt=0.01)
    # Launch the simulator runtime that the configuration needs; the launcher arguments
    # (including --width and --height) configure it, and it is closed when the block exits
    with launch_simulation(sim_cfg, args_cli):
        # Initialize the simulation context
        sim = sim_utils.SimulationContext(sim_cfg)
理解--help 的输出#
执行脚本时,传入 --help 即可查看自定义参数和启动器选项的合并输出(下面有所省略)。
uv run python scripts/tutorials/00_sim/launch_app.py --help

usage: launch_app.py [-h] [--size SIZE] [--width WIDTH] [--height HEIGHT] [--livestream {0,1,2}] [--xr]
                     [--device DEVICE] [--visualizer VISUALIZER] [--verbose] [--info] [--experience EXPERIENCE]
                     ...

Tutorial on configuring the simulator launch.

options:
  -h, --help            show this help message and exit
  --size SIZE           Side-length of cuboid
  --width WIDTH         Width of the viewport and generated images. Defaults to 1280
  --height HEIGHT       Height of the viewport and generated images. Defaults to 720

launcher arguments:
  Arguments for the KitLauncher. For more details, please check the documentation.

  --livestream {0,1,2}  Force enable livestreaming. Mapping corresponds to that for the `LIVESTREAM` environment
                        variable.
  --xr                  Enable XR mode for VR/AR applications.
  --device DEVICE       The device to run the simulation on. Can be "cpu", "cuda", "cuda:N", where N is the device ID
  --visualizer VISUALIZER, --viz VISUALIZER
                        Visualizer backends to enable as CSV (e.g., kit,newton,rerun,viser).
  --verbose             Enable verbose-level log output from the SimulationApp.
  --info                Enable info-level log output from the SimulationApp.
  --experience EXPERIENCE
                        The experience file to load when launching the SimulationApp. If an empty string is provided,
                        the experience file is determined from the resolved visualizer and XR settings. If a relative
                        path is provided, it is resolved relative to the `apps` folder in Isaac Sim and Isaac Lab (in
                        that order).
  ...
./isaaclab.sh -p scripts/tutorials/00_sim/launch_app.py --help

usage: launch_app.py [-h] [--size SIZE] [--width WIDTH] [--height HEIGHT] [--livestream {0,1,2}] [--xr]
                     [--device DEVICE] [--visualizer VISUALIZER] [--verbose] [--info] [--experience EXPERIENCE]
                     ...

Tutorial on configuring the simulator launch.

options:
  -h, --help            show this help message and exit
  --size SIZE           Side-length of cuboid
  --width WIDTH         Width of the viewport and generated images. Defaults to 1280
  --height HEIGHT       Height of the viewport and generated images. Defaults to 720

launcher arguments:
  Arguments for the KitLauncher. For more details, please check the documentation.

  --livestream {0,1,2}  Force enable livestreaming. Mapping corresponds to that for the `LIVESTREAM` environment
                        variable.
  --xr                  Enable XR mode for VR/AR applications.
  --device DEVICE       The device to run the simulation on. Can be "cpu", "cuda", "cuda:N", where N is the device ID
  --visualizer VISUALIZER, --viz VISUALIZER
                        Visualizer backends to enable as CSV (e.g., kit,newton,rerun,viser).
  --verbose             Enable verbose-level log output from the SimulationApp.
  --info                Enable info-level log output from the SimulationApp.
  --experience EXPERIENCE
                        The experience file to load when launching the SimulationApp. If an empty string is provided,
                        the experience file is determined from the resolved visualizer and XR settings. If a relative
                        path is provided, it is resolved relative to the `apps` folder in Isaac Sim and Isaac Lab (in
                        that order).
  ...
该输出列出了脚本直接定义的 --size 、 --height 、 --width 参数,以及启动器参数。
如果脚本参数的名称和类型与 SimulationApp 的某个参数一致,这里的例子是 --height 和 --width ,那么 launch_simulation() 启动 Isaac Sim 时,会将它们转交给 SimulationApp 实例。更多示例见 参数说明 。
使用环境变量#
如帮助信息所示, --livestream 等启动器参数也有对应的环境变量,详见 isaaclab.app 文档。通过命令行提供这些参数,等价于在已设置对应环境变量的 shell 中运行脚本。
启动器支持环境变量,是为了方便保留会话中的配置。可以将其写入用户的 ${HOME}/.bashrc ,使设置在不同会话间持续生效。如果同时通过命令行提供参数,则命令行值会覆盖对应环境变量;本教程稍后会演示这一点。
任何使用 launch_simulation() 启动仿真的脚本都能使用这些参数。相机和离屏渲染支持会自动配置。
代码执行#
现在我们将运行示例脚本:
LIVESTREAM=2 uv run python scripts/tutorials/00_sim/launch_app.py --size 0.5
LIVESTREAM=2 ./isaaclab.sh -p scripts/tutorials/00_sim/launch_app.py --size 0.5
LIVESTREAM=2 LD_PRELOAD=/lib/aarch64-linux-gnu/libgomp.so.1 uv run python scripts/tutorials/00_sim/launch_app.py --size 0.5
LIVESTREAM=2 LD_PRELOAD=/lib/aarch64-linux-gnu/libgomp.so.1 ./isaaclab.sh -p scripts/tutorials/00_sim/launch_app.py --size 0.5
备注
在 aarch64 上,直接导入 Isaac Sim 的 Python 命令需要加上上述 LD_PRELOAD=/lib/aarch64-linux-gnu/libgomp.so.1 前缀。参见 使用 uv 自动安装(推荐) 。
$env:LIVESTREAM = "2"
uv run python scripts\tutorials\00_sim\launch_app.py --size 0.5
$env:LIVESTREAM = "2"
.\isaaclab.bat -p scripts\tutorials\00_sim\launch_app.py --size 0.5
这会在仿真中生成一个体积为 0.5 m3 的长方体。不会出现图形界面;在这一配置下,这等价于省略 --visualizer ,因为 LIVESTREAM 环境变量已隐含无界面运行。如果需要可视化,可以使用 Isaac 的 WebRTC 实时串流 。串流目前是容器内唯一受支持的可视化方式。在启动终端按 Ctrl+C 可结束进程。
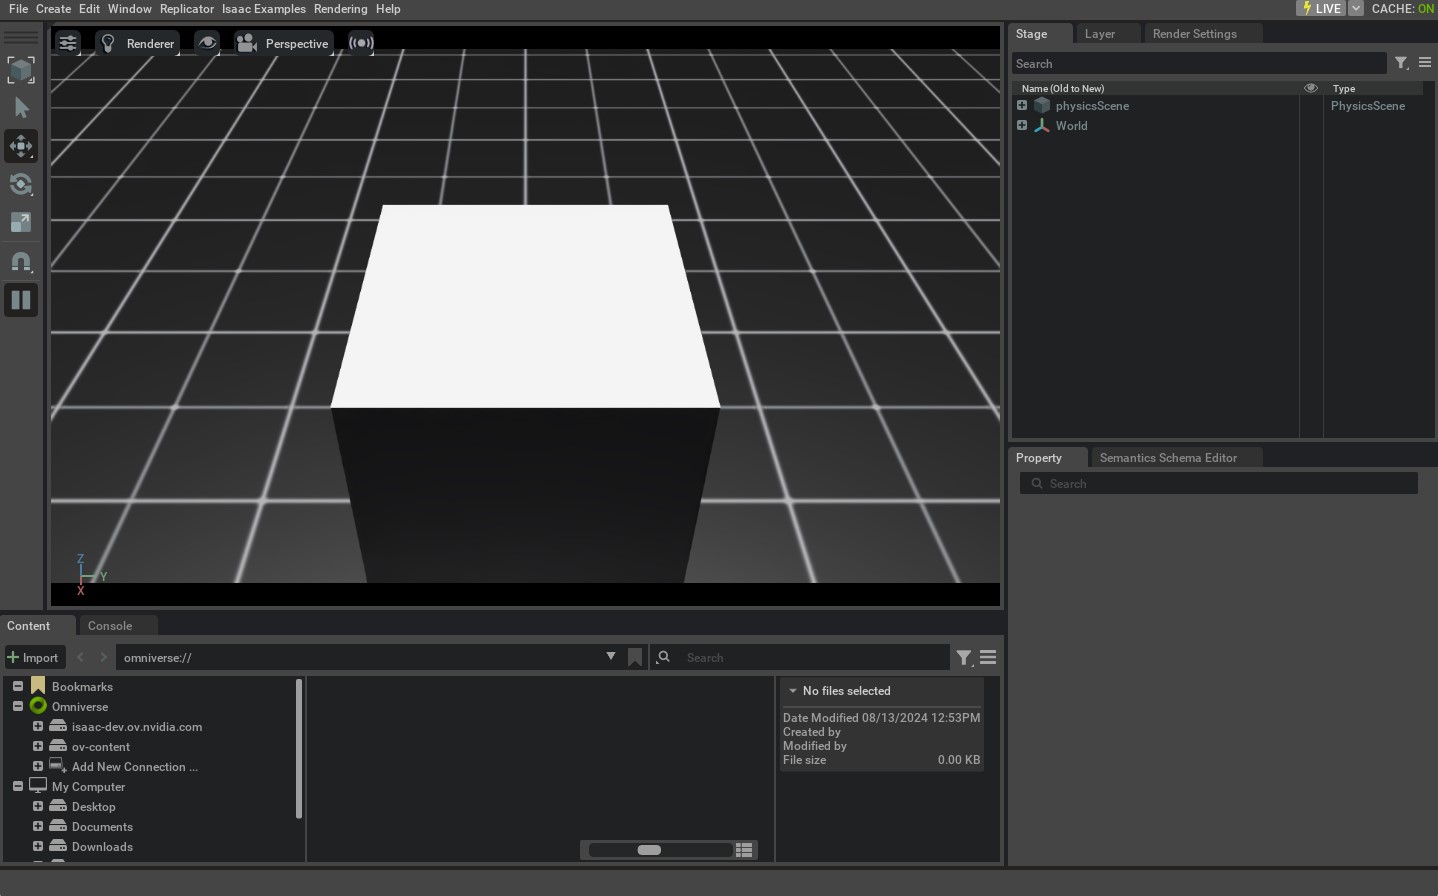
接下来看看启动器如何处理相互冲突的命令:
LIVESTREAM=0 uv run python scripts/tutorials/00_sim/launch_app.py --size 0.5 --livestream 2
LIVESTREAM=0 ./isaaclab.sh -p scripts/tutorials/00_sim/launch_app.py --size 0.5 --livestream 2
LIVESTREAM=0 LD_PRELOAD=/lib/aarch64-linux-gnu/libgomp.so.1 uv run python scripts/tutorials/00_sim/launch_app.py --size 0.5 --livestream 2
LIVESTREAM=0 LD_PRELOAD=/lib/aarch64-linux-gnu/libgomp.so.1 ./isaaclab.sh -p scripts/tutorials/00_sim/launch_app.py --size 0.5 --livestream 2
备注
在 aarch64 上,直接导入 Isaac Sim 的 Python 命令需要加上上述 LD_PRELOAD=/lib/aarch64-linux-gnu/libgomp.so.1 前缀。参见 使用 uv 自动安装(推荐) 。
$env:LIVESTREAM = "0"
uv run python scripts\tutorials\00_sim\launch_app.py --size 0.5 --livestream 2
$env:LIVESTREAM = "0"
.\isaaclab.bat -p scripts\tutorials\00_sim\launch_app.py --size 0.5 --livestream 2
这会导致与上次运行相同的行为,因为虽然我们在 envars 中设置了 LIVESTREAM=0 ,但 CLI 参数如 --livestream 优先确定行为。可以通过在启动终端中按 Ctrl+C 键来终止该进程。
最后,看看如何通过 launch_simulation() 向 SimulationApp 传入参数:
LIVESTREAM=2 uv run python scripts/tutorials/00_sim/launch_app.py --size 0.5 --width 1920 --height 1080
LIVESTREAM=2 ./isaaclab.sh -p scripts/tutorials/00_sim/launch_app.py --size 0.5 --width 1920 --height 1080
LIVESTREAM=2 LD_PRELOAD=/lib/aarch64-linux-gnu/libgomp.so.1 uv run python scripts/tutorials/00_sim/launch_app.py --size 0.5 --width 1920 --height 1080
LIVESTREAM=2 LD_PRELOAD=/lib/aarch64-linux-gnu/libgomp.so.1 ./isaaclab.sh -p scripts/tutorials/00_sim/launch_app.py --size 0.5 --width 1920 --height 1080
备注
在 aarch64 上,直接导入 Isaac Sim 的 Python 命令需要加上上述 LD_PRELOAD=/lib/aarch64-linux-gnu/libgomp.so.1 前缀。参见 使用 uv 自动安装(推荐) 。
$env:LIVESTREAM = "2"
uv run python scripts\tutorials\00_sim\launch_app.py --size 0.5 --width 1920 --height 1080
$env:LIVESTREAM = "2"
.\isaaclab.bat -p scripts\tutorials\00_sim\launch_app.py --size 0.5 --width 1920 --height 1080
这将导致与之前的行为相同,但现在视口将以 1920x1080p 分辨率进行渲染。在希望收集高分辨率视频或者希望使仿真更具性能时,这可能非常有用。可以通过在启动终端中按 Ctrl+C 键来终止该进程。
无界面模式和可视化器启动的更多信息见 迁移到 3.0 。