

向机器人添加传感器#
尽管资产类别允许我们创建和仿真机器人的实体,但传感器有助于获取有关环境的信息。它们通常以比仿真更新频率更低的频率更新,并且有助于获取不同的本体感知和外部感知信息。例如,相机传感器可以用于获取环境的视觉信息,接触传感器可以用于获取机器人与环境的接触信息。
在本教程中,我们将看到如何向机器人添加不同的传感器。我们将在本教程中使用 ANYmal-C 机器人。ANYmal-C 机器人是一个有 12 个自由度的四足机器人。它有 4 条腿,每个腿有 3 个自由度。机器人具有以下传感器:
机器人头部的相机传感器,提供 RGB-D 图像
提供地形高度信息的高度扫描传感器
机器人脚部的接触传感器,提供接触信息
我们将从之前关于 使用交互式场景 的教程中继续本教程,在那里我们了解了 scene.InteractiveScene 类。
代码#
本教程对应于 scripts/tutorials/04_sensors 目录中的 add_sensors_on_robot.py 脚本。
add_sensors_on_robot.py 的代码
  1# Copyright (c) 2022-2026, The Isaac Lab Project Developers (https://github.com/isaac-sim/IsaacLab/blob/main/CONTRIBUTORS.md).
  2# All rights reserved.
  3#
  4# SPDX-License-Identifier: BSD-3-Clause
  5
  6"""
  7This script demonstrates how to add and simulate on-board sensors for a robot.
  8
  9We add the following sensors on the quadruped robot, ANYmal-C (ANYbotics):
 10
 11* USD-Camera: This is a camera sensor that is attached to the robot's base.
 12* Height Scanner: This is a height scanner sensor that is attached to the robot's base.
 13* Contact Sensor: This is a contact sensor that is attached to the robot's feet.
 14
 15.. code-block:: bash
 16
 17    # Usage
 18    uv run python scripts/tutorials/04_sensors/add_sensors_on_robot.py --viz kit
 19
 20"""
 21
 22"""Parse the command-line arguments first."""
 23
 24import argparse
 25from typing import TYPE_CHECKING
 26
 27from isaaclab.app import add_launcher_args, launch_simulation
 28
 29# add argparse arguments
 30parser = argparse.ArgumentParser(description="Tutorial on adding sensors on a robot.")
 31parser.add_argument("--num_envs", type=int, default=2, help="Number of environments to spawn.")
 32# append simulation launcher cli args
 33add_launcher_args(parser)
 34# parse the arguments
 35args_cli = parser.parse_args()
 36# The scene has a camera sensor, which requires the rendering extensions in headless launches.
 37args_cli.enable_cameras = True
 38
 39"""Rest everything follows."""
 40
 41import torch
 42
 43import isaaclab.sim as sim_utils
 44from isaaclab.assets import ArticulationCfg, AssetBaseCfg
 45from isaaclab.scene import InteractiveSceneCfg
 46from isaaclab.sensors import CameraCfg, ContactSensorCfg, RayCasterCfg, patterns
 47from isaaclab.utils import configclass, instantiate, replace
 48
 49if TYPE_CHECKING:
 50    from isaaclab.scene import InteractiveScene
 51
 52##
 53# Pre-defined configs
 54##
 55from isaaclab_assets.robots.anymal import ANYMAL_C_CFG  # isort: skip
 56
 57
 58@configclass
 59class SensorsSceneCfg(InteractiveSceneCfg):
 60    """Design the scene with sensors on the robot."""
 61
 62    # ground plane
 63    ground = AssetBaseCfg(prim_path="/World/defaultGroundPlane", spawn=sim_utils.GroundPlaneCfg())
 64
 65    # lights
 66    dome_light = AssetBaseCfg(
 67        prim_path="/World/Light", spawn=sim_utils.DomeLightCfg(intensity=3000.0, color=(0.75, 0.75, 0.75))
 68    )
 69
 70    # robot
 71    robot: ArticulationCfg = replace(ANYMAL_C_CFG, prim_path="{ENV_REGEX_NS}/Robot")
 72
 73    # sensors
 74    camera = CameraCfg(
 75        prim_path="{ENV_REGEX_NS}/Robot/base/front_cam",
 76        update_period=0.1,
 77        height=480,
 78        width=640,
 79        data_types=["rgb", "distance_to_image_plane"],
 80        spawn=sim_utils.PinholeCameraCfg(
 81            focal_length=24.0, focus_distance=400.0, horizontal_aperture=20.955, clipping_range=(0.1, 1.0e5)
 82        ),
 83        offset=CameraCfg.OffsetCfg(pos=(0.510, 0.0, 0.015), rot=(0.5, -0.5, 0.5, -0.5), convention="ros"),
 84    )
 85    height_scanner = RayCasterCfg(
 86        prim_path="{ENV_REGEX_NS}/Robot/base",
 87        update_period=0.02,
 88        offset=RayCasterCfg.OffsetCfg(pos=(0.0, 0.0, 20.0)),
 89        ray_alignment="yaw",
 90        pattern_cfg=patterns.GridPatternCfg(resolution=0.1, size=[1.6, 1.0]),
 91        debug_vis=True,
 92        mesh_prim_paths=["/World/defaultGroundPlane"],
 93    )
 94    contact_forces = ContactSensorCfg(
 95        prim_path="{ENV_REGEX_NS}/Robot/.*_FOOT", update_period=0.0, history_length=6, debug_vis=True
 96    )
 97
 98
 99def run_simulator(sim: sim_utils.SimulationContext, scene: "InteractiveScene"):
100    """Run the simulator."""
101    # Define simulation stepping
102    sim_dt = sim.get_physics_dt()
103    sim_time = 0.0
104    count = 0
105
106    # Simulate physics
107    while sim.is_running():
108        # Reset
109        if count % 500 == 0:
110            # reset counter
111            count = 0
112            # reset the scene entities
113            # root state
114            # we offset the root state by the origin since the states are written in simulation world frame
115            # if this is not done, then the robots will be spawned at the (0, 0, 0) of the simulation world
116            root_pose = scene["robot"].data.default_root_pose.torch.clone()
117            root_pose[:, :3] += scene.env_origins
118            scene["robot"].write_root_pose_to_sim_index(root_pose=root_pose)
119            root_vel = scene["robot"].data.default_root_vel.torch.clone()
120            scene["robot"].write_root_velocity_to_sim_index(root_velocity=root_vel)
121            # set joint positions with some noise
122            joint_pos, joint_vel = (
123                scene["robot"].data.default_joint_pos.torch.clone(),
124                scene["robot"].data.default_joint_vel.torch.clone(),
125            )
126            joint_pos += torch.rand_like(joint_pos) * 0.1
127            scene["robot"].write_joint_position_to_sim_index(position=joint_pos)
128            scene["robot"].write_joint_velocity_to_sim_index(velocity=joint_vel)
129            # clear internal buffers
130            scene.reset()
131            print("[INFO]: Resetting robot state...")
132        # Apply default actions to the robot
133        # -- generate actions/commands
134        targets = scene["robot"].data.default_joint_pos.torch
135        # -- apply action to the robot
136        scene["robot"].set_joint_position_target_index(target=targets)
137        # -- write data to sim
138        scene.write_data_to_sim()
139        # perform step
140        sim.step()
141        # update sim-time
142        sim_time += sim_dt
143        count += 1
144        # update buffers
145        scene.update(sim_dt)
146
147        # print information from the sensors
148        print("-------------------------------")
149        print(scene["camera"])
150        print("Received shape of rgb   image: ", scene["camera"].data.output["rgb"].shape)
151        print("Received shape of depth image: ", scene["camera"].data.output["distance_to_image_plane"].shape)
152        print("-------------------------------")
153        print(scene["height_scanner"])
154        print(
155            "Received max height value: ",
156            torch.max(scene["height_scanner"].data.ray_hits_w.torch[..., -1]).item(),
157        )
158        print("-------------------------------")
159        print(scene["contact_forces"])
160        print("Received max contact force of: ", torch.max(scene["contact_forces"].data.net_normal_forces_w).item())
161
162
163def main():
164    """Main function."""
165
166    # Configure the simulation
167    sim_cfg = sim_utils.SimulationCfg(dt=0.005, device=args_cli.device)
168    # Launch the simulator runtime that the configuration needs
169    with launch_simulation(sim_cfg, args_cli):
170        # Initialize the simulation context
171        sim = sim_utils.SimulationContext(sim_cfg)
172        # Set main camera
173        sim.set_camera_view(eye=[3.5, 3.5, 3.5], target=[0.0, 0.0, 0.0])
174        # Design scene
175        scene_cfg = SensorsSceneCfg(num_envs=args_cli.num_envs, env_spacing=2.0)
176        scene = instantiate(scene_cfg)
177        # Play the simulator
178        sim.reset()
179        # Now we are ready!
180        print("[INFO]: Setup complete...")
181        # Run the simulator
182        run_simulator(sim, scene)
183
184
185if __name__ == "__main__":
186    # run the main function
187    main()
代码解释#
与之前的教程类似,我们添加资产到场景中时,传感器也是使用场景配置添加到场景中的。所有传感器都继承自 sensors.SensorBase 类,并通过其各自的配置类进行配置。每个传感器实例可以定义自己的更新周期,即传感器更新的频率。更新周期通过 sensors.SensorBaseCfg.update_period 属性以秒为单位指定。
根据指定的路径和传感器类型,传感器将附加到场景中的 prims 上。它们可能有一个关联的 prim 在场景中创建,或者它们可能附加到现有的 prim 上。例如,相机传感器有一个对应的 prim 在场景中创建,而对于接触传感器,激活接触报告是刚体 prim 上的一个属性。
接下来,我们介绍本教程中使用的不同传感器及其配置。有关更多描述,请查看 sensors 模块。
相机传感器#
使用 sensors.CameraCfg 定义相机。它基于 USD 相机传感器,并使用 Omniverse Replicator API 捕获不同的数据类型。由于它在场景中有一个对应的 prim,因此 prims 会在指定的 prim 路径上创建在场景中。
相机传感器的配置包括以下参数:
spawn: 要创建的 USD 相机类型。这可以是PinholeCameraCfg或FisheyeCameraCfg。offset: 相机传感器相对于父 prim 的偏移量。data_types: 要捕获的数据类型。这可以是rgb、distance_to_image_plane、normals等 USD 相机传感器支持的其他类型。
要将 RGB-D 相机传感器安装在机器人头部,需要设置相对于机器人基座坐标系的偏移。该偏移包含相对基座坐标系的平移和旋转,并通过 convention 指定所采用的坐标系约定。
接下来,我们展示本教程中使用的相机传感器的配置。我们将更新周期设置为 0.1 秒,这意味着相机传感器以 10Hz 进行更新。prim 路径表达式设置为 {ENV_REGEX_NS}/Robot/base/front_cam ,其中 {ENV_REGEX_NS} 是环境命名空间, "Robot" 是机器人名称, "base" 是相机附加到的 prim 的名称, "front_cam" 是与相机传感器关联的 prim 的名称。
    camera = CameraCfg(
        prim_path="{ENV_REGEX_NS}/Robot/base/front_cam",
        update_period=0.1,
        height=480,
        width=640,
        data_types=["rgb", "distance_to_image_plane"],
        spawn=sim_utils.PinholeCameraCfg(
            focal_length=24.0, focus_distance=400.0, horizontal_aperture=20.955, clipping_range=(0.1, 1.0e5)
        ),
        offset=CameraCfg.OffsetCfg(pos=(0.510, 0.0, 0.015), rot=(0.5, -0.5, 0.5, -0.5), convention="ros"),
    )
即使不使用可视化器,相机传感器也需要仿真器的渲染扩展。当传给 launch_simulation() 的配置包含相机时,它会自动启用这些扩展。由于本脚本只传入仿真配置,而相机位于场景配置中,因此脚本会在解析参数后显式请求相机渲染:
args_cli = parser.parse_args()
# The scene has a camera sensor, which requires the rendering extensions in headless launches.
args_cli.enable_cameras = True
高度扫描传感器#
高度扫描器使用虚拟射线投射传感器实现,通过 sensors.RayCasterCfg 指定射线分布。基于 PhysX 的后端对配置的网格进行射线检测,而 Newton 对其当前场景的 BVH 进行检测,并忽略网格列表。默认情况下,spawn 会在 prim_path 创建一个普通 USD Xform,作为传感器的挂载坐标系。这一兼容行为已弃用;新配置应将 spawn 设为 None,并跟踪已有坐标系。
本教程将基于射线投射的高度扫描器挂在机器人基座坐标系下。射线模式由 pattern 属性指定;均匀网格模式使用 GridPatternCfg 。由于我们只关心高度信息,无需考虑机器人的滚转和俯仰,因此将 ray_alignment 设为 "yaw"。
对于高度扫描器,可以将光线击中网格的点可视化。通过设置 debug_vis 属性为 true 实现此功能。
高度扫描器的整体配置如下:
    height_scanner = RayCasterCfg(
        prim_path="{ENV_REGEX_NS}/Robot/base",
        update_period=0.02,
        offset=RayCasterCfg.OffsetCfg(pos=(0.0, 0.0, 20.0)),
        ray_alignment="yaw",
        pattern_cfg=patterns.GridPatternCfg(resolution=0.1, size=[1.6, 1.0]),
        debug_vis=True,
        mesh_prim_paths=["/World/defaultGroundPlane"],
    )
接触传感器#
接触传感器包装 PhysX 接触报告 API 以获取机器人与环境的接触信息。由于它依赖于 PhysX,因此接触传感器希望启用机器人的刚体上的接触报告 API。可以通过在资产配置中将 activate_contact_sensors 设置为 true 来完成此操作。
通过 sensors.ContactSensorCfg ,可以指定要获取其接触信息的 prims。可以设置附加标志以获取有关接触的更多信息,例如过滤 prims 之间的接触空气时间、接触力等。
本教程将接触传感器附加到机器人的足部。四个足部名称分别为 "LF_FOOT" 、 "RF_FOOT" 、 "LH_FOOT" 和 "RH_FOOT" 。为简化 prim 路径设置,我们使用正则表达式 ".*_FOOT" ,匹配所有名称以 "_FOOT" 结尾的 prim。
将更新周期设置为 0 以使传感器以仿真相同的频率更新。此外,对于接触传感器,可以指定要存储的接触信息的历史长度。对于本教程,我们将历史长度设置为 6,这意味着存储最后 6 个仿真步骤的接触信息。
接触传感器的整体配置如下:
    contact_forces = ContactSensorCfg(
        prim_path="{ENV_REGEX_NS}/Robot/.*_FOOT", update_period=0.0, history_length=6, debug_vis=True
    )
运行仿真循环#
与使用资产时类似,仅当播放仿真时才会初始化传感器的缓冲区和物理句柄,即在创建场景后调用 sim.reset() 是重要的。
        # Play the simulator
        sim.reset()
此外,仿真循环类似于以前的教程。传感器作为场景更新的一部分进行更新,并且它们内部处理基于其更新周期的缓冲区的更新。
可以通过它们的 data 属性访问传感器的数据。作为示例,我们展示了如何访问本教程中创建的不同传感器的数据:
        # print information from the sensors
        print("-------------------------------")
        print(scene["camera"])
        print("Received shape of rgb   image: ", scene["camera"].data.output["rgb"].shape)
        print("Received shape of depth image: ", scene["camera"].data.output["distance_to_image_plane"].shape)
        print("-------------------------------")
        print(scene["height_scanner"])
        print(
            "Received max height value: ",
            torch.max(scene["height_scanner"].data.ray_hits_w.torch[..., -1]).item(),
        )
        print("-------------------------------")
        print(scene["contact_forces"])
        print("Received max contact force of: ", torch.max(scene["contact_forces"].data.net_normal_forces_w).item())
代码执行#
现在我们已经浏览了代码,让我们运行脚本并查看结果:
uv run python scripts/tutorials/04_sensors/add_sensors_on_robot.py --num_envs 2 --viz kit
./isaaclab.sh -p scripts/tutorials/04_sensors/add_sensors_on_robot.py --num_envs 2 --viz kit
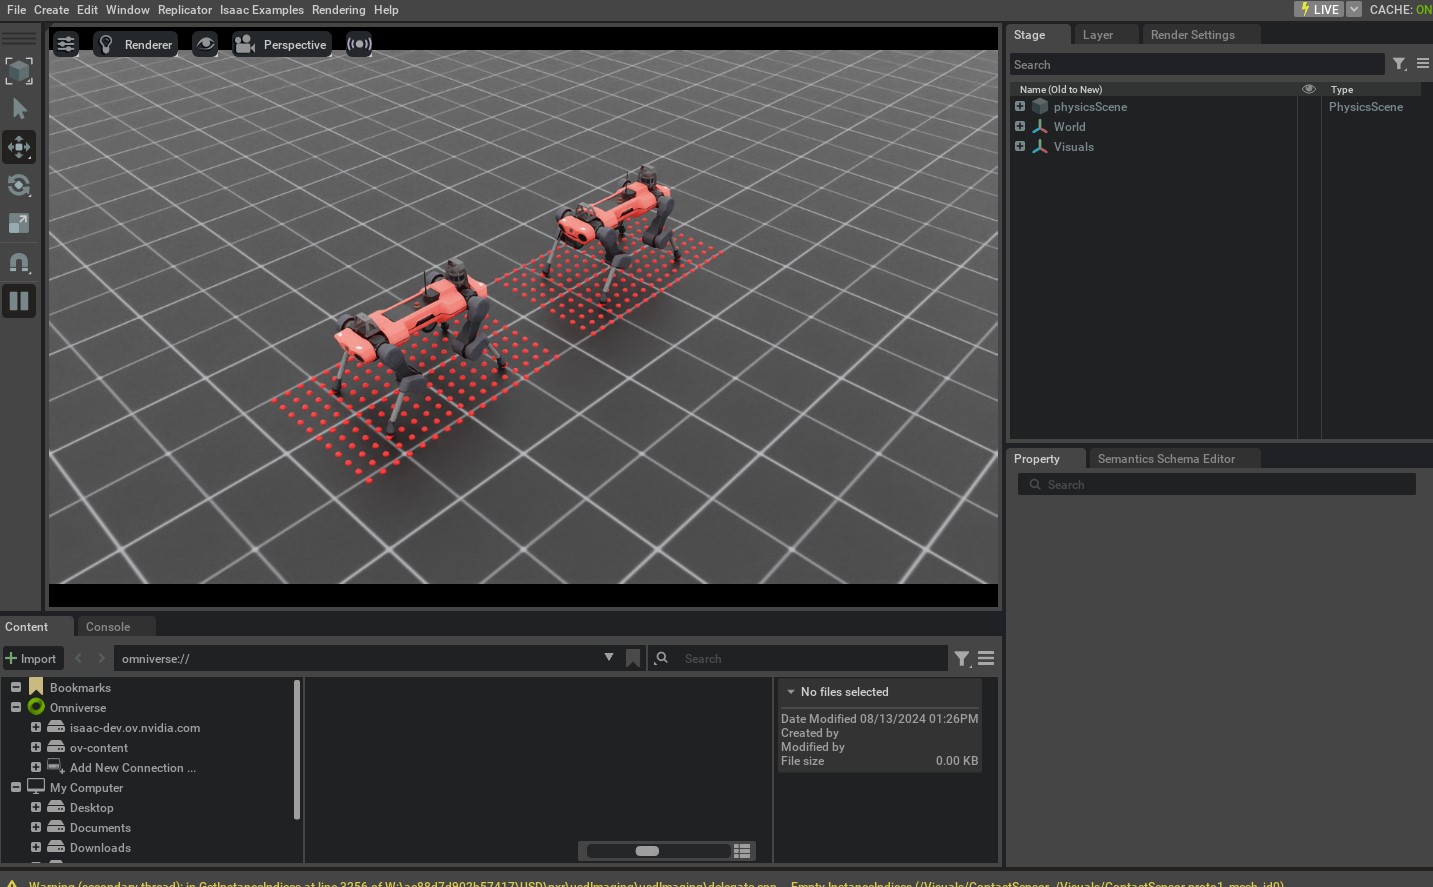
此命令应该打开一个带有地面平面、灯光和两个四足机器人的场景。在机器人周围,您应该看到指示光线击中网格点的红色球。此外,您可以将视口切换到相机视图,以查看相机传感器捕获的 RGB 图像。请查看 这里 获取有关如何将视口切换到相机视图的更多信息。
要停止仿真,您可以关闭窗口,或在终端中按 Ctrl+C 。
在本教程中,我们讨论了创建和使用不同的传感器, sensors 模块中还有许多其他传感器可用。我们在 scripts/tutorials/04_sensors 目录中包含了使用这些传感器的最低限度示例。为了完整起见,可以使用以下命令运行这些脚本:
# Frame Transformer
uv run python scripts/tutorials/04_sensors/run_frame_transformer.py --viz kit

# Ray Caster
uv run python scripts/tutorials/04_sensors/run_ray_caster.py --viz kit

# Ray Caster Camera
uv run python scripts/tutorials/04_sensors/run_ray_caster_camera.py --viz kit

# USD Camera
uv run python scripts/tutorials/04_sensors/run_usd_camera.py --viz kit
# Frame Transformer
./isaaclab.sh -p scripts/tutorials/04_sensors/run_frame_transformer.py --viz kit

# Ray Caster
./isaaclab.sh -p scripts/tutorials/04_sensors/run_ray_caster.py --viz kit

# Ray Caster Camera
./isaaclab.sh -p scripts/tutorials/04_sensors/run_ray_caster_camera.py --viz kit

# USD Camera
./isaaclab.sh -p scripts/tutorials/04_sensors/run_usd_camera.py --viz kit