Setting up CloudXR Teleoperation#
NVIDIA CloudXR enables seamless, high-fidelity immersive streaming to extended reality (XR) devices over any network.
Isaac Lab developers can use CloudXR with Isaac Lab to build teleoperation workflows that require immersive XR rendering for increased spatial acuity and/or hand tracking for teleoperation of dextrous robots.
In these workflows, Isaac Lab renders and submits stereo views of the robot simulation to CloudXR, which then encodes and streams the rendered views to a compatible XR device in realtime using a low-latency, GPU-accelerated pipeline. Control inputs such as hand tracking data are sent from the XR device back to Isaac Lab through CloudXR, where they can be used to control the robot.
This guide explains how to use CloudXR and Apple Vision Pro for immersive streaming and teleoperation in Isaac Lab.
Note
See Manus + Vive Hand Tracking for more information on supported hand-tracking peripherals.
Note
Meta Quest 3 and Pico 4 Ultra Support (Early Access)
Meta Quest 3 and Pico 4 Ultra are now supported via the CloudXR Early Access program. Join the program by mentioning isaac use cases. Once approved, you’ll receive email to set up NGC, then download CloudXR.js with Isaac Teleop samples and follow its guide. Pico 4 Ultra must use HTTPS mode (see NGC documentation for details). General availability will be provided in a future version of Isaac Lab.
Overview#
Using CloudXR with Isaac Lab involves the following components:
Isaac Lab is used to simulate the robot environment and apply control data received from the teleoperator.
The NVIDIA CloudXR Runtime runs on the Isaac Lab workstation in a Docker container, and streams the virtual simulation from Isaac Lab to compatible XR devices.
The Isaac XR Teleop Sample Client is a sample app for Apple Vision Pro which enables immersive streaming and teleoperation of an Isaac Lab simulation using CloudXR.
This guide will walk you through how to:
Use Apple Vision Pro for Teleoperation, including how to Build and Install the Isaac XR Teleop Sample Client App for Apple Vision Pro, Teleoperate an Isaac Lab Robot with Apple Vision Pro, and Manus + Vive Hand Tracking.
Develop for XR in Isaac Lab, including how to Run Isaac Lab with XR Extensions Enabled, Configure XR Scene Placement, and Optimize XR Performance.
Control the Robot with XR Device Inputs, including the OpenXR Device, Retargeting Architecture, and how to implement Adding Callbacks for XR UI Events.
As well as Known Issues.
System Requirements#
Prior to using CloudXR with Isaac Lab, please review the following system requirements:
Isaac Lab workstation
Ubuntu 22.04 or Ubuntu 24.04
- Hardware requirements to sustain 45 FPS with a 120Hz physics simulation:
CPU: 16-Cores AMD Ryzen Threadripper Pro 5955WX or higher
Memory: 64GB RAM
GPU: 1x RTX PRO 6000 GPUs (or equivalent e.g. 1x RTX 5090) or higher
For details on driver requirements, please see the Technical Requirements guide
Docker 26.0.0+, Docker Compose 2.25.0+, and the NVIDIA Container Toolkit. Refer to the Isaac Lab Docker Guide for how to install.
Apple Vision Pro
visionOS 26
Apple M3 Pro chip with an 11-core CPU with at least 5 performance cores and 6 efficiency cores
16GB unified memory
256 GB SSD
Apple Silicon based Mac (for building the Isaac XR Teleop Sample Client App for Apple Vision Pro with Xcode)
macOS Sequoia 15.6 or later
Xcode 26.0
Wifi 6 capable router
A strong wireless connection is essential for a high-quality streaming experience. Refer to the requirements of Omniverse Spatial Streaming for more details.
We recommend using a dedicated router, as concurrent usage will degrade quality
The Apple Vision Pro and Isaac Lab workstation must be IP-reachable from one another (note: many institutional wireless networks will prevent devices from reaching each other, resulting in the Apple Vision Pro being unable to find the Isaac Lab workstation on the network)
Note
If you are using DGX Spark, check DGX Spark Limitations for compatibility.
Run Isaac Lab with the CloudXR Runtime#
The CloudXR Runtime runs in a Docker container on your Isaac Lab workstation, and is responsible for streaming the Isaac Lab simulation to a compatible XR device.
Ensure that Docker, Docker Compose, and the NVIDIA Container Toolkit are installed on your Isaac Lab workstation as described in the Isaac Lab Docker Guide.
Also ensure that your firewall allows connections to the ports used by CloudXR by running:
sudo ufw allow 47998:48000,48005,48008,48012/udp
sudo ufw allow 48010/tcp
There are two options to run the CloudXR Runtime Docker container:
Option 1 (Recommended): Use Docker Compose to run the Isaac Lab and CloudXR Runtime containers together
On your Isaac Lab workstation:
From the root of the Isaac Lab repository, start the Isaac Lab and CloudXR Runtime containers using the Isaac Lab
container.pyscript./docker/container.py start \ --files docker-compose.cloudxr-runtime.patch.yaml \ --env-file .env.cloudxr-runtime
If prompted, elect to activate X11 forwarding, which is necessary to see the Isaac Sim UI.
Note
The
container.pyscript is a thin wrapper around Docker Compose. The additional--filesand--env-filearguments augment the base Docker Compose configuration to additionally run the CloudXR RuntimeFor more details on
container.pyand running Isaac Lab with Docker Compose, see the Docker Guide.Enter the Isaac Lab base container with:
./docker/container.py enter base
From within the Isaac Lab base container, you can run Isaac Lab scripts that use XR.
Run an example teleop task with:
./isaaclab.sh -p scripts/environments/teleoperation/teleop_se3_agent.py \
    --task Isaac-PickPlace-GR1T2-Abs-v0 \
    --teleop_device handtracking \
    --enable_pinocchio
You’ll want to leave the container running for the next steps. But once you are finished, you can stop the containers with:
./docker/container.py stop \
    --files docker-compose.cloudxr-runtime.patch.yaml \
    --env-file .env.cloudxr-runtime
Tip
If you encounter issues on restart, you can run the following command to clean up orphaned containers:
docker system prune -f
Option 2: Run Isaac Lab as a local process and CloudXR Runtime container with Docker
Isaac Lab can be run as a local process that connects to the CloudXR Runtime Docker container. However, this method requires manually specifying a shared directory for communication between the Isaac Lab instance and the CloudXR Runtime.
On your Isaac Lab workstation:
From the root of the Isaac Lab repository, create a local folder for temporary cache files:
mkdir -p $(pwd)/openxr
Start the CloudXR Runtime, mounting the directory created above to the
/openxrdirectory in the container:docker run -it --rm --name cloudxr-runtime \ --user $(id -u):$(id -g) \ --gpus=all \ -e "ACCEPT_EULA=Y" \ --mount type=bind,src=$(pwd)/openxr,dst=/openxr \ -p 48010:48010 \ -p 47998:47998/udp \ -p 47999:47999/udp \ -p 48000:48000/udp \ -p 48005:48005/udp \ -p 48008:48008/udp \ -p 48012:48012/udp \ nvcr.io/nvidia/cloudxr-runtime:5.0.1
Note
If you choose a particular GPU instead of
all, you need to make sure Isaac Lab also runs on that GPU.Tip
If you encounter issues on running cloudxr-runtime container, you can run the following command to clean up the orphaned container:
docker stop cloudxr-runtime
docker rm cloudxr-runtime
In a new terminal where you intend to run Isaac Lab, export the following environment variables, which reference the directory created above:
export XDG_RUNTIME_DIR=$(pwd)/openxr/run
export XR_RUNTIME_JSON=$(pwd)/openxr/share/openxr/1/openxr_cloudxr.json
You can now run Isaac Lab scripts that use XR.
Run an example teleop task with:
./isaaclab.sh -p scripts/environments/teleoperation/teleop_se3_agent.py \
    --task Isaac-PickPlace-GR1T2-Abs-v0 \
    --teleop_device handtracking \
    --enable_pinocchio
With Isaac Lab and the CloudXR Runtime running:
In the Isaac Sim UI: locate the Panel named AR and choose the following options:
Selected Output Plugin: OpenXR
OpenXR Runtime: System OpenXR Runtime

Note
Isaac Sim lets you choose from several OpenXR runtime options:
System OpenXR Runtime: Use a runtime installed outside of Isaac Lab, such as the CloudXR Runtime set up via Docker in this tutorial.
CloudXR Runtime (5.0): Use the built-in CloudXR Runtime.
Custom: Allow you to specify and run any custom OpenXR Runtime of your choice.
Click Start AR.
The Viewport should show two eyes being rendered, and you should see the status “AR profile is active”.

Isaac Lab is now ready to receive connections from a CloudXR client. The next sections will walk you through building and connecting a CloudXR client.
Learn More about Teleoperation and Imitation Learning in Isaac Lab
To learn more about the Isaac Lab teleoperation scripts, and how to build new teleoperation and imitation learning workflows in Isaac Lab, see Teleoperation and Imitation Learning with Isaac Lab Mimic.
Use Apple Vision Pro for Teleoperation#
This section will walk you through building and installing the Isaac XR Teleop Sample Client for Apple Vision Pro, connecting to Isaac Lab, and teleoperating a simulated robot.
Build and Install the Isaac XR Teleop Sample Client App for Apple Vision Pro#
On your Mac:
Clone the Isaac XR Teleop Sample Client GitHub repository:
git clone git@github.com:isaac-sim/isaac-xr-teleop-sample-client-apple.git
Check out the App version that matches your Isaac Lab version:
Isaac Lab Version
Client App Version
2.3
v2.3.0
2.2
v2.2.0
2.1
v1.0.0
git checkout <client_app_version>
Follow the README in the repository to build and install the app on your Apple Vision Pro.
Teleoperate an Isaac Lab Robot with Apple Vision Pro#
With the Isaac XR Teleop Sample Client installed on your Apple Vision Pro, you are ready to connect to Isaac Lab.
Tip
Before wearing the headset, you can first verify connectivity from your Mac:
# Test signaling port (replace <isaac-lab-ip> with your workstation IP)
nc -vz <isaac-lab-ip> 48010
Expected output: Connection to <ip> port 48010 [tcp/*] succeeded!
If the connection fails, check that the runtime container is running (docker ps) and no stale
runtime container is blocking ports.
On your Isaac Lab workstation:
Ensure that Isaac Lab and CloudXR are both running as described in Run Isaac Lab with the CloudXR Runtime, including starting Isaac Lab with a script that supports teleoperation. For example:
./isaaclab.sh -p scripts/environments/teleoperation/teleop_se3_agent.py \
    --task Isaac-PickPlace-GR1T2-Abs-v0 \
    --teleop_device handtracking \
    --enable_pinocchio
Note
Recall that the script above should either be run within the Isaac Lab Docker container (Option 1, recommended), or with environment variables configured to a directory shared by a running CloudXR Runtime Docker container (Option 2).
Locate the Panel named AR.
Click Start AR and ensure that the Viewport shows two eyes being rendered.
Back on your Apple Vision Pro:
Open the Isaac XR Teleop Sample Client. You should see a UI window:

Enter the IP address of your Isaac Lab workstation.
Note
The Apple Vision Pro and Isaac Lab machine must be IP-reachable from one another.
We recommend using a dedicated Wifi 6 router for this process, as many institutional wireless networks will prevent devices from reaching each other, resulting in the Apple Vision Pro being unable to find the Isaac Lab workstation on the network.
Click Connect.
The first time you attempt to connect, you may need to allow the application access to permissions such as hand tracking and local network usage, and then connect again.
After a brief period, you should see the Isaac Lab simulation rendered in the Apple Vision Pro, as well as a set of controls for teleoperation.
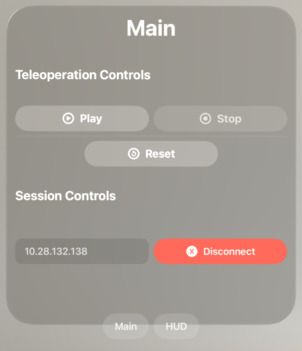
Click Play to begin teleoperating the simulated robot. The robot motion should now be directed by your hand movements.
You may repeatedly Play, Stop, and Reset the teleoperation session using the UI controls.
Tip
For teleoperation tasks that require bimanual manipulation, visionOS accessibility features can be used to control teleoperation without the use of hand gestures. For example, in order to enable voice control of the UI:
In Settings > Accessibility > Voice Control, Turn on Voice Control
In Settings > Accessibility > Voice Control > Commands > Basic Navigation > Turn on <item name>
Now you can say “Play”, “Stop”, and “Reset” to control teleoperation while the app is connected.
Teleoperate the simulated robot by moving your hands.
Note
The red dots represent the tracked position of the hand joints. Latency or offset between the motion of the dots and the robot may be caused by the limits of the robot joints and/or robot controller.
Note
When the inverse kinematics solver fails to find a valid solution, an error message will appear in the XR device display. To recover from this state, click the Reset button to return the robot to its original pose and continue teleoperation.

When you are finished with the example, click Disconnect to disconnect from Isaac Lab.
Learn More about Teleoperation and Imitation Learning in Isaac Lab
See Teleoperation and Imitation Learning with Isaac Lab Mimic to learn how to record teleoperated demonstrations and build teleoperation and imitation learning workflows with Isaac Lab.
Manus + Vive Hand Tracking#
Manus gloves and HTC Vive trackers can provide hand tracking when optical hand tracking from a headset is occluded. This setup expects Manus gloves with a Manus SDK license and Vive trackers attached to the gloves. Requires Isaac Sim 5.1 or later.
Run the teleoperation example with Manus + Vive tracking:
Installation instructions
Vive tracker integration is provided through the libsurvive library.
To install, clone the repository, build the python package, and install the required udev rules. In your Isaac Lab virtual environment, run the following commands:
git clone https://github.com/collabora/libsurvive.git
cd libsurvive
pip install scikit-build
python setup.py install

sudo cp ./useful_files/81-vive.rules /etc/udev/rules.d/
sudo udevadm control --reload-rules && sudo udevadm trigger
The Manus integration is provided through the Isaac Sim teleoperation input plugin framework. Install the plugin by following the build and installation steps in isaac-teleop-device-plugins.
In the same terminal from which you will launch Isaac Lab, set:
export ISAACSIM_HANDTRACKER_LIB=<path to isaac-teleop-device-plugins>/build-manus-default/lib/libIsaacSimManusHandTracking.so
Once the plugin is installed, run the teleoperation example:
./isaaclab.sh -p scripts/environments/teleoperation/teleop_se3_agent.py \
    --task Isaac-PickPlace-GR1T2-Abs-v0 \
    --teleop_device manusvive \
    --xr \
    --enable_pinocchio
The recommended workflow, is to start Isaac Lab, click Start AR, and then put on the Manus gloves, vive trackers, and headset. Once you are ready to begin the session, use voice commands to launch the Isaac XR teleop sample client and connect to Isaac Lab.
Isaac Lab automatically calibrates the Vive trackers using wrist pose data from the Apple Vision Pro during the initial frames of the session. If calibration fails, for example, if the red dots do not accurately follow the teleoperator’s hands, restart Isaac Lab and begin with your hands in a palm-up position to improve calibration reliability.
For optimal performance, position the lighthouse above the hands, tilted slightly downward. Ensure the lighthouse remains stable; a stand is recommended to prevent wobbling.
Ensure that while the task is being teleoperated, the hands remain stable and visible to the lighthouse at all times. See: Installing the Base Stations and Tips for Setting Up the Base Stations
Note
On first launch of the Manus Vive device, the Vive lighthouses may take a few seconds to calibrate. Keep the Vive trackers
stable and visible to the lighthouse during this time. If the light houses are moved or if tracking fails or is unstable,
calibration can be forced by deleting the calibration file at: $XDG_RUNTIME_DIR/libsurvive/config.json. If XDG_RUNTIME_DIR
is not set, the default directory is ~/.config/libsurvive.
For more information consult the libsurvive documentation: libsurvive.
For optimal performance, position the lighthouse above the hands, tilted slightly downward. One lighthouse is sufficient if both hands are visible. Ensure the lighthouse remains stable; a stand is recommended to prevent wobbling.
Note
To avoid resource contention and crashes, ensure Manus and Vive devices are connected to different USB controllers/buses.
Use lsusb -t to identify different buses and connect devices accordingly.
Vive trackers are automatically calculated to map to the left and right wrist joints obtained from a stable OpenXR hand tracking wrist pose. This auto-mapping calculation supports up to 2 Vive trackers; if more than 2 Vive trackers are detected, it uses the first two trackers detected for calibration, which may not be correct.
Develop for XR in Isaac Lab#
This section will walk you through how to develop XR environments in Isaac Lab for building teleoperation workflows.
Run Isaac Lab with XR Extensions Enabled#
In order to enable extensions necessary for XR, and to see the AR Panel in the UI, Isaac Lab must be
loaded with an XR experience file. This can be done automatically by passing the --xr flag to
any Isaac Lab script that uses app.AppLauncher.
For example: you can enable and use XR in any of the Tutorials by invoking them with the
additional --xr flag.
Configure XR Scene Placement#
Placement of the robot simulation within the XR device’s local coordinate frame can be achieved
using an XR anchor, and is configurable using the xr field (type openxr.XrCfg) in the
environment configuration.
Specifically: the pose specified by the anchor_pos and anchor_rot fields of the
openxr.XrCfg will appear at the origin of the XR device’s local coordinate frame, which
should be on the floor.
Note
On Apple Vision Pro, the local coordinate frame can be reset to a point on the floor beneath the user by holding the digital crown.
For example: if a robot should appear at the position of the user, the anchor_pos and
anchor_rot properties should be set to a pose on the floor directly beneath the robot.
Note
The XR anchor configuration is applied in openxr.OpenXRDevice by creating a prim at the
position of the anchor, and modifying the xr/profile/ar/anchorMode and
/xrstage/profile/ar/customAnchor settings.
If you are running a script that does not use openxr.OpenXRDevice, you will need to do
this explicitly.
Optimize XR Performance#
Configure the physics and render time step
In order to provide a high-fidelity immersive experience, it is recommended to ensure that the simulation render time step roughly matches the XR device display time step.
It is also important to ensure that this time step can be simulated and rendered in real time.
The Apple Vision Pro display runs at 90Hz, but many Isaac Lab simulations will not achieve 90Hz performance when rendering stereo views for XR; so for best experience on Apple Vision Pro, we suggest running with a simulation dt of 90Hz and a render interval of 2, meaning that the simulation is rendered once for every two simulation steps, or at 45Hz, if performance allows.
You can still set the simulation dt lower or higher depending on your requirements, but this may result in the simulation appearing faster or slower when rendered in XR.
Overriding the time step configuration for an environment can be done by modifying the
sim.SimulationCfg in the environment’s __post_init__ function. For instance:
@configclass
class XrTeleopEnvCfg(ManagerBasedRLEnvCfg):

    def __post_init__(self):
        self.sim.dt = 1.0 / 90
        self.sim.render_interval = 2
Also note that by default the CloudXR Runtime attempts to dynamically adjust its pacing based on
how long Isaac Lab takes to render. If render times are highly variable, this can lead to the
simulation appearing to speed up or slow down when rendered in XR. If this is an issue, the
CloudXR Runtime can be configured to use a fixed time step by setting the environment variable
NV_PACER_FIXED_TIME_STEP_MS to an integer quantity when starting the CloudXR Runtime Docker
containere.
Try running physics on CPU
It is currently recommended to try running Isaac Lab teleoperation scripts with the --device
cpu flag. This will cause Physics calculations to be done on the CPU, which may be reduce
latency when only a single environment is present in the simulation.
Control the Robot with XR Device Inputs#
Isaac Lab provides a flexible architecture for using XR tracking data to control simulated robots. This section explains the components of this architecture and how they work together.
OpenXR Device#
The isaaclab.devices.OpenXRDevice is the core component that enables XR-based teleoperation in Isaac Lab.
This device interfaces with CloudXR to receive tracking data from the XR headset and transform it into robot control
commands.
At its heart, XR teleoperation requires mapping (or “retargeting”) user inputs, such as hand movements and poses, into robot control signals. Isaac Lab makes this straightforward through its OpenXRDevice and Retargeter architecture. The OpenXRDevice captures hand tracking data via Isaac Sim’s OpenXR API, then passes this data through one or more Retargeters that convert it into robot actions.
The OpenXRDevice also integrates with the XR device’s user interface when using CloudXR, allowing users to trigger simulation events directly from their XR environment.
Retargeting Architecture#
Retargeters are specialized components that convert raw tracking data into meaningful control signals
for robots. They implement the isaaclab.devices.RetargeterBase interface and are passed to
the OpenXRDevice during initialization.
Isaac Lab provides three main retargeters for hand tracking:
Se3RelRetargeter (isaaclab.devices.openxr.retargeters.Se3RelRetargeter)
Generates incremental robot commands from relative hand movements
Best for precise manipulation tasks
Se3AbsRetargeter (isaaclab.devices.openxr.retargeters.Se3AbsRetargeter)
Maps hand position directly to robot end-effector position
Enables 1:1 spatial control
GripperRetargeter (isaaclab.devices.openxr.retargeters.GripperRetargeter)
Controls gripper state based on thumb-index finger distance
Used alongside position retargeters for full robot control
GR1T2Retargeter (isaaclab.devices.openxr.retargeters.GR1T2Retargeter)
Retargets OpenXR hand tracking data to GR1T2 hand end-effector commands
Handles both left and right hands, converting hand poses to joint angles for the GR1T2 robot’s hands
Supports visualization of tracked hand joints
UnitreeG1Retargeter (isaaclab.devices.openxr.retargeters.UnitreeG1Retargeter)
Retargets OpenXR hand tracking data to Unitree G1 using Inspire 5-finger hand end-effector commands
Handles both left and right hands, converting hand poses to joint angles for the G1 robot’s hands
Supports visualization of tracked hand joints
Retargeters can be combined to control different robot functions simultaneously.
Using Retargeters with Hand Tracking#
Here’s an example of setting up hand tracking:
from isaaclab.devices import OpenXRDevice, OpenXRDeviceCfg
from isaaclab.devices.openxr.retargeters import Se3AbsRetargeter, GripperRetargeter

# Create retargeters
position_retargeter = Se3AbsRetargeter(
    bound_hand=DeviceBase.TrackingTarget.HAND_RIGHT,
    zero_out_xy_rotation=True,
    use_wrist_position=False  # Use pinch position (thumb-index midpoint) instead of wrist
)
gripper_retargeter = GripperRetargeter(bound_hand=DeviceBase.TrackingTarget.HAND_RIGHT)

# Create OpenXR device with hand tracking and both retargeters
device = OpenXRDevice(
    OpenXRDeviceCfg(xr_cfg=env_cfg.xr),
    retargeters=[position_retargeter, gripper_retargeter],
)

# Main control loop
while True:
    # Get the latest commands from the XR device
    commands = device.advance()
    if commands is None:
        continue

    # Apply the commands to the environment
    obs, reward, terminated, truncated, info = env.step(commands)

    if terminated or truncated:
        break
Here’s a diagram for the dataflow and algorithm used in humanoid teleoperation. Using Apple Vision Pro, we collect 26 keypoints for each hand. The wrist keypoint is used to control the hand end-effector, while the remaining hand keypoints are used for hand retargeting.
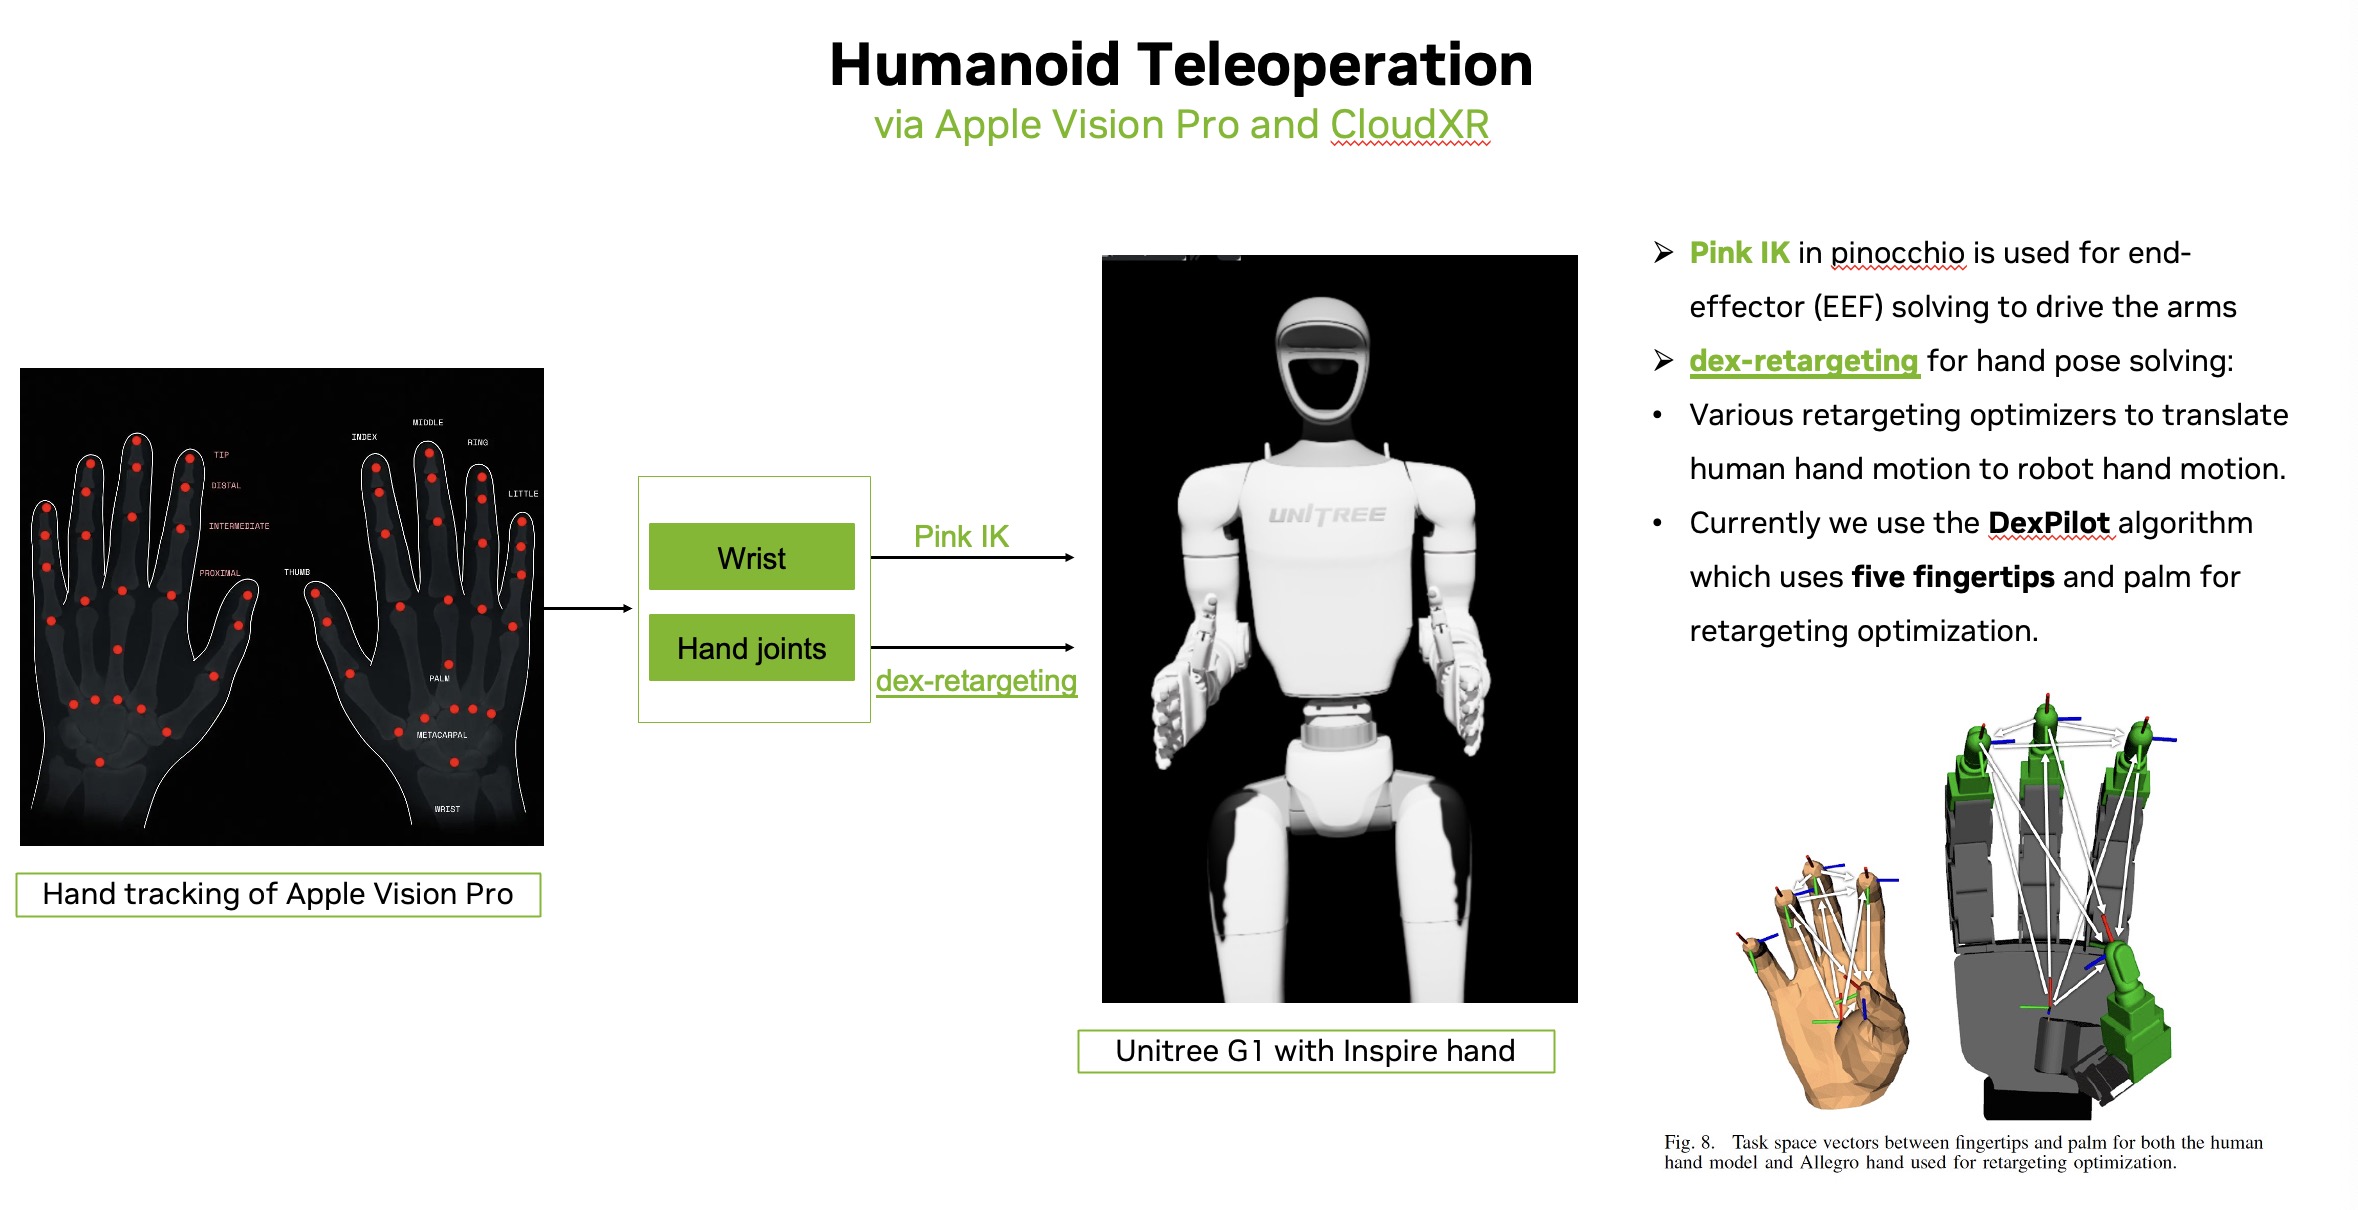
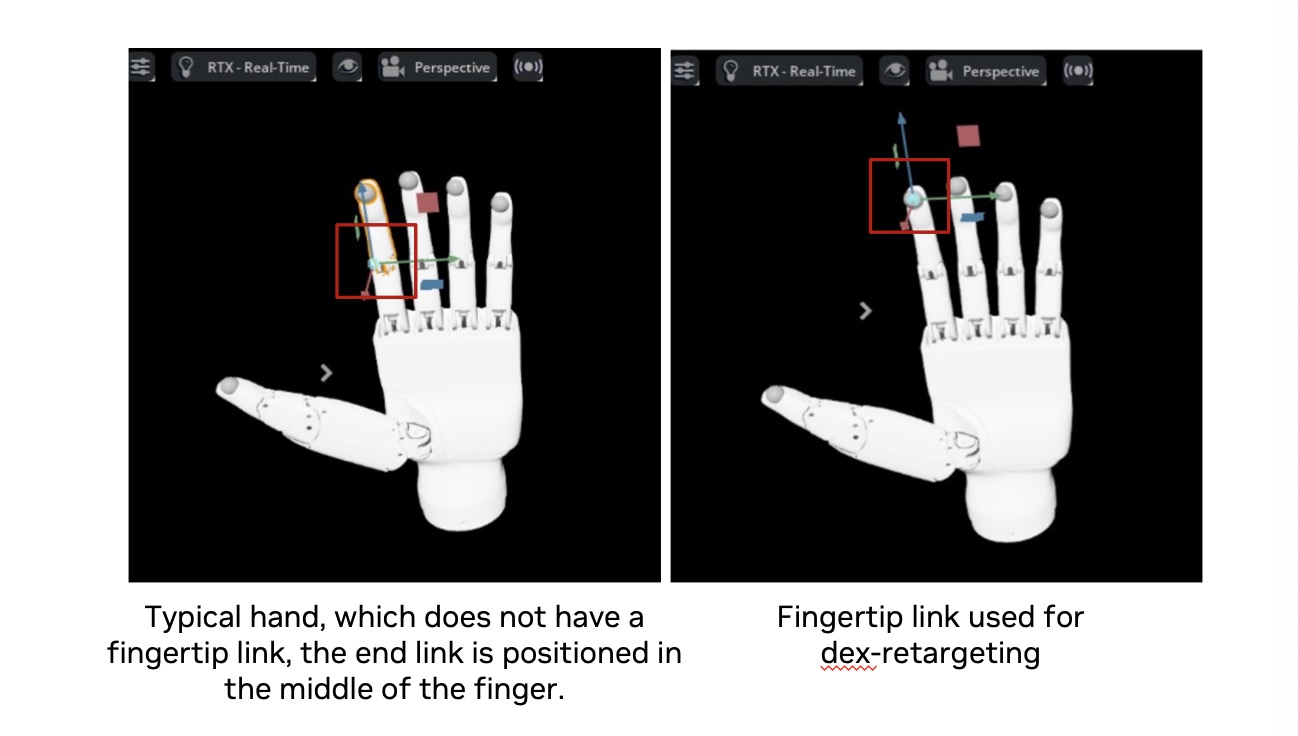
For dex-retargeting, we are currently using the Dexpilot optimizer, which relies on the five fingertips and the palm for retargeting. It is essential that the links used for retargeting are defined exactly at the fingertips—not in the middle of the fingers—to ensure accurate optimization.Please refer to the image below for hand asset selection, find a suitable hand asset, or add fingertip links in IsaacLab as needed.
Adding Callbacks for XR UI Events#
The OpenXRDevice can handle events triggered by user interactions with XR UI elements like buttons and menus. When a user interacts with these elements, the device triggers registered callback functions:
# Register callbacks for teleop control events
device.add_callback("RESET", reset_callback)
device.add_callback("START", start_callback)
device.add_callback("STOP", stop_callback)
When the user interacts with the XR UI, these callbacks will be triggered to control the simulation or recording process. You can also add custom messages from the client side using custom keys that will trigger these callbacks, allowing for programmatic control of the simulation alongside direct user interaction. The custom keys can be any string value that matches the callback registration.
Teleop Environment Configuration#
XR-based teleoperation can be integrated with Isaac Lab’s environment configuration system using the
teleop_devices field in your environment configuration:
from dataclasses import field
from isaaclab.envs import ManagerBasedEnvCfg
from isaaclab.devices import DevicesCfg, OpenXRDeviceCfg
from isaaclab.devices.openxr import XrCfg
from isaaclab.devices.openxr.retargeters import Se3AbsRetargeterCfg, GripperRetargeterCfg

@configclass
class MyEnvironmentCfg(ManagerBasedEnvCfg):
    """Configuration for a teleoperation-enabled environment."""

    # Add XR configuration with custom anchor position
    xr: XrCfg = XrCfg(
        anchor_pos=[0.0, 0.0, 0.0],
        anchor_rot=[1.0, 0.0, 0.0, 0.0]
    )

    # Define teleoperation devices
    teleop_devices: DevicesCfg = field(default_factory=lambda: DevicesCfg(
        # Configuration for hand tracking with absolute position control
        handtracking=OpenXRDeviceCfg(
            xr_cfg=None,  # Will use environment's xr config
            retargeters=[
                Se3AbsRetargeterCfg(
                    bound_hand=0,  # HAND_LEFT enum value
                    zero_out_xy_rotation=True,
                    use_wrist_position=False,
                ),
                GripperRetargeterCfg(bound_hand=0),
            ]
        ),
        # Add other device configurations as needed
    ))
Teleop Device Factory#
To create a teleoperation device from your environment configuration, use the create_teleop_device factory function:
from isaaclab.devices import create_teleop_device
from isaaclab.envs import ManagerBasedEnv

# Create environment from configuration
env_cfg = MyEnvironmentCfg()
env = ManagerBasedEnv(env_cfg)

# Define callbacks for teleop events
callbacks = {
    "RESET": lambda: print("Reset simulation"),
    "START": lambda: print("Start teleoperation"),
    "STOP": lambda: print("Stop teleoperation"),
}

# Create teleop device from configuration with callbacks
device_name = "handtracking"  # Must match a key in teleop_devices
device = create_teleop_device(
    device_name,
    env_cfg.teleop_devices,
    callbacks=callbacks
)

# Use device in control loop
while True:
    # Get the latest commands from the device
    commands = device.advance()
    if commands is None:
        continue

    # Apply commands to environment
    obs, reward, terminated, truncated, info = env.step(commands)
Extending the Retargeting System#
The retargeting system is designed to be extensible. You can create custom retargeters by following these steps:
Create a configuration dataclass for your retargeter:
from dataclasses import dataclass
from isaaclab.devices.retargeter_base import RetargeterCfg

@dataclass
class MyCustomRetargeterCfg(RetargeterCfg):
    """Configuration for my custom retargeter."""
    scaling_factor: float = 1.0
    filter_strength: float = 0.5
    # Add any other configuration parameters your retargeter needs
Implement your retargeter class by extending the RetargeterBase:
from isaaclab.devices.retargeter_base import RetargeterBase
from isaaclab.devices import OpenXRDevice
import torch
from typing import Any

class MyCustomRetargeter(RetargeterBase):
    """A custom retargeter that processes OpenXR tracking data."""

    def __init__(self, cfg: MyCustomRetargeterCfg):
        """Initialize retargeter with configuration.

        Args:
            cfg: Configuration object for retargeter settings.
        """
        super().__init__()
        self.scaling_factor = cfg.scaling_factor
        self.filter_strength = cfg.filter_strength
        # Initialize any other required attributes

    def retarget(self, data: dict) -> Any:
        """Transform raw tracking data into robot control commands.

        Args:
            data: Dictionary containing tracking data from OpenXRDevice.
                Keys are TrackingTarget enum values, values are joint pose dictionaries.

        Returns:
            Any: The transformed control commands for the robot.
        """
        # Access hand tracking data using TrackingTarget enum
        right_hand_data = data[DeviceBase.TrackingTarget.HAND_RIGHT]

        # Extract specific joint positions and orientations
        wrist_pose = right_hand_data.get("wrist")
        thumb_tip_pose = right_hand_data.get("thumb_tip")
        index_tip_pose = right_hand_data.get("index_tip")

        # Access head tracking data
        head_pose = data[DeviceBase.TrackingTarget.HEAD]

        # Process the tracking data and apply your custom logic
        # ...

        # Return control commands in appropriate format
        return torch.tensor([0.0, 0.0, 0.0, 0.0, 0.0, 0.0, 1.0])  # Example output
Register your retargeter by setting
retargeter_typeon the config class:
# Import your retargeter at the top of your module
from my_package.retargeters import MyCustomRetargeter, MyCustomRetargeterCfg

# Link the config to the implementation for factory construction
MyCustomRetargeterCfg.retargeter_type = MyCustomRetargeter
Now you can use your custom retargeter in teleop device configurations:
from isaaclab.devices import OpenXRDeviceCfg, DevicesCfg
from isaaclab.devices.openxr import XrCfg
from my_package.retargeters import MyCustomRetargeterCfg

# Create XR configuration for proper scene placement
xr_config = XrCfg(anchor_pos=[0.0, 0.0, 0.0], anchor_rot=[1.0, 0.0, 0.0, 0.0])

# Define teleop devices with custom retargeter
teleop_devices = DevicesCfg(
    handtracking=OpenXRDeviceCfg(
        xr_cfg=xr_config,
        retargeters=[
            MyCustomRetargeterCfg(
                scaling_factor=1.5,
                filter_strength=0.7,
            ),
        ]
    ),
)
As the OpenXR capabilities expand beyond hand tracking to include head tracking and other features, additional retargeters can be developed to map this data to various robot control paradigms.
Creating Custom Teleop Devices#
You can create and register your own custom teleoperation devices by following these steps:
Create a configuration dataclass for your device:
from dataclasses import dataclass
from isaaclab.devices import DeviceCfg

@dataclass
class MyCustomDeviceCfg(DeviceCfg):
    """Configuration for my custom device."""
    sensitivity: float = 1.0
    invert_controls: bool = False
    # Add any other configuration parameters your device needs
Implement your device class by inheriting from DeviceBase:
from isaaclab.devices import DeviceBase
import torch

class MyCustomDevice(DeviceBase):
    """A custom teleoperation device."""

    def __init__(self, cfg: MyCustomDeviceCfg):
        """Initialize the device with configuration.

        Args:
            cfg: Configuration object for device settings.
        """
        super().__init__()
        self.sensitivity = cfg.sensitivity
        self.invert_controls = cfg.invert_controls
        # Initialize any other required attributes
        self._device_input = torch.zeros(7)  # Example: 6D pose + gripper

    def reset(self):
        """Reset the device state."""
        self._device_input.zero_()
        # Reset any other state variables

    def add_callback(self, key: str, func):
        """Add callback function for a button/event.

        Args:
            key: Button or event name.
            func: Callback function to be called when event occurs.
        """
        # Implement callback registration
        pass

    def advance(self) -> torch.Tensor:
        """Get the latest commands from the device.

        Returns:
            torch.Tensor: Control commands (e.g., delta pose + gripper).
        """
        # Update internal state based on device input
        # Return command tensor
        return self._device_input
Register your device with the teleoperation device factory by adding it to the
DEVICE_MAP:
# Import your device at the top of your module
from my_package.devices import MyCustomDevice, MyCustomDeviceCfg

# Add your device to the factory
from isaaclab.devices.teleop_device_factory import DEVICE_MAP

# Register your device type with its constructor
DEVICE_MAP[MyCustomDeviceCfg] = MyCustomDevice
Now you can use your custom device in environment configurations:
from dataclasses import field
from isaaclab.envs import ManagerBasedEnvCfg
from isaaclab.devices import DevicesCfg
from my_package.devices import MyCustomDeviceCfg

@configclass
class MyEnvironmentCfg(ManagerBasedEnvCfg):
    """Environment configuration with custom teleop device."""

    teleop_devices: DevicesCfg = field(default_factory=lambda: DevicesCfg(
        my_custom_device=MyCustomDeviceCfg(
            sensitivity=1.5,
            invert_controls=True,
        ),
    ))
Known Issues#
XR_ERROR_VALIDATION_FAILURE: xrWaitFrame(frameState->type == 0)when stopping AR ModeThis error message can be safely ignored. It is caused by a race condition in the exit handler for AR Mode.
XR_ERROR_INSTANCE_LOST in xrPollEvent: Call to "xrt_session_poll_events" failedThis error may occur if the CloudXR runtime exits before Isaac Lab. Restart the CloudXR runtime to resume teleoperation.
[omni.usd] TF_PYTHON_EXCEPTIONwhen starting/stopping AR ModeThis error message can be safely ignored. It is caused by a race condition in the enter/exit handler for AR Mode.
Invalid version string in _ParseVersionStringThis error message can be caused by shader assets authored with older versions of USD, and can typically be ignored.
The XR device connects successfully, but no video is displayed, even though the Isaac Lab viewport responds to tracking.
This error occurs when the GPU index differs between the host and the container, causing CUDA to load on the wrong GPU. To fix this, set
NV_GPU_INDEXin the runtime container to0,1, or2to ensure the GPU selected by CUDA matches the host.
Kubernetes Deployment#
For information on deploying XR Teleop for Isaac Lab on a Kubernetes cluster, see Deploying CloudXR Teleoperation on Kubernetes.